
A well-designed closet does more than store your clothes, it changes how you start and end your day. But most closets, whether walk-in or reach-in, waste space with generic shelving and single-rod setups that don’t match how you actually live. That’s where custom closet design ideas come in: thoughtful layouts built around your wardrobe, your habits, and the square footage you’re working with.
At Suman Custom Carpentry, we design and hand-build custom closet systems at our shop in Hyannis, Cape Cod, from full walk-in remodels to compact reach-in upgrades. We’ve seen firsthand how a few smart design choices can double usable storage in the same footprint. Every closet we build is tailored to the homeowner, not pulled from a catalog.
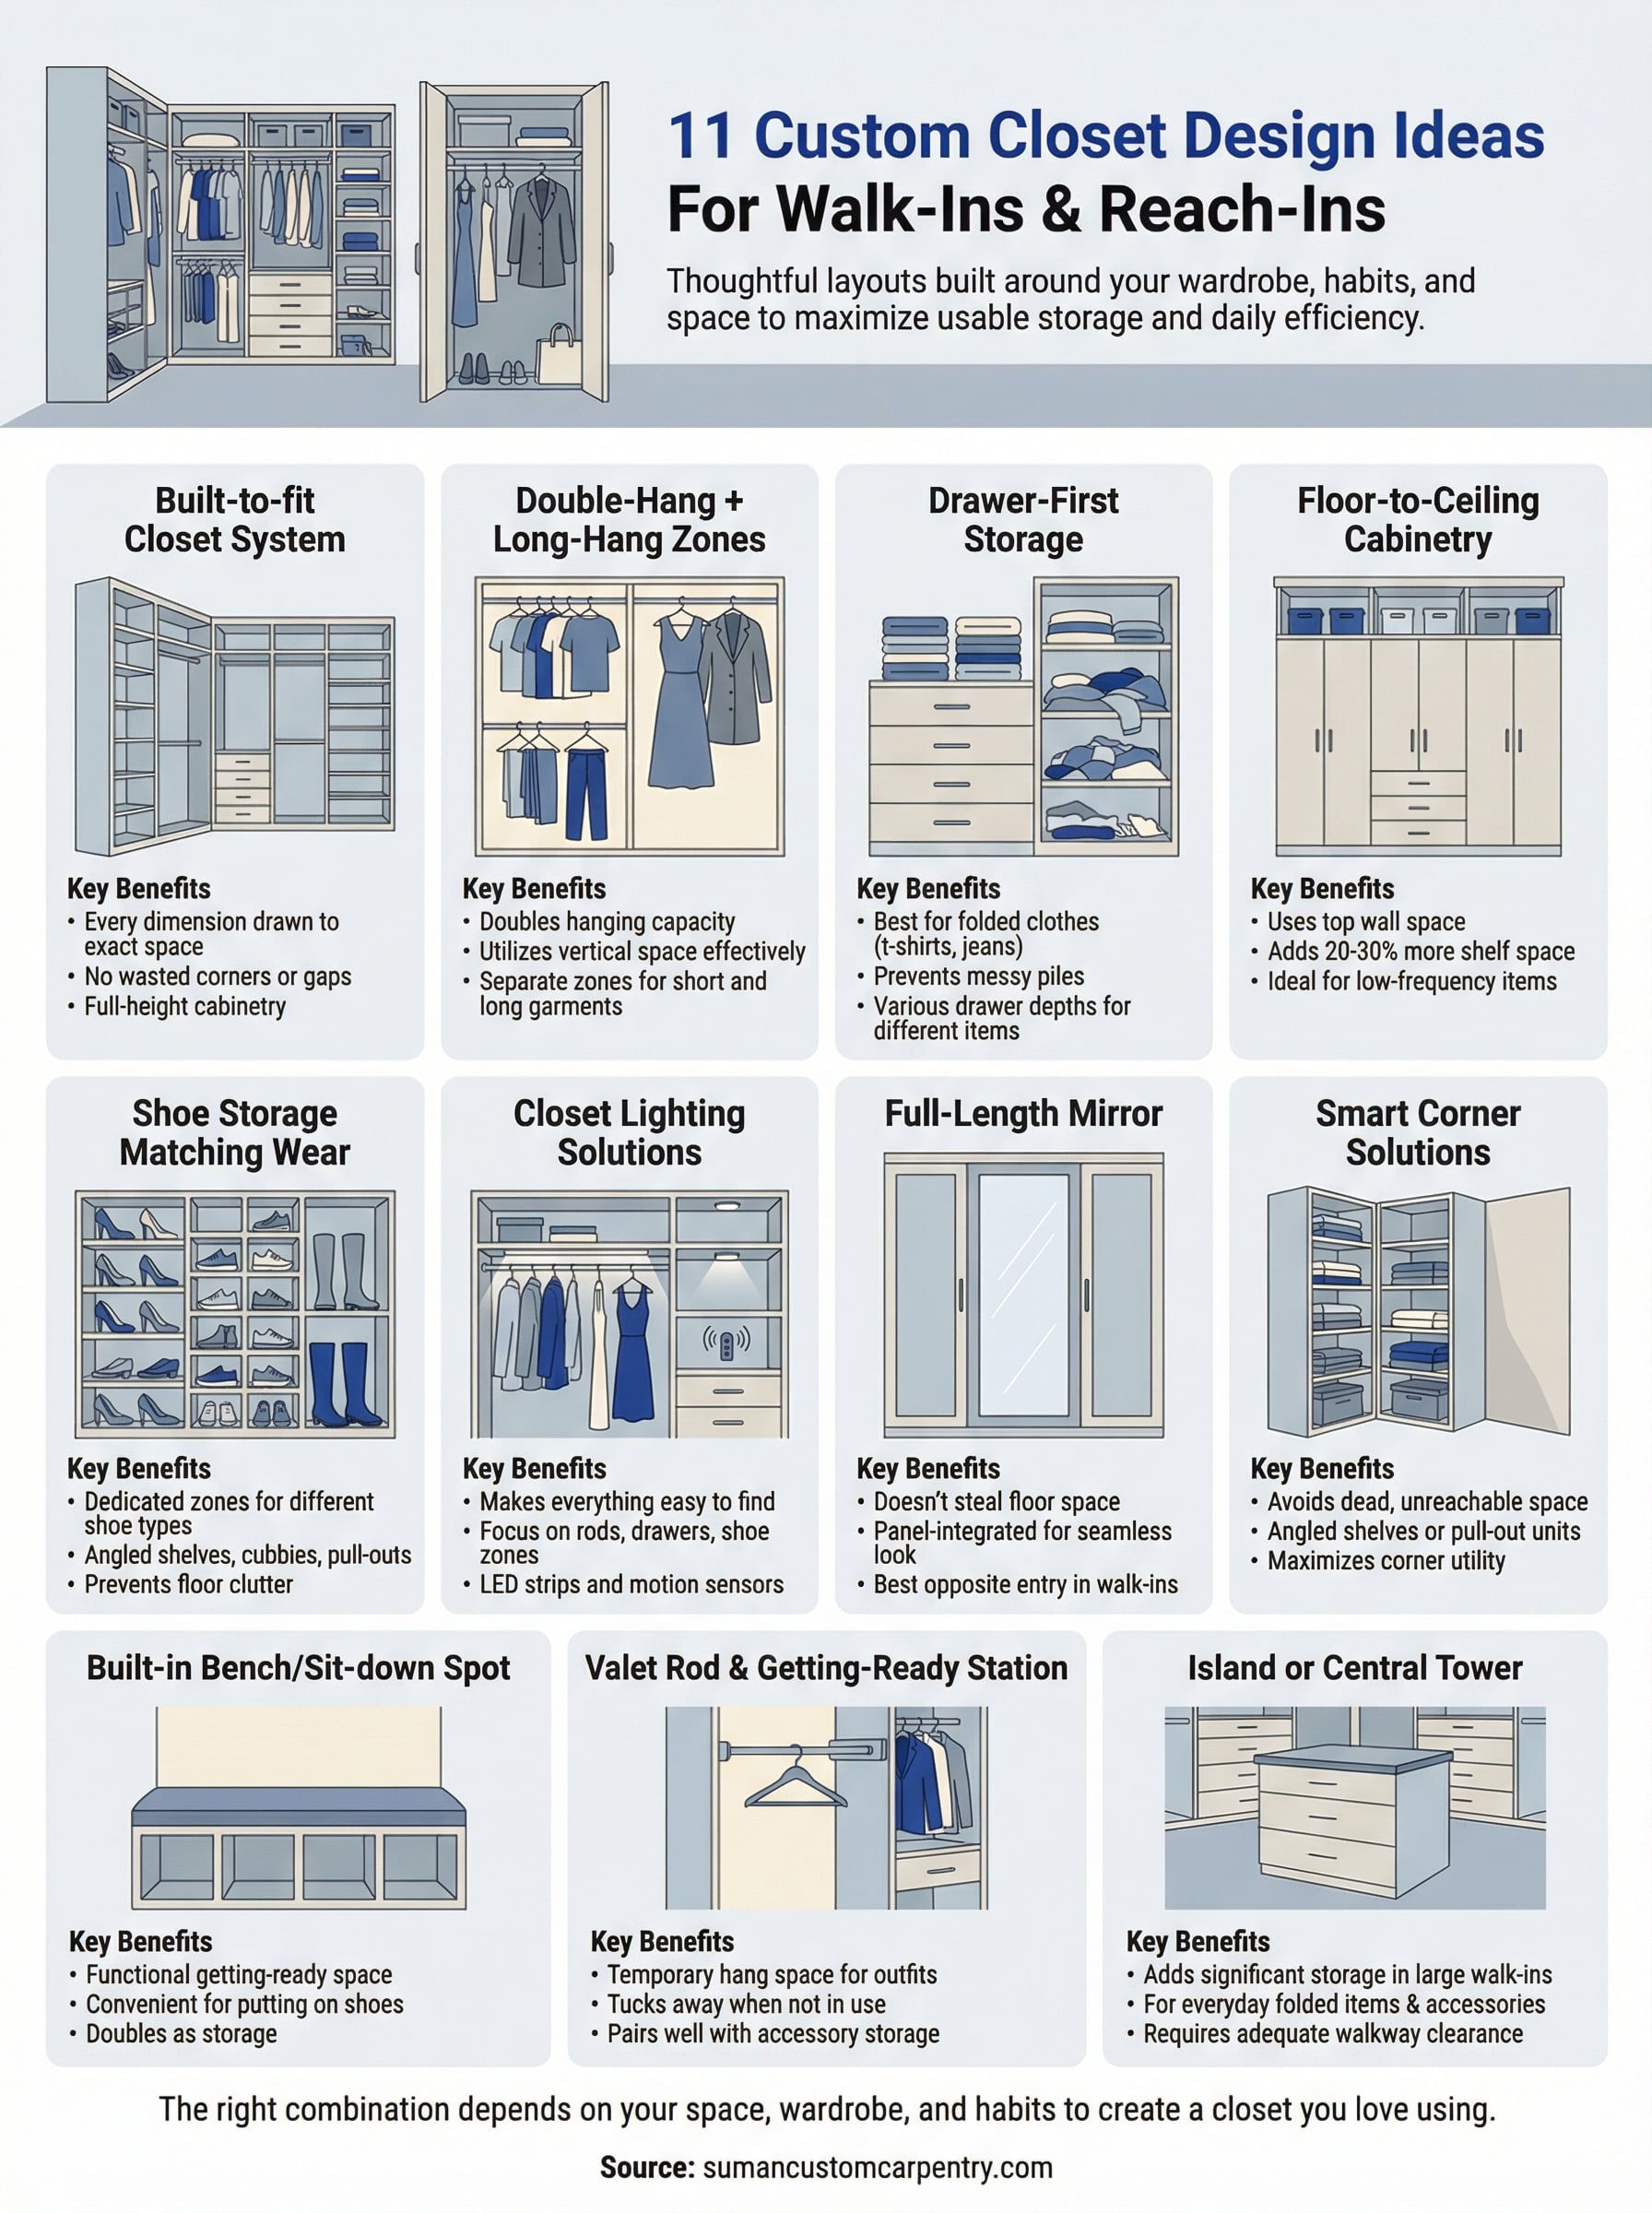
In this article, we’re sharing 11 closet design ideas we trust and recommend, covering everything from drawer configurations and shoe storage to lighting and material choices. Whether you’re planning a renovation or just exploring options, these ideas will help you think through what actually works before you commit to a build.
1. Built-to-fit closet system by Suman Custom Carpentry
When you’re serious about your closet, a built-to-fit system from Suman Custom Carpentry is where to start. We hand-build every unit at our Hyannis shop and install it ourselves, so you’re not working with pre-made modules that leave gaps or waste corners. This is the foundation of the best custom closet design ideas we cover in this article.
What you get in a true custom closet build
A custom build means every dimension is drawn to your exact space, not adjusted to fit a standard panel width. You get full-height cabinetry that reaches the ceiling, precise rod placements matched to your wardrobe, and drawers sized for how you actually fold clothes. Unlike flat-pack systems, the joinery holds up long-term and the finish matches the rest of your home rather than looking like an afterthought.
A true custom closet is designed around your wardrobe, your habits, and your exact square footage, not the other way around.
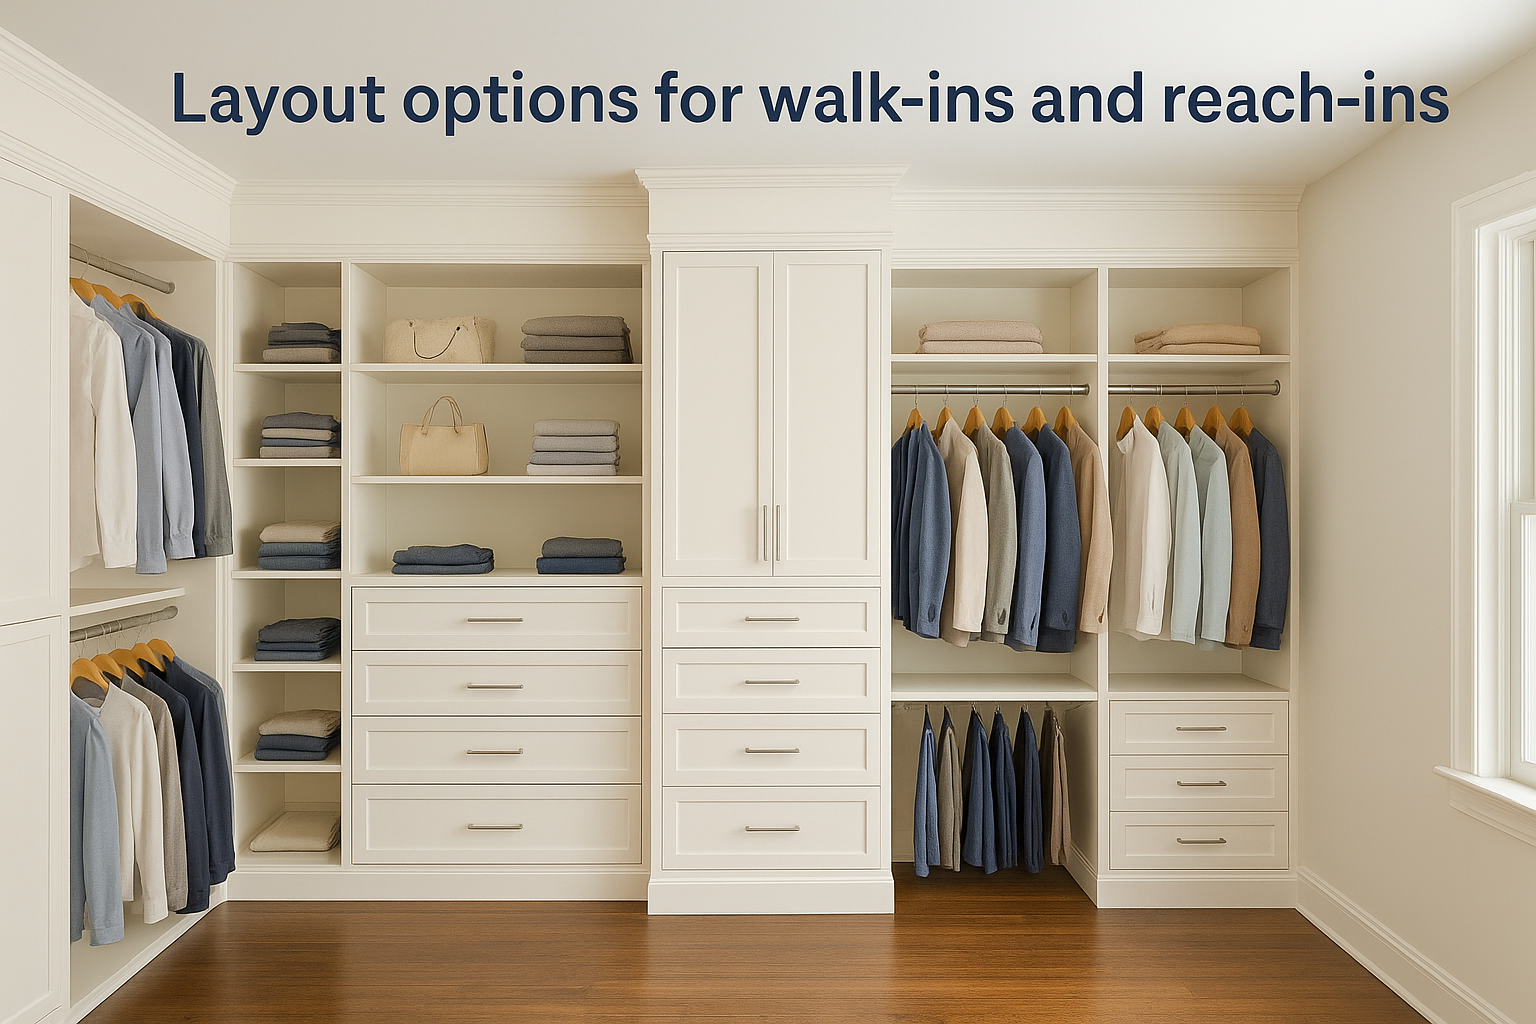
Layout options for walk-ins and reach-ins
Walk-in closets typically work best with a U-shape or L-shape perimeter layout, leaving a clear center aisle of at least 36 inches. Reach-in closets benefit from a stacked approach: double-hang on one side and drawers with shelving on the other. We design both layouts with traffic flow and daily use in mind, so you’re not stepping around doors or squeezing past cabinet edges to reach what you need most often.
Material and finish choices that hold up on the Cape
Cape Cod homes deal with humidity swings and salt air, which means your closet materials matter more here than they do inland. We use solid wood and high-quality plywood with proper sealing and finishing to resist warping and moisture over time. Paint, stain, and specialty finish options are all available, and we match existing millwork in your home when that consistency matters to you.
Cost range and what drives the price
Custom reach-in closets from Suman typically start around $3,000 to $5,000. A full walk-in with cabinetry, drawers, lighting, and trim can range from $8,000 to $20,000 or more depending on size, materials, and how many features you add. The biggest cost drivers are linear footage of cabinetry, drawer count, and finish complexity.
2. Double-hang plus long-hang zones
Splitting your rod space into two dedicated zones is one of the most practical custom closet design ideas for doubling your hanging capacity without expanding your footprint. Most single-rod setups waste all the vertical space below shorter garments like shirts and blazers. Two zones fix that immediately.
How to split rods for daily efficiency
Double-hang works best for shirts, blazers, and folded pants, with a top rod at around 80 to 84 inches and a lower rod at roughly 40 inches. Long-hang keeps one rod for dresses, robes, and full-length coats that need 60 to 70 inches of clear vertical drop. Plan your split based on how many of each type of garment you actually own.
Measure your longest garment before setting rod heights. That one number drives your entire zone layout.
Best closet sizes and layouts for this setup
This setup works in closets as narrow as 5 feet wide, making it practical for both reach-ins and smaller walk-ins. L-shape and U-shape walk-ins benefit most because you can dedicate one full wall to double-hang and another to long-hang without forcing a compromise between the two.
Recommended rod heights and spacing
Set your upper double-hang rod between 80 and 84 inches and the lower rod at 40 to 42 inches. Long-hang rods sit at 66 to 72 inches depending on your tallest garments. Leave at least 12 inches of clearance above each rod so hangers move without binding.
Cost range and upgrade options
A double-hang section in a custom build adds roughly $300 to $700 depending on rod material and bracket type. Pull-down rod hardware costs more upfront but makes high rods accessible every day without needing a step stool.
3. Drawer-first storage for everyday clothes
Rods handle hanging garments, but drawers carry the highest daily volume in most wardrobes. Folded clothes belong in drawers, not stacked on open shelves where piles shift and topple every time you pull something out. Among the most practical custom closet design ideas, this one changes how fast you get dressed each morning.
What to put in drawers vs on rods
T-shirts, jeans, socks, underwear, and workout clothes all fold flat and belong in drawers. Items that wrinkle easily, like dress shirts, blazers, and trousers with a crease, belong on rods. Sorting by category this way means drawers handle frequency while rods protect shape and finish.
Drawer types, sizes, and divider options
Standard drawer boxes run 16 to 24 inches deep and 18 to 30 inches wide. Plan your drawer heights based on what goes inside:
- Shallow drawers (3 to 4 inches): accessories, belts, watches, and jewelry
- Medium drawers (5 to 6 inches): folded shirts and pants
- Deep drawers (8 to 10 inches): sweaters, jeans, and activewear
Velvet-lined dividers keep small items from sliding, and soft-close undermount slides hold up far longer than basic side-mount hardware.
Plan your drawer heights before finalizing the cabinet layout. Shallow on top for accessories, deeper below for folded clothes.
Placement tips so drawers do not block traffic
Keep drawer banks between knee and shoulder height so you’re not crouching or reaching overhead constantly. In a walk-in, position drawer towers along the side walls so the center aisle stays open when drawers are fully extended.
Cost range and ways to keep it affordable
A four-to-six drawer bank in a custom build typically runs $600 to $1,400 depending on drawer size and hardware. Painted plywood boxes with simple pulls cost less than stained hardwood and perform just as well day to day.
4. Floor-to-ceiling cabinetry and high shelves
Most closets leave the top 18 to 24 inches of wall space completely empty. Floor-to-ceiling cabinetry closes that gap and adds meaningful storage without touching your floor plan. Among all the custom closet design ideas in this article, this one delivers the biggest capacity gain per dollar in a fixed footprint.
How vertical storage changes capacity
Going from a standard 84-inch cabinet to a full ceiling-height build can add 20 to 30 percent more shelf space in the same wall run. That difference adds up fast in a closet where every inch counts. Taller cabinetry also makes the room feel finished and intentional rather than like a basic shelving unit dropped into a box.
The space above your head in a closet is the easiest square footage to gain without a single demo wall.
What to store up high and how to access it
Reserve the top shelves for low-frequency items: luggage, off-season clothing in labeled bins, extra bedding, and rarely used accessories. A folding step stool or pull-down shelf mechanism makes reaching those shelves practical without becoming a daily frustration. Keep everyday items within arm’s reach and let the upper zone handle overflow.
Shelf depth and height guidelines
Upper shelves work best at 12 to 14 inches deep so bins and boxes sit securely without overhanging. Position the topmost shelf at ceiling height minus 2 inches and space shelves every 12 to 14 inches above the standard hanging zone.
Cost range and trim details that elevate the look
Full-height cabinetry adds roughly $500 to $1,500 over a standard build depending on linear footage and whether you add crown molding at the top. Painted crown trim at the ceiling line is one of the simplest upgrades that makes a custom closet look truly built-in.
5. Shoe storage that matches how you wear shoes
Shoe storage is where most closets fail first. Generic single shelves don’t account for the difference between a pair of heels and a pair of winter boots, and when everything lands on the floor, the whole closet unravels. Among practical custom closet design ideas, building shoe storage around how you actually wear your shoes makes the biggest visible difference fastest.

Shelf, cubby, tilt-out, and pull-out options
Fixed angled shelves work well for heels and dress shoes you wear regularly. Cubbies keep sneakers and casual shoes organized without stacking. Tilt-out drawers hide shoes behind a clean cabinet face, and pull-out shelves bring the back row forward so nothing gets buried.
How to plan for boots, sneakers, and heels
Start by counting your shoes by category. Boots need 12 to 15 inches of vertical clearance, while heels and flats fit on shelves spaced 6 to 7 inches apart. Sneakers need 5 to 6 inches. Planning separate zones for each type keeps the storage functional and easy to maintain.
Measure your tallest boot before finalizing shelf heights. That one dimension sets the minimum vertical clearance for your entire shoe zone.
Spacing and depth measurements that prevent clutter
Shelves for shoes work best at 10 to 12 inches deep so pairs sit fully without overhanging. Leave at least 1 inch between pairs horizontally to pull shoes out without knocking neighbors over.
Cost range and common add-ons
A dedicated shoe section typically adds $400 to $900 to a custom build. Pull-out shelving hardware costs more upfront but makes deep shelves fully accessible without reaching blindly to the back.
6. Closet lighting that makes everything easier to find
Poor lighting turns a well-organized closet into a daily guessing game. Among custom closet design ideas that people overlook, good lighting is the one upgrade that changes your experience every single morning without adding a square inch to the footprint.
Where lighting matters most in a closet
Focus light where you make decisions: above the hanging rods so you can distinguish garment colors clearly, and inside drawer sections and shoe zones so nothing disappears into shadow. The back wall and areas above upper shelving cause the most daily frustration in otherwise well-designed closets.
LED strips, puck lights, and motion sensors
LED strip lights mounted under shelves deliver even, low-profile illumination across rod sections without taking up space. Use the right fixture type for each zone:
- LED strips: best under shelves and along rod sections
- Puck lights: ideal inside cubbies and enclosed cabinetry
- Motion sensors: most practical for closets because they activate when you step in and shut off automatically
Motion sensors mean you never fumble for a switch with an armful of clothes.
Wiring vs plug-in and switch placement basics
Hardwired lighting looks cleaner and performs more reliably long-term. Plug-in options work if your closet already has an outlet inside, but cords become a problem fast. Place any wall switch just inside the door frame at standard height so it’s reachable before you fully enter the space.
Cost range and what to prioritize
Basic LED strip lighting for a full walk-in runs $200 to $500 installed. Hardwired fixtures with a dedicated switch add $400 to $800 depending on the number of zones and how much new wire your electrician needs to run.
7. A full-length mirror that does not steal space
A full-length mirror belongs in every closet, but most people hang it somewhere that blocks storage or forces them to step backward into a doorframe to get a clear view. Among custom closet design ideas that add daily utility without eating into your layout, a well-placed mirror solves a real problem while keeping the rest of your storage intact.
Best mirror placements for walk-ins and reach-ins
In a walk-in closet, the end wall opposite the door is the most functional mirror placement because you step in and immediately see a full reflection without turning around. In a reach-in closet, the back of the door works well if your swing clearance allows enough distance to see your full length clearly.
Door-mounted vs wall-mounted vs panel-integrated
Door-mounted mirrors work in reach-ins but require a solid-core door that won’t flex over time. Wall-mounted mirrors are more stable and can be trimmed out to match your cabinetry. Panel-integrated mirrors sit flush within a cabinet section, which keeps the look clean and uses space that would otherwise be a plain cabinet face.
A panel-integrated mirror uses dead cabinet face space and gives you a seamless built-in look at the same time.
Clearances to avoid awkward viewing angles
You need at least 36 inches of clear floor space in front of any mirror to see from head to toe comfortably. In narrow reach-ins, that distance often isn’t available at the mirror itself, which is why a door-mounted placement works better in tight spaces.
Cost range and framing options
A wall-mounted or panel-integrated mirror in a custom build typically adds $300 to $700 depending on size and frame detail. Painted wood frames that match your cabinetry finish cost more than a frameless option but tie the whole closet together visually.
8. Smart corner solutions that avoid dead space
Corners are the most wasted zone in any closet layout. Most standard shelving systems simply stop at the corner and leave a dead pocket behind it that you can’t reach without pulling everything else out first. Among all the custom closet design ideas in this article, fixing your corners is the highest-impact move in a walk-in where perimeter footage matters.
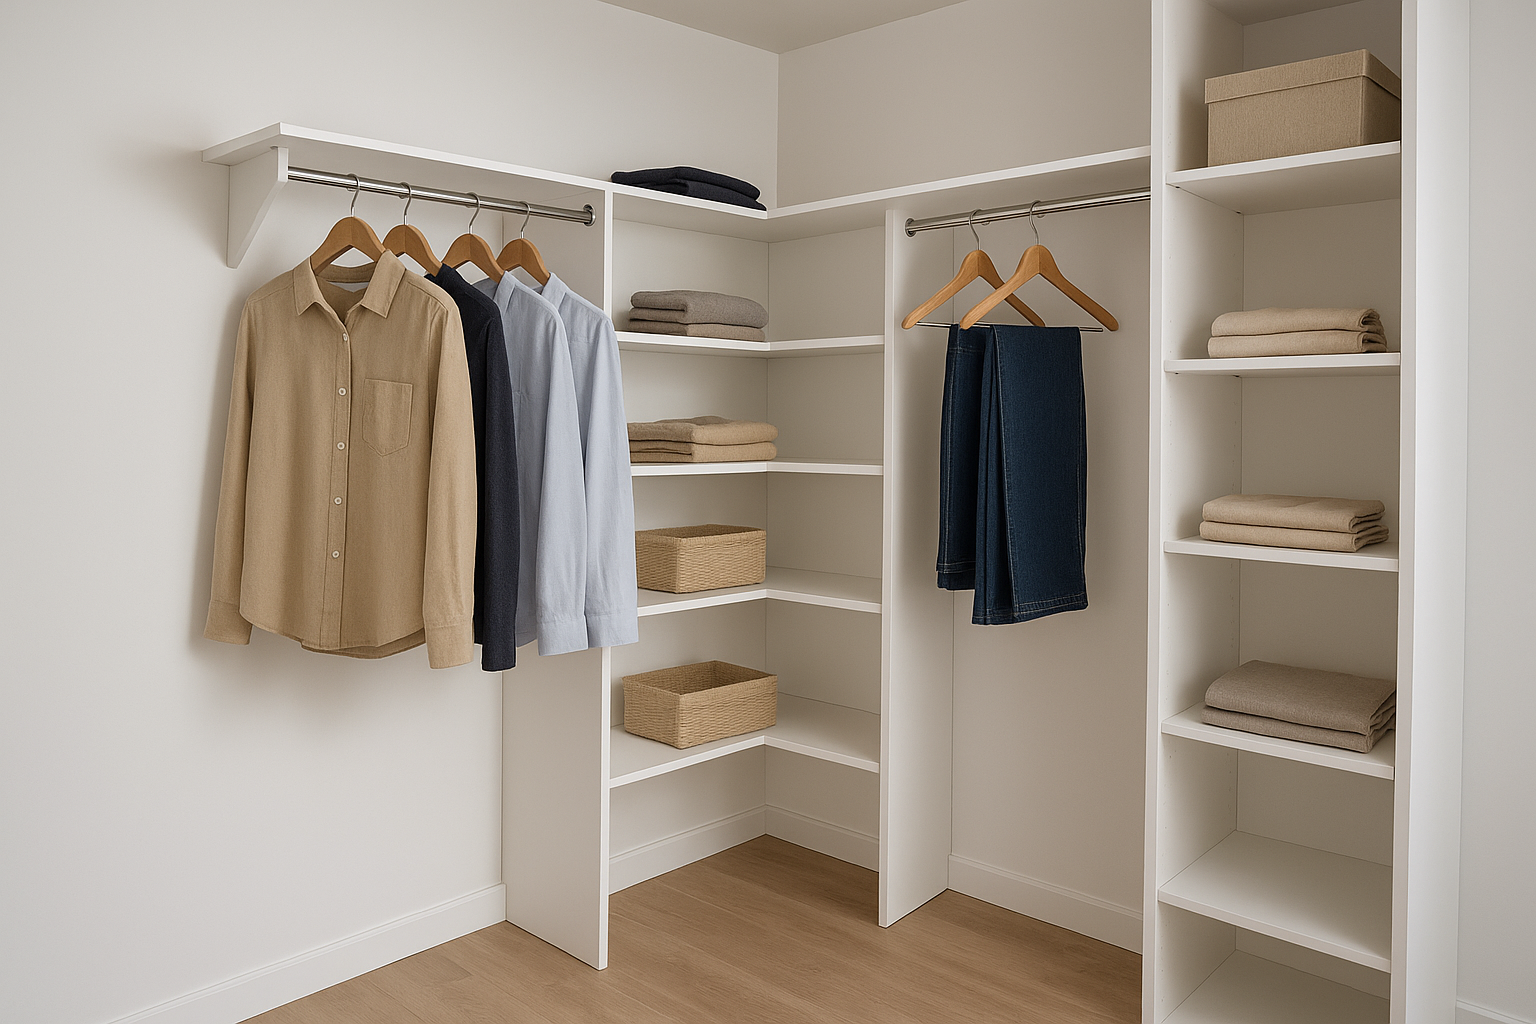
Why corners fail and how to fix them
The problem is geometry. Standard rectangular shelves and cabinet boxes meet at a corner and block access to anything stored behind the joint. Fixing this requires either angled shelving, a hanging return rod, or purpose-built pull-out hardware that brings the stored items out to you instead of forcing you to reach blindly around a wall.
A corner you can’t access isn’t storage. It’s a place where things disappear.
Corner shelves, hanging returns, and pull-out hardware
Diagonal corner shelves cut across the corner at 45 degrees and open up the full depth for folded items, bins, or accessories. A hanging return rod angles out from the back wall and adds short-hang capacity without dead space. Pull-out corner units use hardware that swings or slides outward so the full shelf comes to you when you open it.
Minimum clearances for comfortable access
Leave at least 24 inches of clear aisle space on each side of a corner unit so you can stand in front of it and reach the full depth comfortably. Tighter clearances make corner hardware impractical even when the unit itself fits.
Cost range and when to skip the corner build-out
Corner solutions add roughly $400 to $900 depending on the hardware type and whether angled framing is involved. Skip the corner build-out if your walk-in is too narrow to maintain safe aisle clearance on both approach sides.
9. A built-in bench or sit-down spot
A built-in bench turns your closet from a pass-through into a functional getting-ready space. Among custom closet design ideas that add comfort without complicating the layout, a seat at the right height and location makes pulling on shoes, sorting laundry, and setting out tomorrow’s outfit significantly faster.
How seating improves daily use
Standing on one foot to put on shoes is a balance problem you don’t need at 7 AM. A bench at 17 to 18 inches high matches standard seat height and lets you sit comfortably without adjusting. Daily use is where built-in seating earns its place, because it keeps you from perching on the bed or sitting on the floor every morning.
A bench that doubles as storage gives you two functions in the same footprint, which matters most in smaller walk-ins.
Best placements for narrow and wide closets
In a wide walk-in with a center aisle, position the bench at the far end wall opposite the entry so it doesn’t interrupt traffic flow along the sides. In a narrower closet, a wall-mounted fold-down bench works well because it tucks flat when you don’t need it and frees the aisle completely.
Storage bench ideas for shoes and bags
A bench with an open base works well for shoes and bags you grab frequently. Lift-top benches with an interior compartment keep off-season items or extra bags completely out of sight.
Cost range and material choices
A built-in storage bench typically adds $500 to $1,200 to a custom build. Painted poplar or maple keeps costs reasonable while holding up well to daily use.
10. A valet rod and getting-ready station
A valet rod is one of those custom closet design ideas that takes up almost no space but earns its place every single day. It pulls out when you need it and tucks flat against the cabinet when you don’t, which makes it one of the most practical small additions in a well-built closet.
What a valet rod does and where it belongs
A valet rod is a pull-out horizontal bar that extends from a cabinet panel and gives you a temporary spot to hang tomorrow’s outfit, a dry-cleaned item, or clothes you’re sorting before putting away. Mount it inside a cabinet section between 60 and 66 inches off the floor so it sits at a comfortable reach without interfering with shelves above or drawers below.
A valet rod turns a cabinet face into an active part of your getting-ready routine without permanently taking up rod space.
Pairing valet rods with hampers and accessory storage
Position your valet rod near a pull-out hamper so dirty clothes move from rod to basket in one motion. Add a small drawer or open cubby alongside it for accessories, a watch, or a phone charger, and the whole zone becomes a complete getting-ready station rather than just a single feature.
Hardware and mounting considerations
Choose solid metal pull-out hardware over plastic versions, which flex and loosen over time. The rod should extend at least 10 inches from the cabinet face to give hangers room to slide freely.
Cost range and small upgrades that add convenience
A valet rod with quality pull-out hardware typically adds $150 to $400 to a custom build. Pairing it with a pull-out hamper below adds another $200 to $500 depending on hamper size and frame construction.
11. A small island or central tower for walk-ins
A central island or tower is one of the most aspirational custom closet design ideas for large walk-ins, but it only works when your square footage genuinely supports it. In the right space, it adds significant storage without touching your perimeter layout at all.
When an island makes sense and when it does not
An island works well in walk-in closets that measure at least 10 by 10 feet, which gives you enough room for the unit itself plus safe walkway clearance on all sides. In smaller walk-ins, a central tower fixed to one wall delivers similar benefits without eating into the aisle.
A central island only improves your closet if the walkways around it stay wide enough to use comfortably.
What to store in an island vs perimeter cabinetry
Use your island for everyday items you access most often: folded clothes, accessories, and jewelry in shallow top drawers, and bags or shoes in lower compartments. Keep perimeter cabinetry for hanging garments and high-frequency rods so the center zone stays focused on flat, folded storage.
Walkway clearances and sizing rules of thumb
Leave a minimum of 36 inches on all sides of a freestanding island, and size the island itself to no more than 40 percent of your floor plan’s shortest dimension. Tighter clearances make the space feel cramped and reduce daily function.
Cost range and ways to simplify the build
A built-in island with drawers and a finished top surface typically adds $1,500 to $4,000 to your project. Choosing a painted finish over stained hardwood and keeping the island to one or two drawer configurations cuts cost significantly without affecting performance.
Next steps
These 11 custom closet design ideas cover the decisions that separate a closet that functions well from one you actually look forward to using every day. The right combination depends on your square footage, your wardrobe, and how you move through your space in the morning. Not every idea belongs in every closet, but walking through each one helps you figure out exactly what your space needs before a single board gets cut.
If you’re ready to move from inspiration to an actual build, Suman Custom Carpentry designs and hand-builds custom closet systems at our Hyannis shop on Cape Cod, with full installation and a lifetime guarantee on cabinet boxes and doors. Every project starts with a consultation where we listen to how you use your space and build a layout around that. Contact Suman Custom Carpentry to talk through your project and get a quote.