
Crown molding looks simple until you’re staring at a miter saw with a tape measure in one hand and a piece of trim you just cut too short in the other. Learning how to measure crown molding correctly is the difference between clean, tight corners and a wall full of gaps hidden under caulk. Most homeowners lose material to the same two mistakes: measuring wall length instead of the actual molding run, and guessing at corner angles instead of checking them.
This guide walks you through the exact process we use on jobsites across Cape Cod, from measuring your room’s perimeter to accounting for outside corners, inside corners, and the odd angles that show up in older coastal homes. You’ll learn how spring angle affects your numbers and why a $15 protractor tool saves you from wasting expensive molding.
We’ve installed crown molding in hundreds of homes since 2018, and the measuring step is where most DIY projects go wrong before the first cut is even made. Whether you’re trimming out one room or a whole first floor, these steps will help you order the right amount and cut with confidence instead of guesswork.
What you need before measuring crown molding
Grab the right tools before you touch a tape measure to the wall, because the wrong gear leads to rounded numbers and rounded numbers lead to gaps. Crown molding measurement rewards precision down to the eighth of an inch, so a stretched-out cloth tape or a bent metal one will throw off every cut down the line. Set aside 20 minutes to gather your supplies and you’ll save hours of rework later.
Here’s what you actually need, not what a big box store tries to sell you:
- A steel tape measure, at least 25 feet, with a locking mechanism
- A digital angle finder or protractor tool (roughly $15-$30) for reading corner angles
- Graph paper or a notepad for your room sketch
- A pencil and a small notebook to log wall-by-wall numbers
- Painter’s tape to mark reference points on the wall
- A calculator or your phone’s calculator app for miter math
- A helper, if you can get one, for holding the tape on long walls
Digital angle finders have replaced the old plastic protractor for good reason. They read corner angles to a tenth of a degree and split the number in half automatically for your miter saw setting. That single feature eliminates the most common source of gapped corners we see on Cape Cod jobsites, which is guessing at a 90-degree corner that’s actually 87 or 93 degrees. Older homes here settle over decades of salt air and shifting foundations, so square corners are the exception, not the rule.
Assume no corner in an older home is truly 90 degrees, and check every one before you cut.
Before you start measuring, know what type of crown molding you have and its spring angle, either 38/72 or 45/45, since it changes how the piece sits against the wall and ceiling. Check the product packaging or ask your supplier if you’re unsure. This number matters more than most DIYers realize because it determines the actual cutting angle, not just the corner angle you measured. Mixing up spring angles between pieces is one of the fastest ways to end up with molding that won’t sit flush.
Also decide now whether you’re cutting with a compound miter saw or coping joints by hand, since that choice affects how you record your measurements in the next step and how the crown molding install goes later. Compound saws handle both cuts in one pass, while coped joints need a straight cut on one piece and a hand-carved profile on the other. Neither method changes how you measure the wall, but it does change what numbers you write down for the shop or your saw setup.
Step 1. Sketch your room and mark every corner
Start with a rough floor plan sketch of the room on graph paper, even if your drawing skills stop at stick figures. This sketch becomes your master reference sheet, the one place where every wall length, corner type, and angle reading lives together instead of scattered across sticky notes. Draw the room roughly to scale, walking the perimeter as you go so you don’t skip a wall or double up on one by accident.

Mark every corner type as you go
Label each corner on your sketch as either inside or outside the moment you spot it, because that distinction changes your cut direction later. An inside corner is where two walls meet and the angle opens toward you, like the corners of a standard rectangular room. An outside corner juts out toward the room, common on fireplace surrounds, soffits, or bump-outs.
- Walk clockwise around the room, one corner at a time
- Mark each corner with an "I" for inside or "O" for outside
- Number the walls in order so your measurements match your sketch
- Note any obstructions like windows, doorways, or built-ins that interrupt the molding run
A sketch with mislabeled corners guarantees a miscut piece, no matter how careful your measuring was.
Why the sketch matters more than memory
Skipping this step and relying on memory is where most first-time installers get burned, especially in rooms with five or six walls instead of four. Trusting your recall for a bay window or an offset closet almost always backfires once you’re standing at the saw with three pieces cut and no clear idea which wall each one belongs to. Give the sketch five extra minutes now, because it’s the cheapest insurance you’ll buy on this entire project.
Step 2. Measure each wall for length
Now you actually put the tape measure to work, and this is where wall length measurement gets confused with molding length measurement. They’re not the same thing. You’re not measuring the flat wall surface, you’re measuring the distance the crown molding will actually travel once it’s cut and angled into the corners. Skip this distinction and every piece comes back short.
Measure long point to long point
Always measure from the long point of one corner to the long point of the next, not wall edge to wall edge. On an inside corner, the long point sits at the back of the wall where the molding meets the ceiling line. On an outside corner, it’s the front tip of the miter. Run your tape along the ceiling line itself, not the baseboard or floor, since crown molding sits at an angle and the ceiling measurement reflects the true cut length.
Measure the ceiling line, not the wall, or every piece you cut will run short.
Log every number on your sketch
Write each measurement directly onto your sketch next to the matching wall number the moment you take it, before you move to the next wall. Rounding to the nearest quarter inch is fine for ordering material, but write exact eighth-inch readings once you’re ready to cut. Keep this checklist in mind as you go:
- Measure at ceiling height, not floor height
- Record long point to long point, corner to corner
- Add 2-3 extra inches per piece for cutting room
- Double-check any wall longer than 12 feet, since tape sag skews the number
These numbers feed directly into the miter math in the next step, so accuracy here saves you a wasted cut later.
Step 3. Measure the corner angles
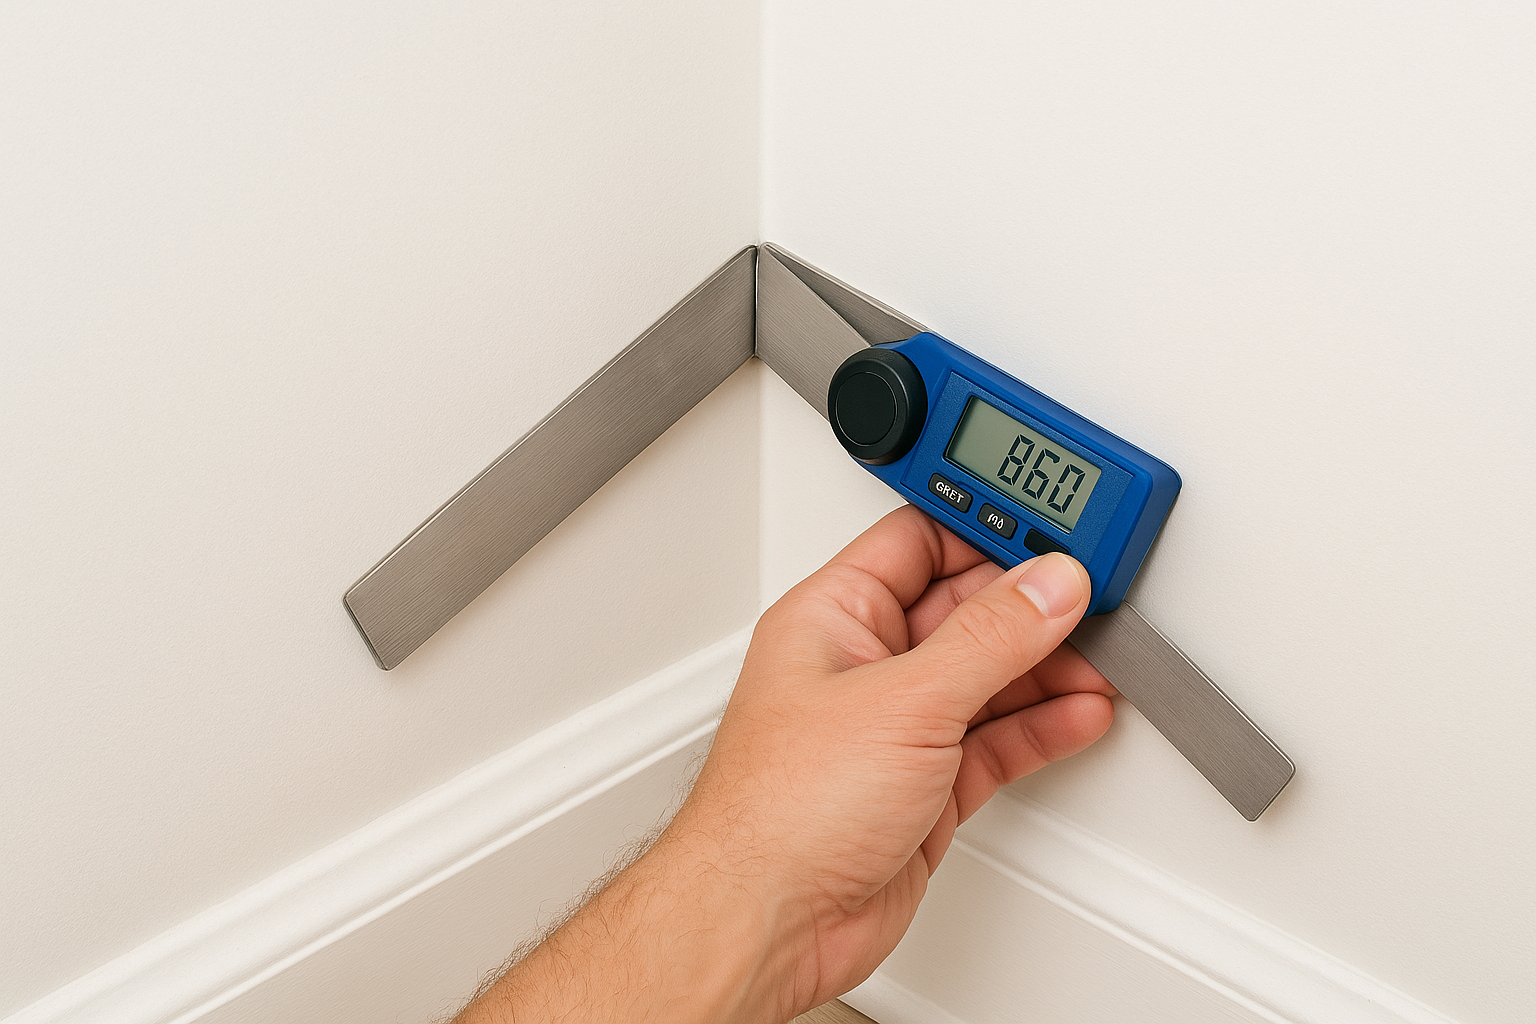
Grab your digital angle finder and press it into each corner before you cut a single piece of molding. Corner angle measurement tells you the true shape of the joint, and that number rarely matches the 90 degrees you’d expect from a textbook room. Coastal homes on Cape Cod shift with humidity and settling, so a corner that looks square to the eye might read 86 or 94 degrees on the tool. Skipping this step is how installers end up recutting the same board three times.
Reading the angle correctly
Open the angle finder’s two arms flush against each wall on either side of the corner, then let the digital readout settle before you write anything down. Hold the tool at the same height where the molding will actually sit, not down at the baseboard, since walls can bow slightly from top to bottom. Log the reading straight onto your sketch next to the matching corner label so it stays paired with the right wall numbers.
A miter cut is only as accurate as the angle reading it’s based on.
Splitting the angle for your miter saw
Divide the total corner angle in half to get your miter saw setting for each piece meeting at that joint. A 90-degree corner splits into two 45-degree cuts, but a 94-degree corner needs two 47-degree cuts instead. Most digital angle finders do this math automatically and display the split number right on screen, which removes the guesswork entirely.
Run through every corner in the room before moving on:
- Check both inside and outside corners with the same tool
- Record the raw angle and the split angle separately on your sketch
- Re-check any corner that seems off from a standard 90 or 45 degrees
- Flag corners near windows or built-ins, since framing often skews them further
Step 4. Calculate your miter and bevel cuts
Once you have the split corner angle from Step 3, you still need to translate it into an actual miter and bevel setting on your saw, since crown molding cuts differently than baseboard or flat trim. Because crown sits at an angle against both the wall and ceiling, a compound miter saw needs two numbers dialed in at once: the miter angle (the horizontal swing) and the bevel angle (the tilt of the blade). Guessing at either one is how a perfectly measured piece still ends up with a visible gap.
Match your spring angle to the chart
Grab the spring angle you noted back in the tools step, either 38/72 or 45/45, and pair it with your split corner angle to find the correct settings. Standard charts exist for exactly this purpose, and most saw manufacturers print one right on the tool itself.
| Corner Angle (Split) | Spring Angle | Miter Setting | Bevel Setting |
|---|---|---|---|
| 45° | 38/72 | 31.6° | 33.9° |
| 45° | 45/45 | 35.3° | 30° |
| 47° (from a 94° corner) | 38/72 | 30.9° | 33.6° |
| 43° (from a 86° corner) | 38/72 | 32.4° | 34.2° |
Two correct numbers, miter and bevel, are what actually close a corner. One right setting alone won’t do it.
Cut a test piece first
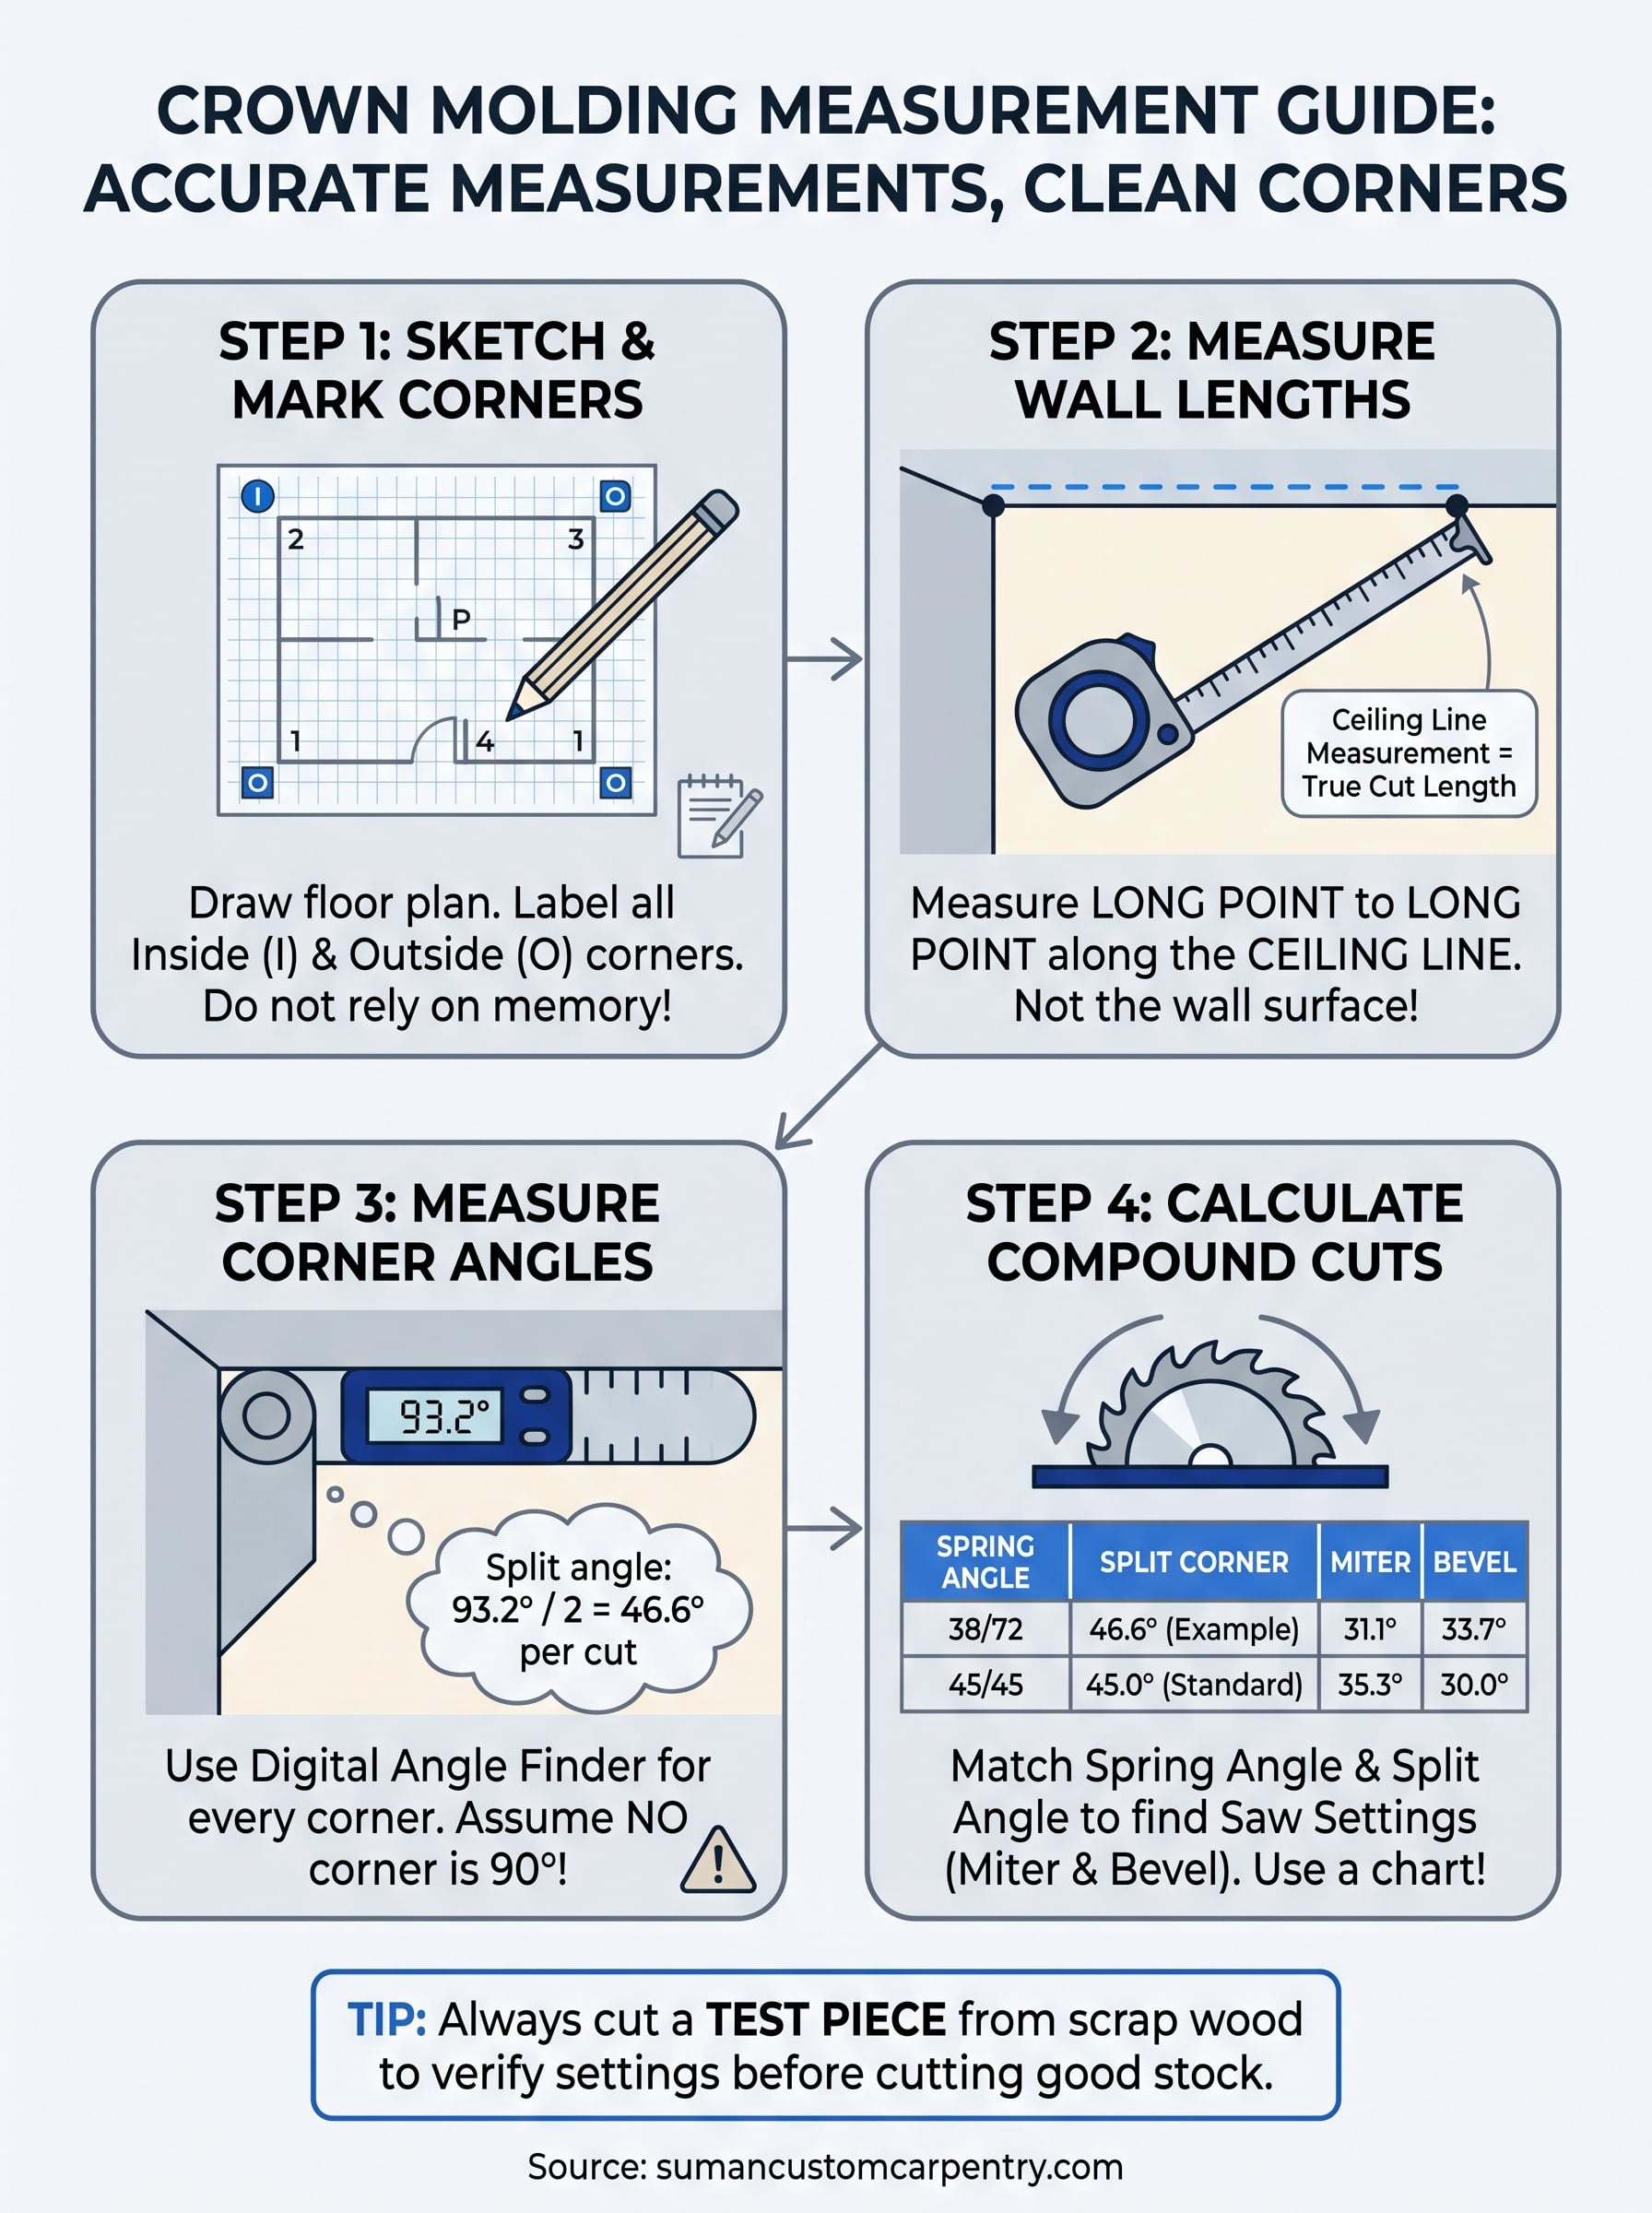
Scrap wood earns its keep here. Cut two short test pieces at your calculated miter cut angle and hold them together in a corner before touching your real molding, using the same technique you’d use for cutting inside and outside corners on the finished stock. If the joint gaps at the ceiling or the wall, recheck your spring angle orientation on the saw fence, since flipping the piece upside down is the single most common setup mistake we see on jobsites.
Getting a clean, gap-free fit
Get the sketch, the wall measurements, and the angle readings right, and the saw settings practically calculate themselves. Most gapped corners trace back to one skipped step, usually an assumed 90-degree angle that was never checked. Accurate measurements cost you an extra 20 minutes upfront and save you an entire afternoon of recuts and wasted molding.
Crown molding rewards patience more than skill. A steady hand at the saw means nothing if the numbers feeding it are wrong. Slow down at the measuring stage, double-check every corner with your angle finder, and cut test pieces before touching your good stock.
If the math starts feeling like more trouble than it’s worth, or you’d rather have a crown that fits right the first time without burning through material, get in touch with our Cape Cod carpentry team and let us handle the measuring, cutting, and installation for you.