
Whether you’re finishing a new build or refreshing a room that feels incomplete, interior trim installation cost is one of those line items that catches homeowners off guard. Baseboards, crown molding, door casings, window trim, the materials themselves aren’t always expensive, but the labor, complexity, and linear footage add up fast. Understanding what drives these costs puts you in a much stronger position before you request quotes or set a renovation budget.
At Suman Custom Carpentry, we design and install custom trim and millwork from our shop in Hyannis, Cape Cod. We work with homeowners every week who want straight answers on pricing, not vague ranges that don’t mean anything. That hands-on experience across hundreds of residential trim projects gives us a clear picture of what you should actually expect to pay in 2026, and where your money goes.
This guide breaks down current pricing per linear foot by trim type, covers labor versus material costs, explains what affects your total project estimate based on home size, and flags the details that separate a fair quote from an inflated one.
Why interior trim pricing matters before you start
Getting a handle on interior trim installation cost before contractors arrive saves you from two common problems: accepting a quote with no reference point, and cutting your budget so tight that you end up with rushed work or cheap materials. Trim is one of the finishing details that defines how polished a room feels, and skimping on it shows for as long as you own the house.
Budgeting without a baseline creates real problems
Most homeowners start their trim projects with a rough idea of what they want but no sense of what it costs. That gap leads to scope decisions made on the fly, like dropping crown molding from the living room because the quote came in higher than expected. When you know the typical cost ranges per linear foot and per room ahead of time, you can make those tradeoffs intentionally rather than reactively.
Setting a realistic budget before you talk to a contractor puts you in control of the conversation, not the other way around.
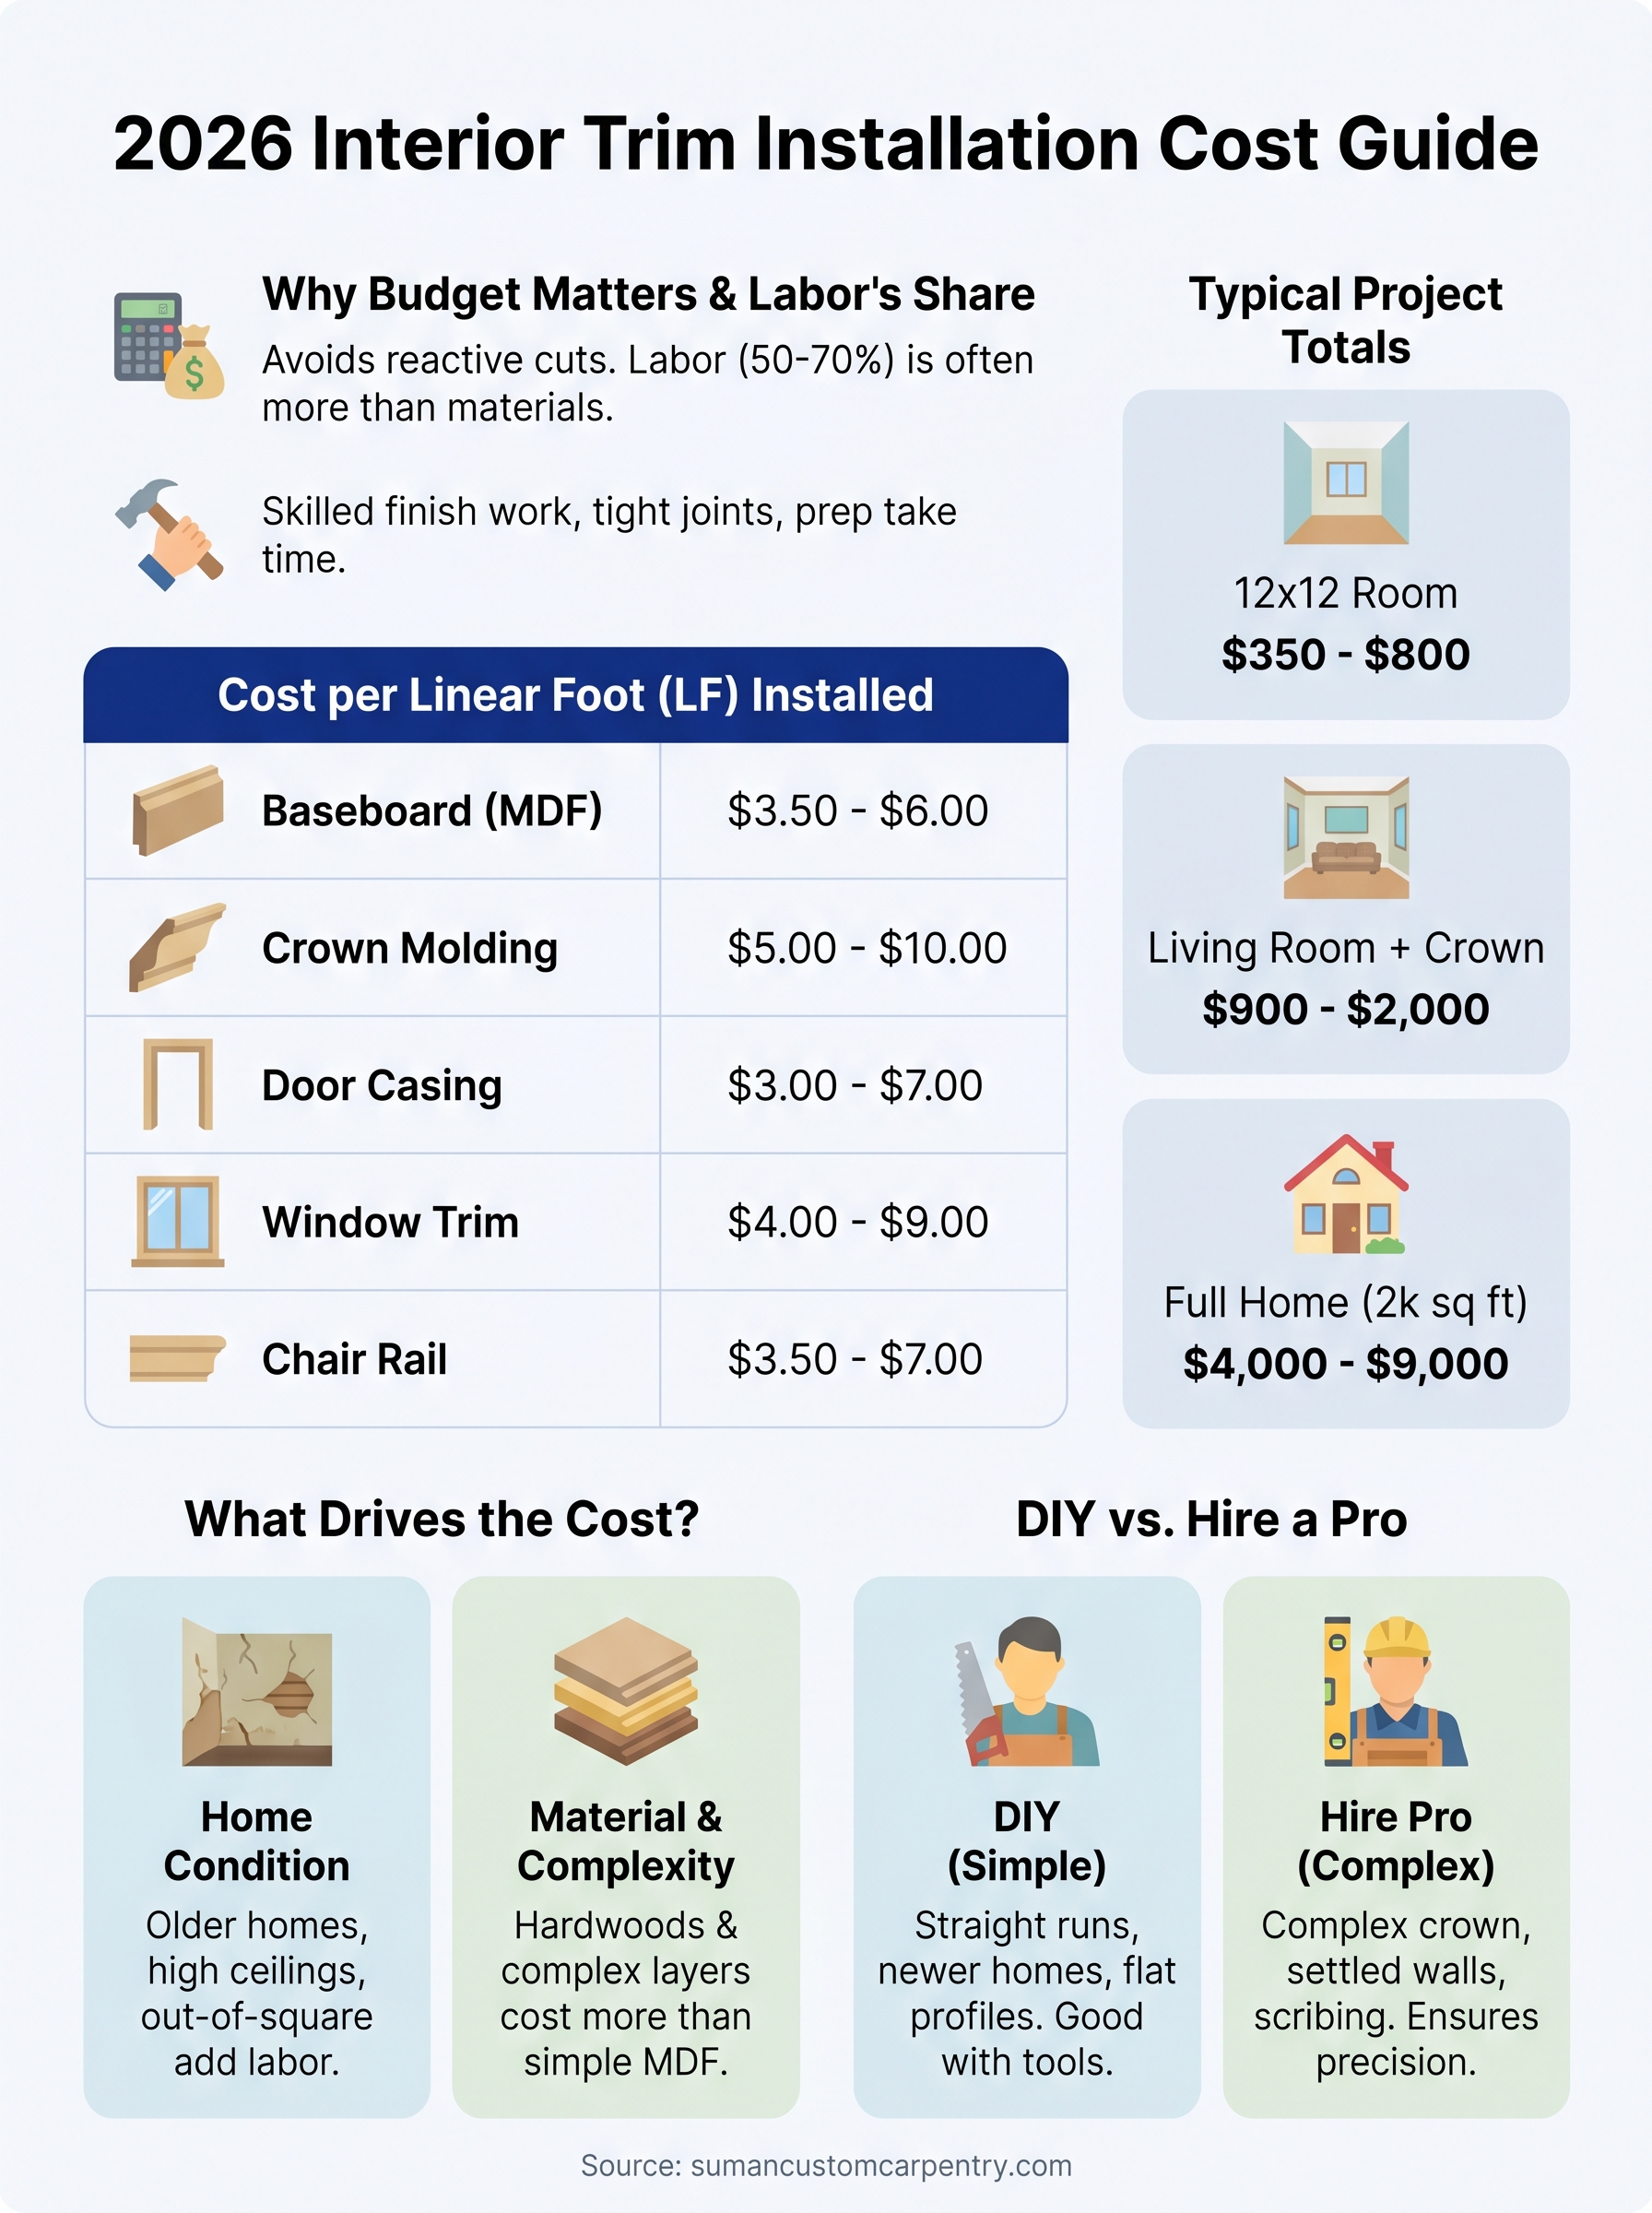
Labor accounts for more of the bill than most people expect
Materials are only part of the picture. On a typical trim project, labor makes up 50 to 70 percent of the total cost. That ratio surprises homeowners who price out wood at the lumber yard and assume the install will be a small add-on. A finish carpenter who does the work correctly, with tight mitered corners, properly coped joints, and clean paint prep, brings real skill to the job.
Your home’s age, ceiling height, and existing wall conditions all affect how long that work takes. Older homes with settled walls and out-of-square corners take longer to trim, which drives up the final number even when the material costs look straightforward on paper.
2026 average costs per linear foot and per room
Interior trim installation cost in 2026 runs between $3.50 and $12 per linear foot installed, depending on the trim profile, material, and labor involved. That range covers everything from simple painted MDF baseboard to detailed hardwood crown molding. Knowing where your specific project falls on that spectrum helps you build a number you can actually use.
Cost per linear foot by trim type
The table below reflects combined material and labor costs for professionally installed trim in 2026.
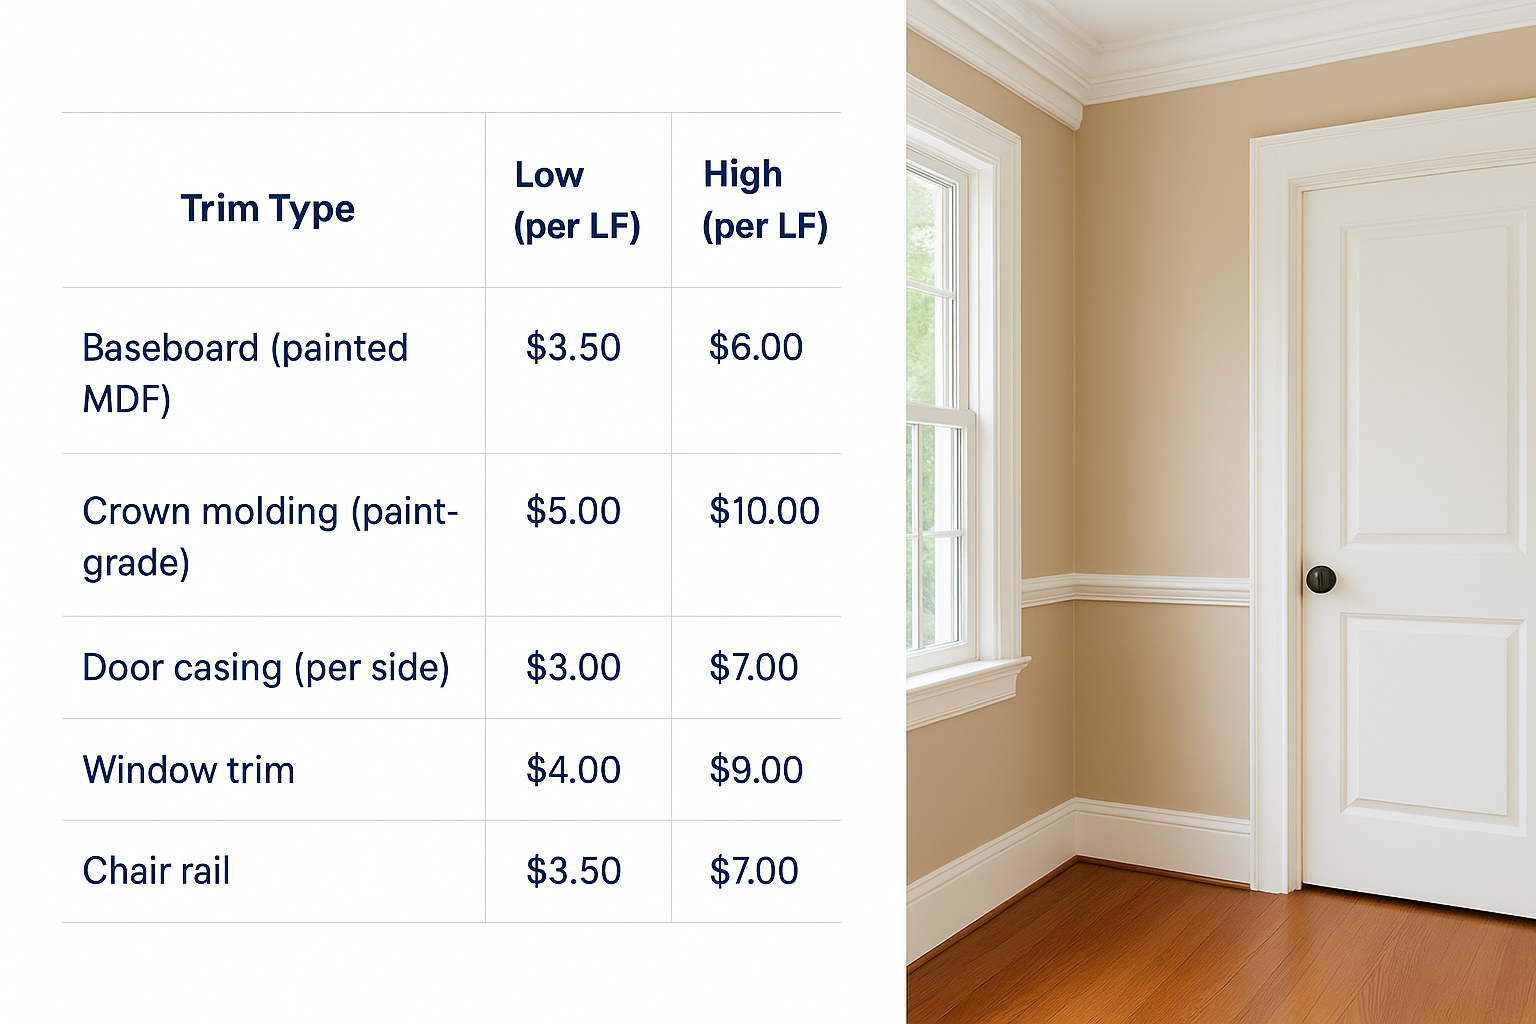
| Trim Type | Low (per LF) | High (per LF) |
|---|---|---|
| Baseboard (painted MDF) | $3.50 | $6.00 |
| Crown molding (paint-grade) | $5.00 | $10.00 |
| Door casing (per side) | $3.00 | $7.00 |
| Window trim | $4.00 | $9.00 |
| Chair rail | $3.50 | $7.00 |
What a full room or home typically costs
A standard 12×12 bedroom with baseboard and door casing runs $350 to $800 total. A larger living room with crown molding added will land closer to $900 to $2,000. For a full 2,000-square-foot home, expect to budget $4,000 to $9,000 depending on ceiling height and trim detail.
These figures assume a finish carpenter, not a general handyman, which makes a measurable difference in the final quality.
What changes the price on a real job
Several variables push your interior trim installation cost up or down from any average you read online. Understanding those variables before you get quotes helps you explain your project clearly and evaluate what you’re being charged for.
Your home’s condition and layout
Older homes and high ceilings are the two biggest cost drivers on most trim jobs. Walls that have settled over decades are rarely plumb or flat, which means a finish carpenter has to scribe, shim, and fit trim to irregular surfaces rather than simply nail it in place. Every out-of-square corner adds time, and time is where your money goes on labor-heavy work.
Ceiling heights above nine feet require more material and more careful handling, both of which add to your final number.
Material and profile complexity
Simpler profiles cost less, full stop. Flat or craftsman-style trim installs faster than multi-piece crown assemblies with built-up layers. Hardwood materials like poplar or oak add $1.50 to $3.00 per linear foot over painted MDF, but they hold detail better and take stain cleanly.
Your paint or stain finish choice also matters. A painted finish on MDF delivers sharp lines at a lower material cost, while stained hardwood demands more prep time and a more careful application process, which adds to labor hours.
How to estimate your trim project step by step
A quick walkthrough of your space gives you a working number before any contractor sets foot in your house. Running your own rough estimate of interior trim installation cost keeps you grounded when quotes arrive and helps you identify anything that looks off before you commit to a budget.
Measure your linear footage first
Start by measuring every wall section, door opening, and window in the rooms you plan to trim. Write down each run separately, then add them up by trim type. Use these rules to stay accurate:
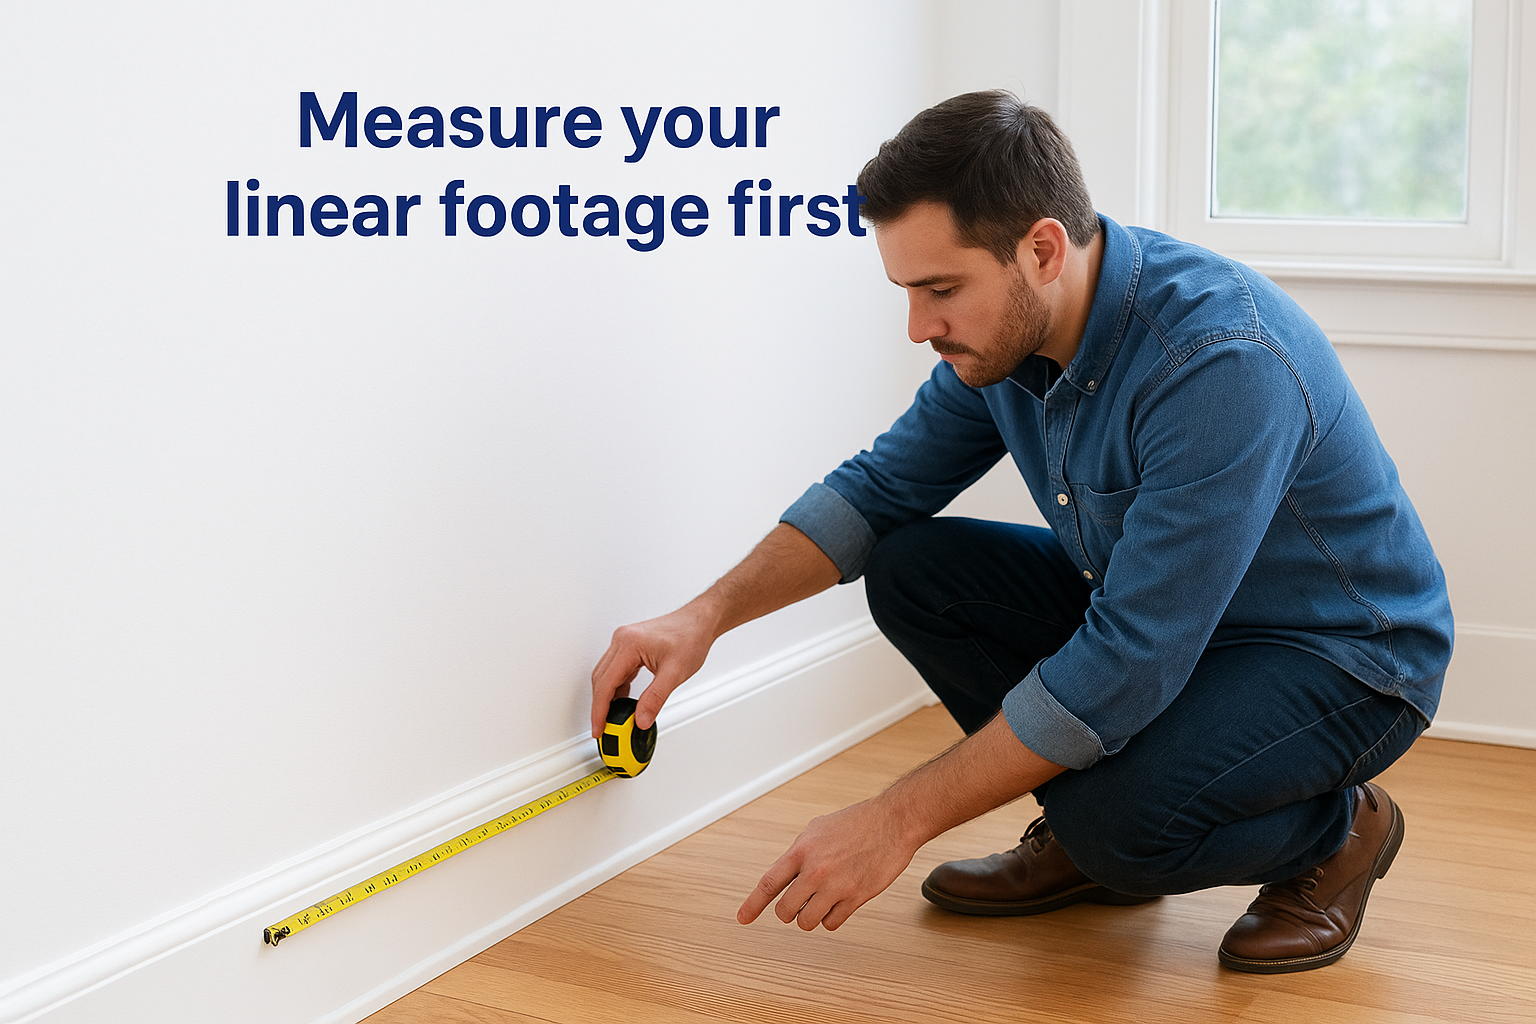
- Baseboard: measure each wall length, then subtract door widths
- Crown molding: measure the full room perimeter without subtracting for doors
- Door casing: measure each side of every opening separately
A simple room-by-room list keeps your measurements organized and makes sharing them with contractors straightforward.
Apply a cost range to your footage
Once you have your total linear footage, multiply it by the low and high per-foot rates for your trim type using the table earlier in this guide. That calculation gives you a realistic budget window. Add 10 to 15 percent on top for material waste, small overages, and the unexpected wall conditions your finish carpenter will run into during installation.
When to hire a finish carpenter vs DIY
DIY trim work can save you labor costs, but problems created by poor technique cost more to fix than professional installation from the start. The right call depends on your skill level and trim profile complexity, and how much your home’s existing wall conditions affect the job.
Where DIY makes sense
Straight runs of baseboard in a newer home with square walls and standard ceiling heights are reasonable DIY territory. If you own a miter saw and have experience making accurate cuts, painting simple flat profiles yourself is a realistic way to reduce your interior trim installation cost without sacrificing the final result.
Start with one room and finish it completely before committing that approach to the rest of your home.
Where professional installation pays off
Complex profiles, multi-piece crown assemblies, and older homes with settled, out-of-square walls are where professional work clearly earns its price. Coped inside corners and scribing trim to irregular surfaces take years of practice to execute cleanly.
Poor execution on finish work is visible every time someone walks into that room. A finish carpenter brings the skill to handle those conditions and deliver results that hold up for decades.
Next steps
You now have a clear picture of what interior trim installation cost looks like in 2026, from per-linear-foot rates by trim type to the variables that push a project higher or lower. Measure your rooms, apply the cost ranges in this guide, and you’ll walk into any contractor conversation with a number you can defend.
The single most useful thing you can do next is get a quote from a finish carpenter who works in your area and does this type of work every day. General contractors and handymen can install trim, but a dedicated finish carpenter brings the precision that shows in the final result and holds up over time.
If you’re on Cape Cod and want a straight conversation about your project, reach out to Suman Custom Carpentry. We build and install custom trim and millwork from our Hyannis shop, and we’ll give you honest pricing without the runaround.