
A kitchen island with a sink changes how you use your kitchen. It pulls prep work, cleanup, and conversation into one central spot, and when it’s designed well, it makes everything flow better. But getting the layout right matters. Sink placement affects where your dishwasher goes, how much counter space you keep, and whether people can actually sit comfortably. If you’ve been searching for kitchen island ideas with sink that balance function and design, you’re in the right place.
At Suman Custom Carpentry, we design and hand-build custom kitchen islands at our shop in Hyannis, Cape Cod. We’ve seen firsthand how sink placement on an island can make or break a kitchen’s workflow, and how the right configuration adds both daily convenience and long-term value to a home. Every kitchen we build starts with how you actually cook, clean, and gather, not with a template pulled off a shelf. That hands-on experience shapes every recommendation in this guide.
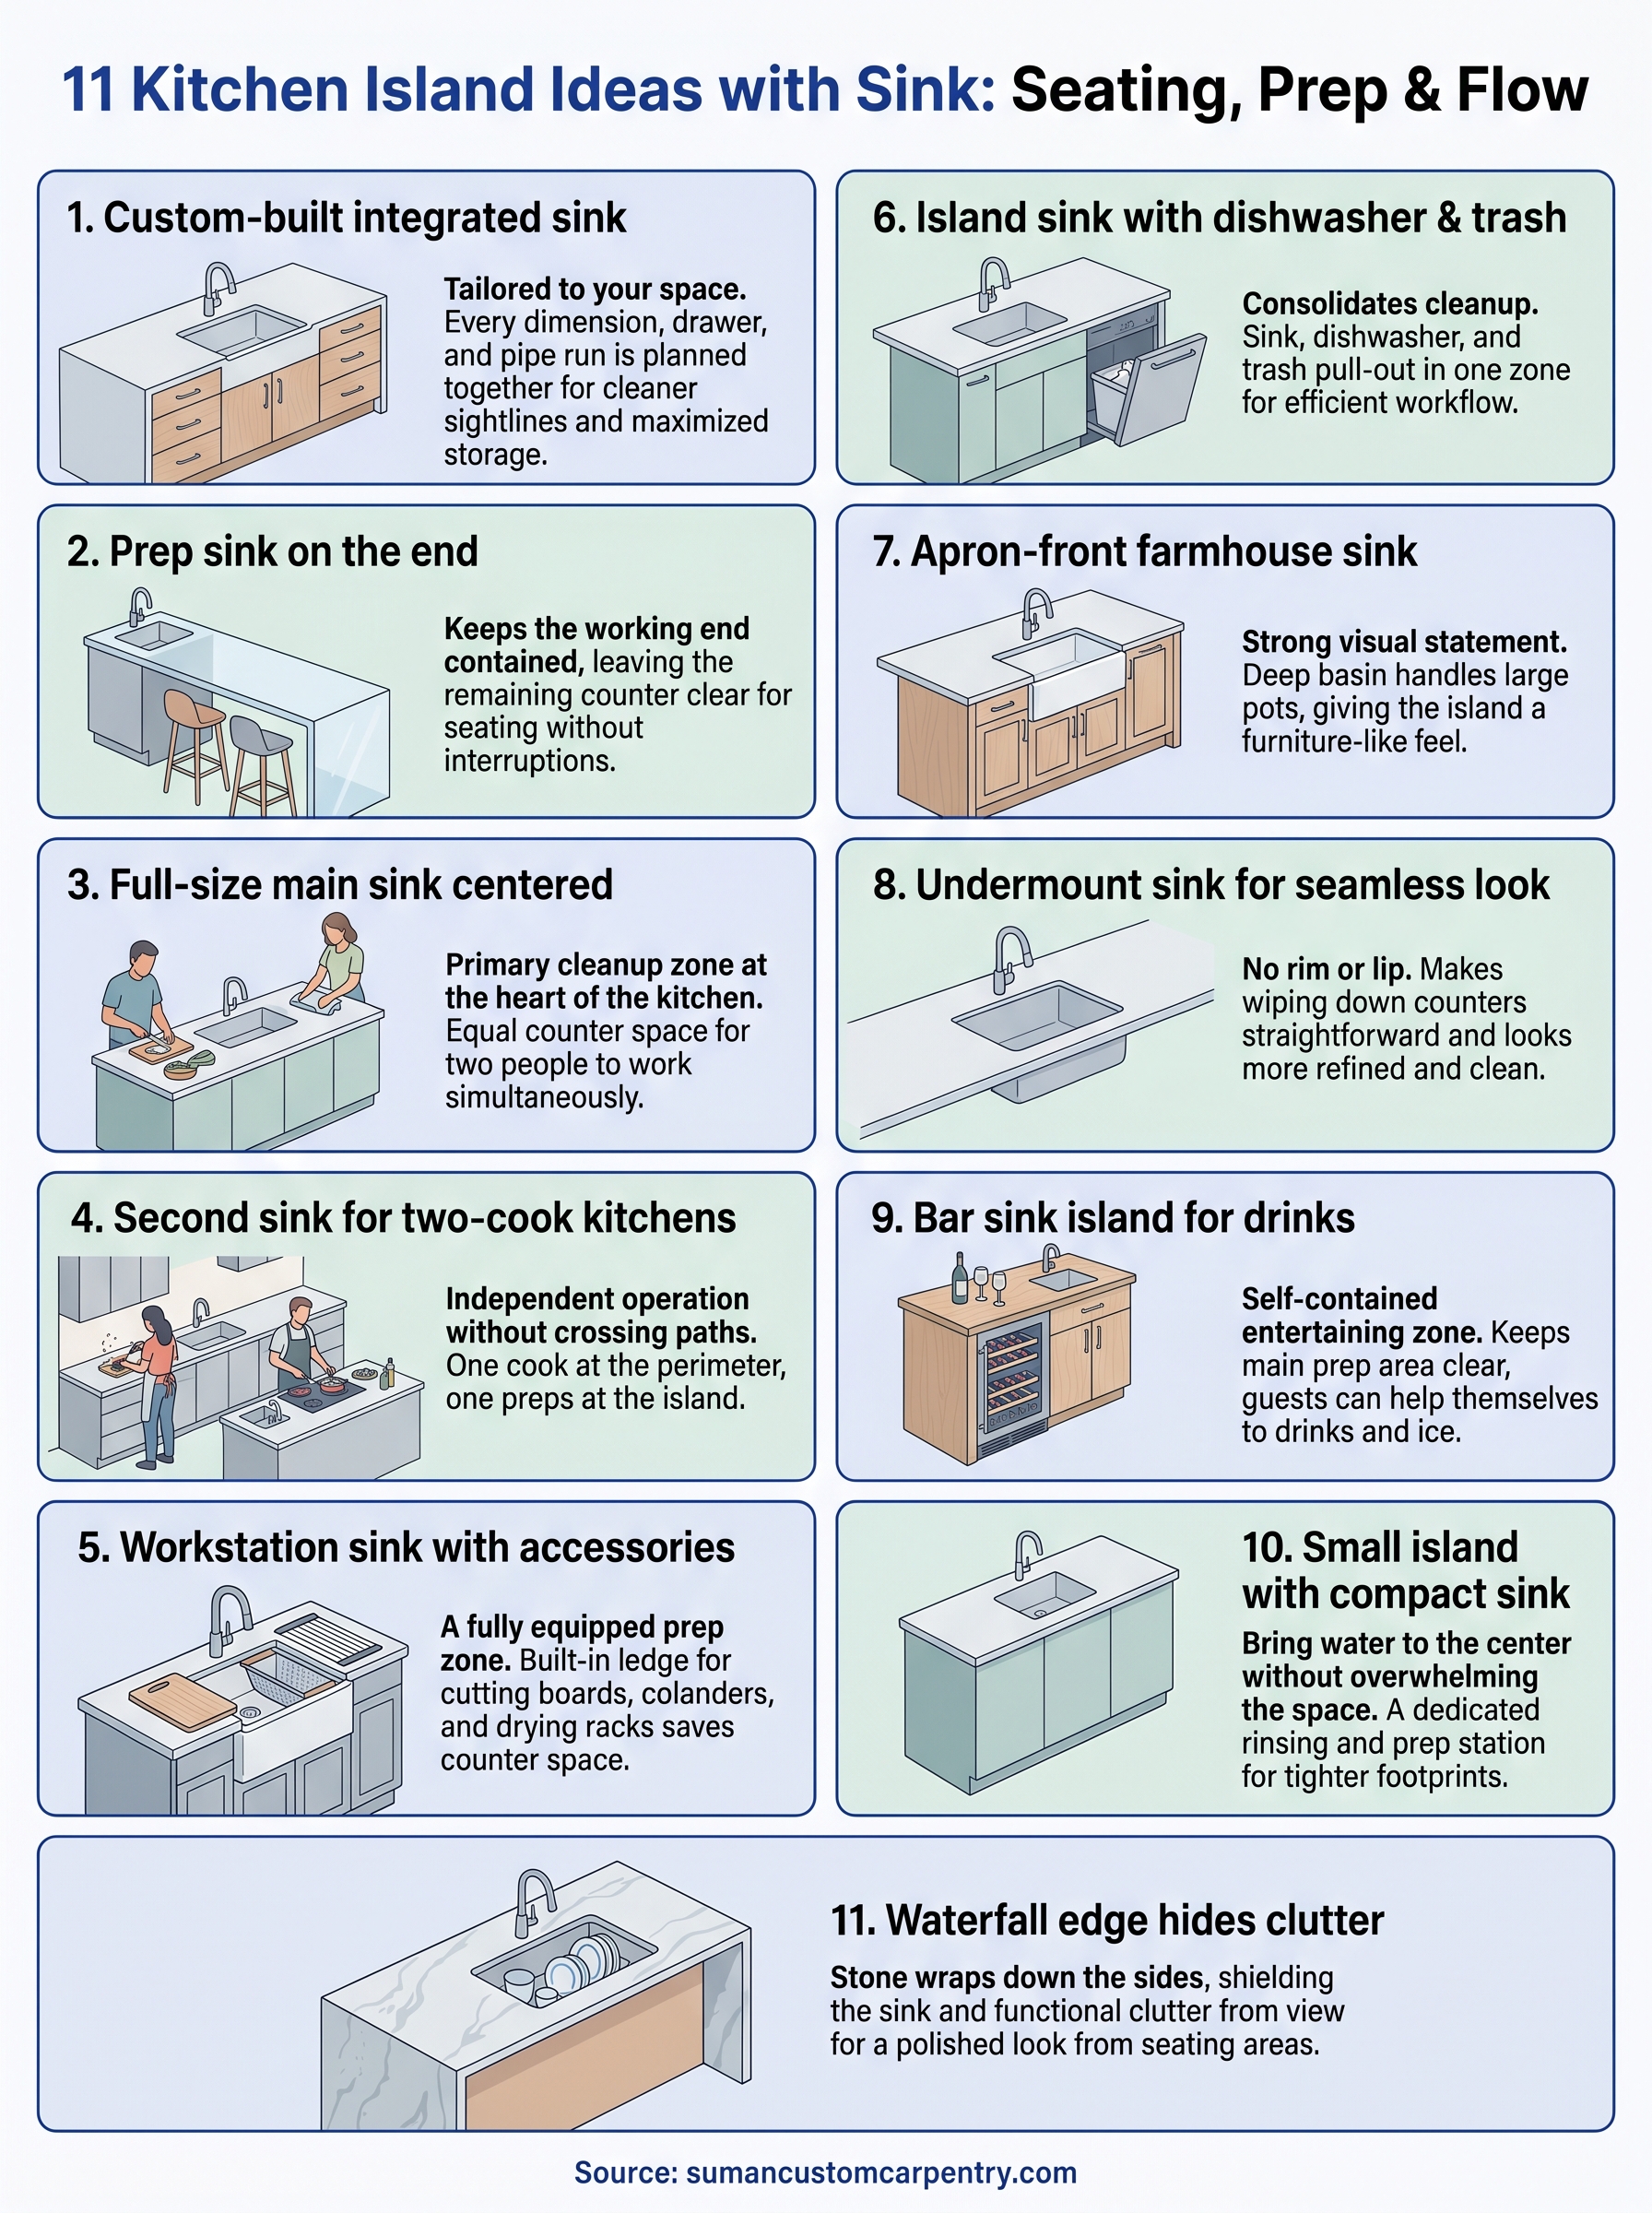
Below, you’ll find 11 kitchen island ideas that cover everything from prep sinks paired with seating to full-size basins with integrated dishwashers, each one designed to help you figure out what actually works for your space before you commit to a build.
1. Custom-built island with integrated sink
A custom-built island with an integrated sink is the most flexible option among all kitchen island ideas with sink configurations. Unlike stock cabinetry retrofitted with a basin, every dimension, drawer placement, and pipe run gets planned to fit your kitchen rather than a generic floor plan from a big-box catalog.
What it is
This configuration starts as a clean design drawn specifically for your space. The cabinetry, countertop, sink cutout, and plumbing access are all planned together before a single board gets cut. At Suman Custom Carpentry, we hand-build these islands at our Hyannis shop, which means the finished product fits your kitchen exactly, not approximately.
Why it works
When the sink is integrated from the design phase, you avoid the compromises that come with adapting a stock cabinet. Drawer stacks, pull-outs, and storage zones can be arranged around the plumbing without sacrificing usable space. You also get cleaner sightlines because nothing looks like an afterthought.
A sink added to a stock cabinet often forces you to lose one or two full drawers to accommodate the P-trap. A custom build eliminates that waste entirely.
Layout and sizing notes
For a sink paired with seating, plan for at least 36 inches of clearance on the opposite side of the basin. The island itself should be at least 48 inches long to give you enough counter on either side of the sink for prep work. Wider islands (42 to 48 inches deep) support seating on one side and a full working counter on the other without crowding either zone.
Finish and fixture ideas
Painted shaker-style bases in navy, sage, or charcoal work well for islands because they ground the space visually. Quartz or quartzite countertops hold up well around sinks because they resist moisture without requiring the regular sealing that natural stone demands. Brass or matte black fixtures add strong contrast against lighter countertops and read well from across the room.
Cost drivers and build complexity
The primary cost factors are island size, countertop material, and whether the plumbing requires relocating a drain line. Custom millwork, integrated electrical for outlets, and specialty hardware all add to the total. Budget more time upfront for a custom build, but what you get in return is a piece that fits your kitchen precisely and holds up for decades.
2. Prep sink on the end with a clear seating run
Positioning a prep sink at one end of the island is one of the most practical kitchen island ideas with sink layouts for homes where cooking and entertaining happen at the same time. You keep the working end of the island contained, and the remaining counter runs clean and open for guests to sit without being in the middle of the action.
What it is
This setup places a small prep sink (typically 15 to 18 inches wide) at one end of the island, leaving the rest of the surface free for seating or prep. The plumbing stays condensed to a single corner zone, which simplifies the cabinet layout underneath.
Why it works
Separating the wet zone from the seating zone means people can sit comfortably without leaning over a basin or a pile of vegetable scraps. It also gives the person cooking a dedicated washing area that doesn’t interrupt the full counter run.
Keeping the sink at one end rather than the middle preserves the longest unbroken stretch of counter, which is where most actual prep happens.
Layout and sizing notes
Your island should be at least 60 inches long to make this layout worthwhile. That gives you roughly 18 inches for the sink zone and 42 or more inches for seating or prep on the other side.
Finish and fixture ideas
Compact bar-style faucets with a single-hole mount suit this configuration well. Pair them with a stone or composite countertop that runs continuously across both zones.
Cost drivers and build complexity
Because the plumbing is limited to one end, pipe runs are shorter and less expensive than center-sink configurations. The main cost variable is countertop material and island length.
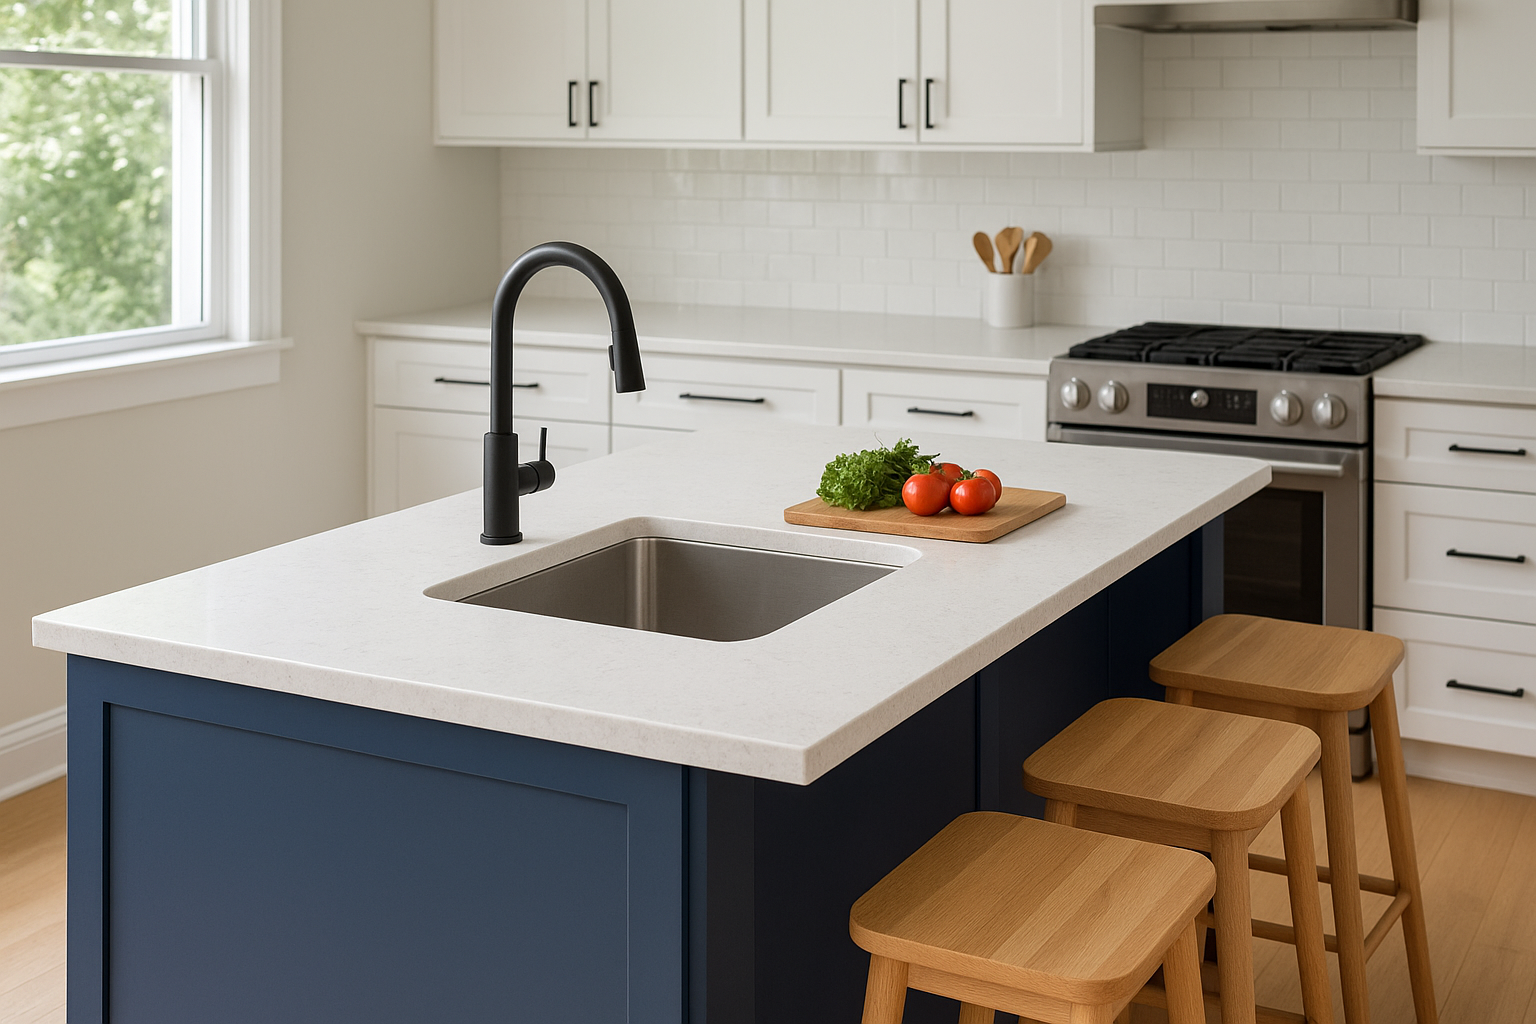
3. Full-size main sink centered for prep and cleanup
Centering a full-size sink in the island puts your primary cleanup zone right at the heart of the kitchen. This layout works especially well when your perimeter counters are already occupied by appliances, and you want one dedicated basin that handles everything from rinsing produce to washing pots.
What it is
This configuration places a standard 30 to 36-inch single or double basin sink at the midpoint of the island. The plumbing runs to the center of the cabinet run, and storage on both sides of the sink stays symmetrical. It functions as your primary kitchen sink, not a secondary prep station.
Why it works
Centering the sink gives you equal counter space on both sides, so two people can work the island at the same time without crowding each other. One side handles prep, the other handles plating or drying, and the sink bridges them naturally.
A centered full-size sink also keeps sightlines balanced, so the island reads as one cohesive piece rather than a counter with something tacked onto one end.
Layout and sizing notes
Your island needs to be at least 72 inches long to pull this off without sacrificing usable counter space. Plan for 18 to 24 inches of counter on each side of the basin and leave room for seating on the opposite face if your depth allows it.
Finish and fixture ideas
Pull-down faucets suit this setup well because they give you the reach to clean a large basin without splashing. Pair them with quartz or granite countertops that run continuously across the island.
Cost drivers and build complexity
Centering the drain adds plumbing complexity compared to an end-mount configuration because the pipe run is longer. Factor in the cost of a higher-capacity sink and any cabinet reinforcement needed to accommodate the basin cutout.
4. Second sink setup for two-cook kitchens
Some households genuinely need two people working in the kitchen at the same time, and a single sink at the perimeter creates a constant bottleneck. Adding a second sink to your island solves that problem without requiring a full kitchen redesign. This is one of the most practical kitchen island ideas with sink configurations for households that cook seriously.
What it is
This layout places a secondary sink on the island while the primary sink stays at the perimeter wall. The island basin is typically smaller, often 15 to 24 inches wide, and handles rinsing, prepping, and light cleanup so the main sink stays clear.
Why it works
Two cooks can operate independently without crossing paths or waiting on each other. One person handles the main cooking zone at the perimeter while the other preps at the island. The kitchen stays functional even when both stations are running at full capacity.
A second sink on the island is especially useful in open-concept kitchens where one cook is also managing conversation with guests at the counter.
Layout and sizing notes
Your island needs to be at least 54 inches long to support a secondary sink without crowding the remaining counter. Keep the island sink on the opposite end from the seating zone to maintain a clean separation between wet work and dining.
Finish and fixture ideas
Match the faucet finish to your primary sink fixture to keep the kitchen looking cohesive. A simple single-handle faucet works well here since the basin handles lighter tasks.
Cost drivers and build complexity
Running a second drain and supply line to the island is the main cost factor. If your island sits far from existing plumbing, expect higher labor costs for the pipe extension.
5. Workstation sink with built-in accessories
A workstation sink takes the standard basin concept and expands it into a fully equipped prep zone. This is one of the more efficient kitchen island ideas with sink configurations because it packs multiple functions into a compact footprint without requiring extra counter space.
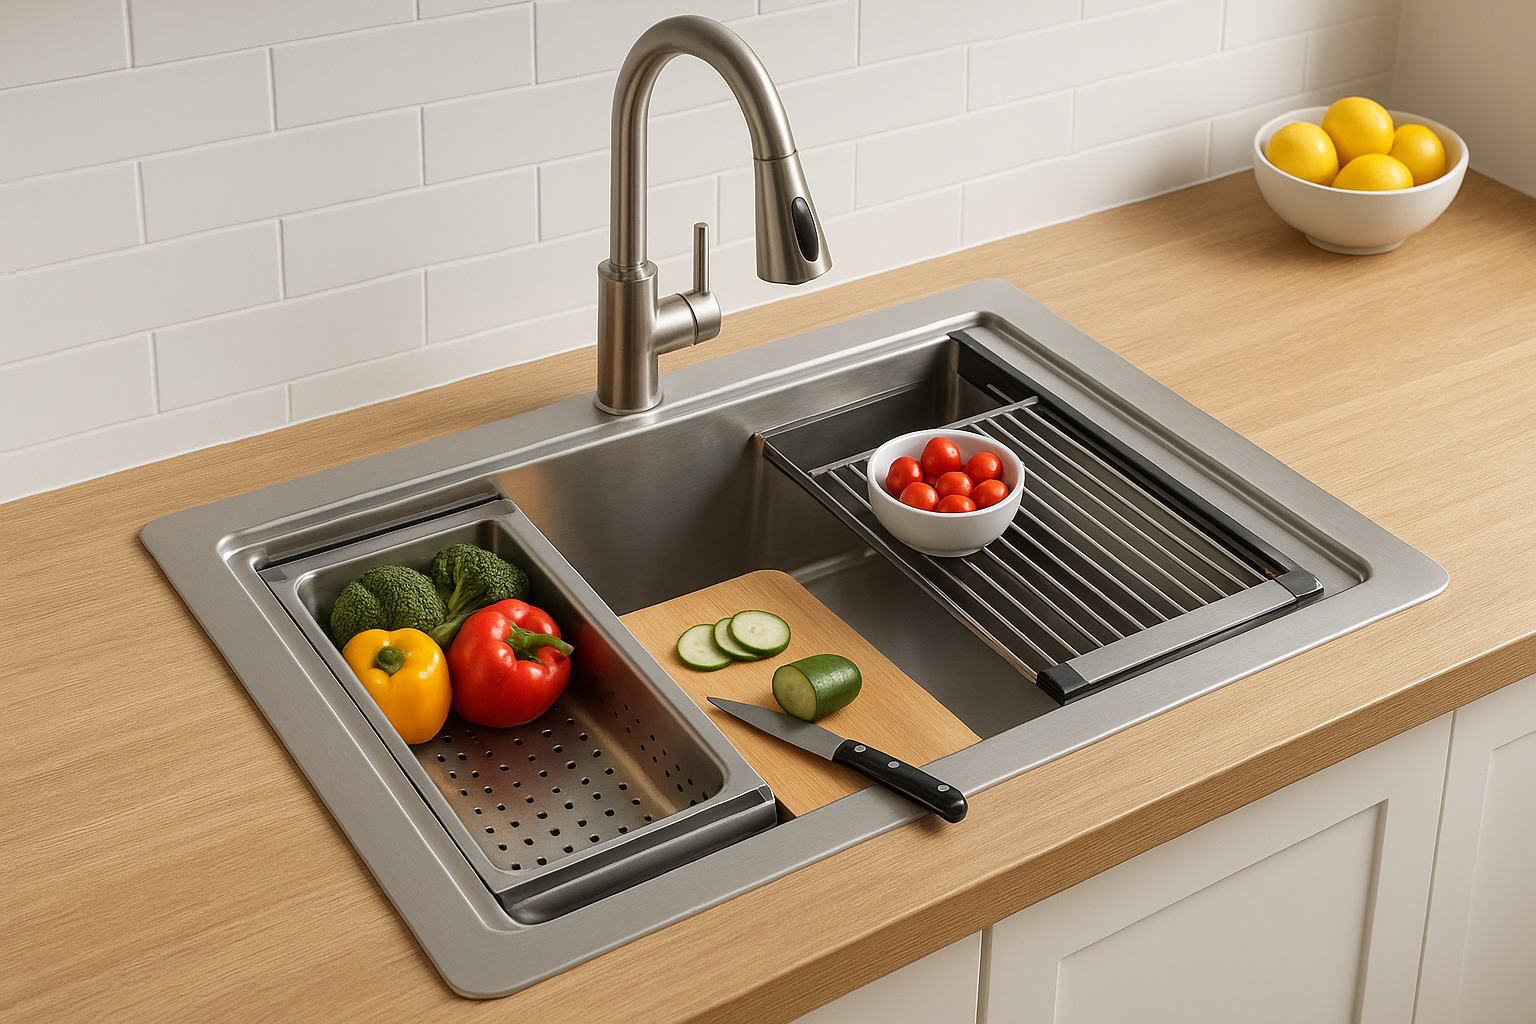
What it is
This setup pairs a deep, ledge-style sink with a set of accessories that rest on rails built into the basin walls. Common add-ons include cutting boards, colanders, drying racks, and knife holders. Everything stores inside the sink when you’re not using it, keeping your counter clear.
Why it works
You essentially get a prep station and a sink in the same footprint, which matters a lot on islands where space is limited. Moving between rinsing and cutting happens without shifting position, which speeds up the actual work of cooking.
A workstation sink with the right accessories can replace a separate prep area entirely, freeing up counter space for plating or seating.
Layout and sizing notes
Most workstation sinks range from 27 to 33 inches wide, which fits comfortably into islands that are at least 48 inches long. Leave at least 12 inches of counter on either side of the cutout to keep the island functional beyond the sink zone.
Finish and fixture ideas
Stainless steel workstation sinks are the most common choice because the ledge system integrates seamlessly with that material. Pair with a high-arc pull-down faucet to give yourself enough clearance when the accessories are in place.
Cost drivers and build complexity
The sink itself costs more than a standard undermount basin because of the integrated ledge system. Factor in the cost of the accessory kit separately, as most manufacturers sell those as add-ons rather than bundling them with the sink.
6. Island sink with dishwasher and trash pull-out
Pairing a sink with a dishwasher and a trash pull-out on the same island is one of the most efficient kitchen island ideas with sink configurations available. You consolidate your entire cleanup routine into one zone so rinsing, loading, and discarding scraps all happen within arm’s reach.
What it is
This layout positions a sink, an 18 or 24-inch dishwasher, and a dedicated trash or recycling pull-out together in a single cabinet run beneath the island countertop. The three components share a plumbing zone, which keeps pipe runs short and the layout logical.
Why it works
Keeping everything in one zone means you stop walking back and forth across the kitchen every time you clear a plate. Food scraps go into the pull-out, dishes go into the dishwasher, and the sink handles the rest without any extra steps.
This configuration works especially well in open-concept kitchens where you want the cleanup zone facing away from the living area so guests don’t see the mess.
Layout and sizing notes
Your island needs to be at least 72 inches long to fit all three components without cramping storage on the remaining side. Position the dishwasher directly adjacent to the sink so the person loading it doesn’t have to reach past cabinet doors.
Finish and fixture ideas
A panel-ready dishwasher that matches your cabinet finish keeps the island looking clean and intentional rather than appliance-heavy.
Cost drivers and build complexity
Running drain and supply lines to the island is the primary cost factor here. Adding a panel-ready dishwasher and a soft-close pull-out with dual bins increases both material and labor costs.
7. Apron-front farmhouse sink in the island
An apron-front sink in an island makes a strong visual statement while still delivering serious function. This is one of the most requested kitchen island ideas with sink configurations for Cape Cod homes because the farmhouse aesthetic fits naturally with the region’s coastal and traditional interior styles.
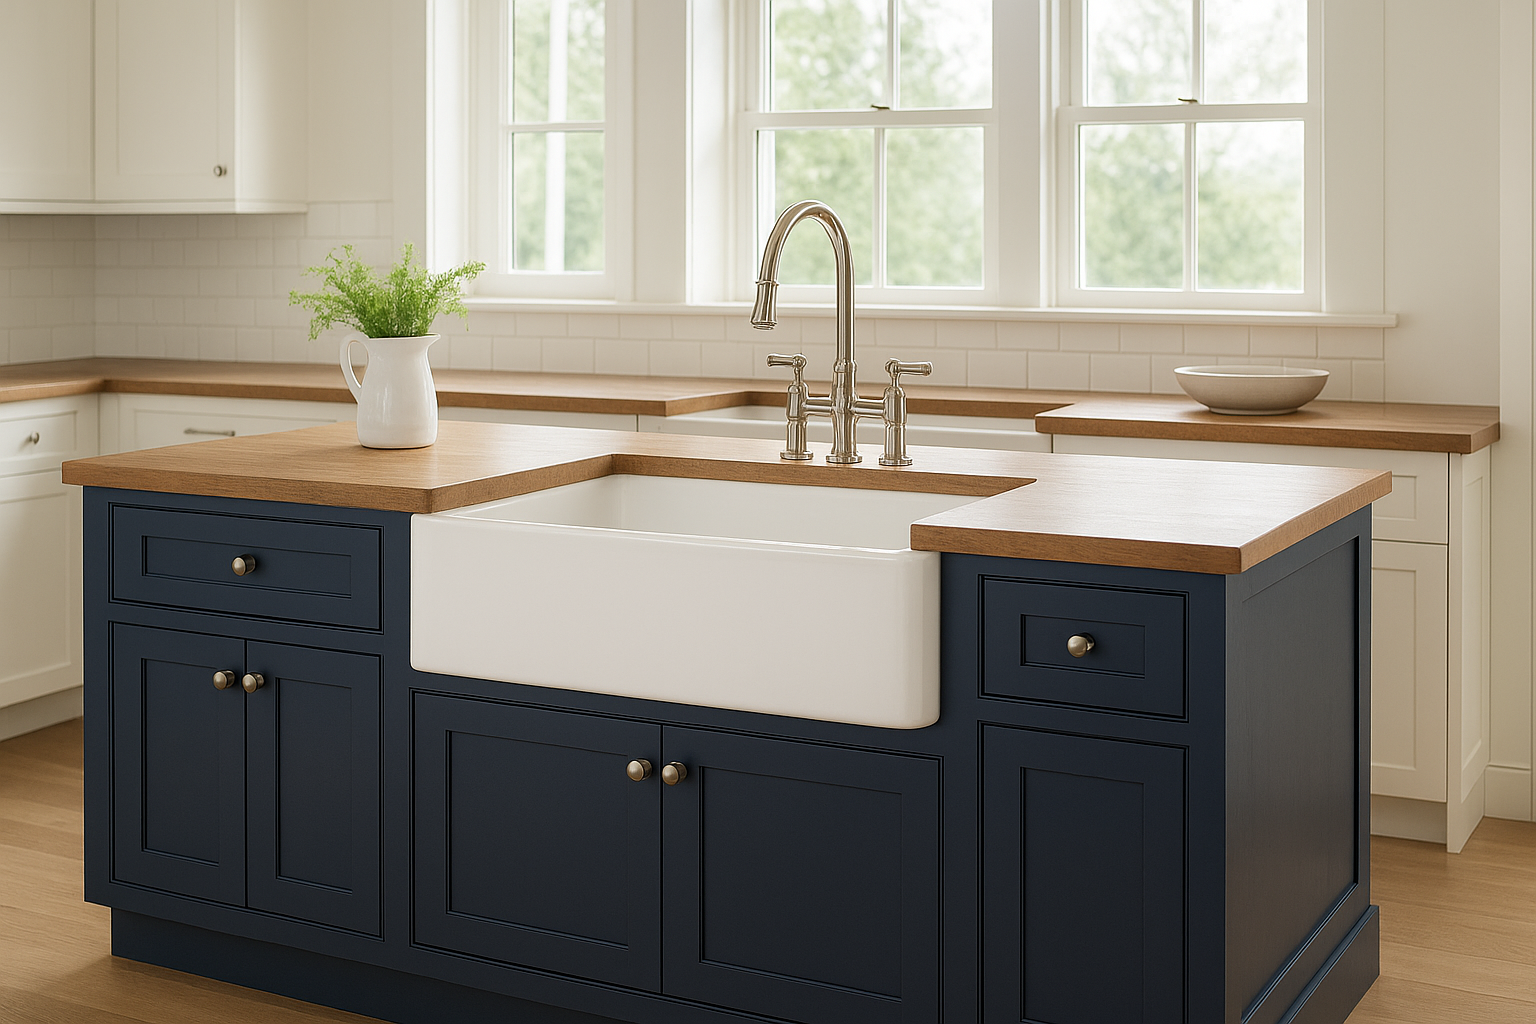
What it is
An apron-front sink, also called a farmhouse sink, has a large exposed front panel that replaces the cabinet face below the sink opening. The basin sits forward of the countertop edge, and that exposed apron becomes a prominent design feature of the island.
Why it works
The deep basin handles large pots and sheet pans without strain, and the wide single-bowl format gives you more usable washing space than most standard undermount sinks. It also anchors the island visually, giving it the feel of a furniture piece rather than a built-in cabinet run.
An apron-front sink reads best when the island cabinetry is designed around it from the start, not retrofitted after the fact.
Layout and sizing notes
Most farmhouse sinks run 30 to 36 inches wide, which requires an island that is at least 60 inches long to maintain adequate counter space on both sides. The cabinet base needs custom framing to support the exposed apron properly.
Finish and fixture ideas
Fireclay or cast iron are the most popular apron-front materials because they hold their color and resist chipping. Pair with a bridge faucet or a tall single-handle fixture to match the traditional look.
Cost drivers and build complexity
The sink itself carries a higher material cost than a standard undermount, and the custom cabinet framing required to support the apron adds to labor time.
8. Undermount sink for a seamless countertop look
An undermount sink is one of the cleanest kitchen island ideas with sink configurations available. The basin mounts below the countertop surface, leaving no rim or lip to collect water or debris along the edges.
What it is
This configuration bonds the sink directly to the underside of the countertop, leaving the stone or solid surface edge fully exposed around the basin. With no seams between the sink and the counter, there is nowhere for food particles or standing water to collect along the perimeter.
Why it works
Wiping down your counter is straightforward because crumbs and liquids sweep directly into the basin without catching on a rim. The uninterrupted surface also makes the island look larger and more refined from across the room.
An undermount sink only works with solid countertop materials like quartz, granite, or quartzite. Tile and laminate cannot support the installation.
Layout and sizing notes
Most undermount sinks fit standard cabinet openings between 24 and 36 inches wide, which makes them compatible with a range of island sizes. Plan for at least 12 inches of counter on each side of the cutout to keep the surface functional.
Finish and fixture ideas
Stainless steel and composite granite are the two most durable undermount materials for a kitchen island. Pair either with a single-hole or three-hole faucet depending on whether you want a separate sprayer or soap dispenser.
Cost drivers and build complexity
Countertop fabrication is the primary cost factor because the undermount installation requires precise cutout work by a stone fabricator. Thicker slabs and specialty edge profiles around the basin opening add to the total.
9. Bar sink island for drinks and entertaining
A bar sink island is one of the more guest-facing kitchen island ideas with sink configurations, built around serving drinks and keeping the entertaining zone self-contained. It keeps your main kitchen prep area clear while giving guests a dedicated spot for ice, rinsing glasses, and pouring.
What it is
This setup places a compact bar sink, typically 9 to 15 inches wide, into an island that also holds a wine refrigerator, beverage cooler, or ice maker nearby. The sink handles light tasks like rinsing fruit, filling glasses, and pouring out drinks without pulling you back to the main kitchen.
Why it works
Separating the bar zone from the cooking zone means guests can help themselves without stepping into the middle of active prep work. It also keeps the mess of drink service, ice, and citrus rinds contained to one end of the island rather than spreading across your main counter.
This configuration works especially well in open-concept layouts where the island faces the living area and doubles as a serving counter during gatherings.
Layout and sizing notes
Your island needs to be at least 48 inches long to fit the sink and a small appliance like a beverage cooler side by side. Position the bar sink closest to guests rather than tucking it near the kitchen side.
Finish and fixture ideas
Brushed nickel or matte black bar faucets with a simple single-hole mount suit this compact configuration well. A dark countertop in soapstone or slate hides water rings and adds a natural warmth to the entertaining zone.
Cost drivers and build complexity
The bar sink itself is typically the least expensive sink option on this list. The larger cost variable is whether you add a wine refrigerator or ice maker, both of which require dedicated electrical circuits in addition to the plumbing rough-in.
10. Small island or peninsula with compact sink
Not every kitchen has room for a large island, and that’s where a small island or peninsula becomes one of the most practical kitchen island ideas with sink configurations you can build. A tighter footprint doesn’t mean giving up water access at the center of your kitchen.
What it is
This configuration fits a compact sink, typically 12 to 18 inches wide, into an island or peninsula that ranges from 36 to 54 inches in total length. The goal is to bring a water source to the center or edge of the kitchen without overwhelming the available floor space.
Why it works
A compact sink on a small island gives you a dedicated rinsing and prep station that pulls foot traffic away from the perimeter wall. You gain a functional wet zone without surrendering the walkways your kitchen needs to stay comfortable.
Even a 12-inch bar sink on a peninsula dramatically reduces how often you walk back and forth to the main sink during prep.
Layout and sizing notes
Your island or peninsula needs at least 36 inches of total length to fit a compact sink and still leave usable counter beside it. Plan for 48 inches of clearance on all open sides to keep movement around the space comfortable.
Finish and fixture ideas
A simple single-hole faucet with a low profile suits compact islands because it doesn’t visually overpower the counter. Pair it with a quartz or solid surface countertop that runs flush to the sink edge without visible seams.
Cost drivers and build complexity
The smaller basin and shorter pipe run make this one of the more affordable configurations on this list. Your primary cost variable is whether existing plumbing requires significant extension to reach the island location.
11. Waterfall edge island that hides sink clutter
A waterfall edge island pairs bold countertop design with smart visual strategy. The stone or solid surface wraps continuously down the sides of the island, creating vertical panels that block sightlines from nearby seating areas. When your sink sits on the interior face, dishes, soap, and drain accessories disappear from view behind that cascading edge.
What it is
This configuration uses a countertop that extends vertically down one or both ends of the island rather than stopping at the cabinet edge. The sink gets positioned so the waterfall panel shields it from the most visible angles in the room, keeping your kitchen island ideas with sink layout looking polished even during heavy use.
Why it works
The waterfall panel does two things simultaneously: it adds a strong architectural feature to the island and it naturally hides the functional clutter a sink generates. Guests seated at the opposite side see a clean stone face rather than a pile of rinsed vegetables or a dish rack.
Positioning the sink on the shielded side of the island works best when the waterfall edge faces your dining or living area.
Layout and sizing notes
Your island needs to be at least 48 inches wide to accommodate both the waterfall depth and a functional basin without crowding the cabinet interior.
Finish and fixture ideas
Quartz and quartzite are the most popular waterfall materials because continuous slabs minimize visible seams along the vertical drop.
Cost drivers and build complexity
The stone fabrication for a continuous waterfall panel is the primary cost driver, as the vertical sections require additional material and precise mitered cuts at the corners.
Plan your island with confidence
Every kitchen island ideas with sink configuration in this guide solves a specific problem, whether that’s separating prep from seating, consolidating cleanup into one zone, or making a smaller kitchen feel more functional. The right choice depends on how you actually use your kitchen, not just how it looks in a photo. Sink placement, island depth, seating clearance, and plumbing access all interact, and getting one wrong affects all the others.
Working with a builder who designs and constructs your island from scratch means none of those details get left to chance. At Suman Custom Carpentry, we hand-build every island at our Hyannis shop with your specific kitchen dimensions and daily habits driving every decision. From the sink cutout to the drawer layout, nothing gets templated from a catalog. If you’re ready to build a kitchen island that actually fits your life, talk to our team at Suman Custom Carpentry to get started.