
A custom kitchen island deserves lighting that does it justice. Whether you’re mid-renovation or just starting to explore kitchen island lighting ideas, the fixture you hang above your island shapes the entire feel of the room, how it looks, how it functions, and how people gather around it. Getting the style, height, and spacing right matters more than most homeowners expect.
At Suman Custom Carpentry, we build custom kitchens from our shop in Hyannis, Cape Cod, and we’ve seen firsthand how the right lighting transforms a handcrafted island from a nice countertop into the centerpiece of the home. Our clients often ask us what works best above the islands we design for them, so we put together five practical ideas to help you make a confident choice.
Here’s what to consider before you pick a fixture and call your electrician.
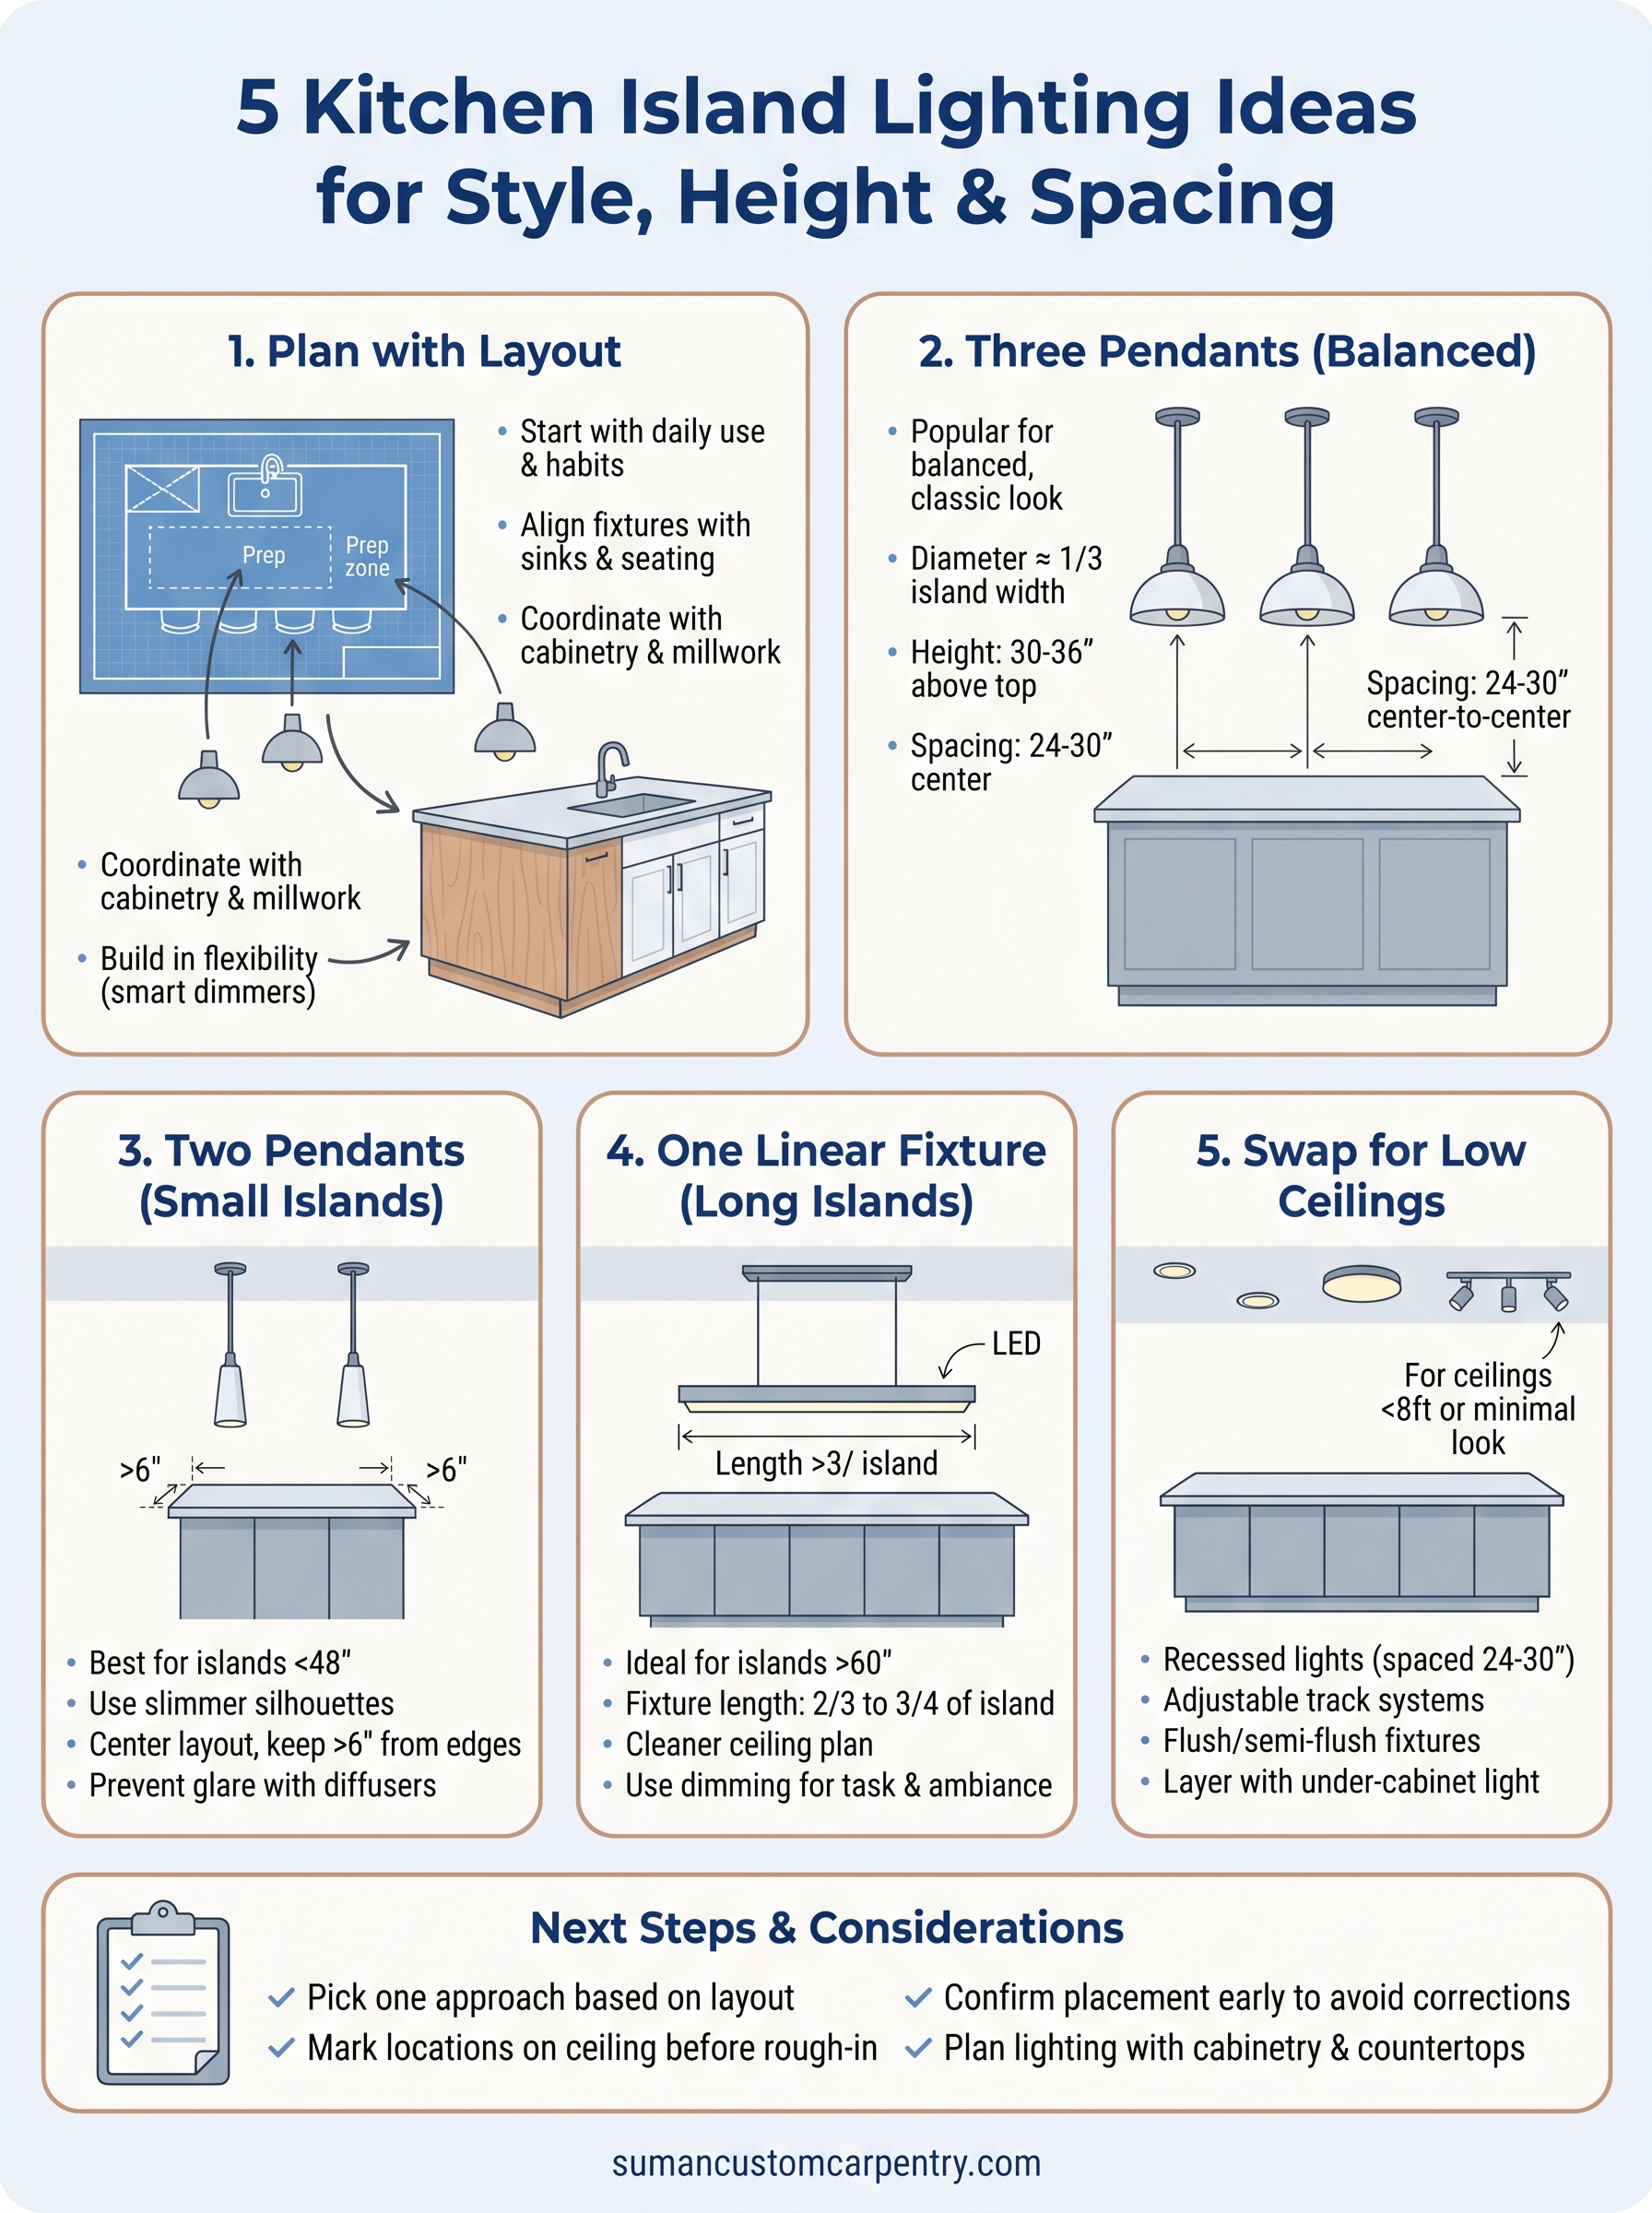
1. Plan lighting with a custom island layout
Before you browse fixtures or commit to any of the kitchen island lighting ideas in this article, think about the island itself. Lighting decisions made early in your kitchen project save you from costly corrections later, and they produce far better results when the island layout, fixture placement, and electrical rough-in all work together from the start.
Start with how you use the island every day
Your daily habits should drive your lighting plan before anything else. If you prep food on one end and your kids do homework on the other, you need even, functional light across the full surface, not just a single decorative fixture centered overhead.
Write down the three or four tasks that happen at your island most often, then use that list to decide how many fixtures you need and where each one should land before you talk to your electrician.
Align fixtures with sinks, seating, and prep zones
If your island includes a sink, position at least one fixture directly above it so you’re not working in your own shadow. Seating areas benefit from slightly softer, warmer light than prep zones, so map each fixture to a specific function before your electrician runs wire.
Aligning each fixture to a zone before rough-in makes the final installation feel purposeful rather than accidental.
Coordinate lighting with custom cabinetry and millwork
Your island’s finish, wood tone, and hardware choices all influence which fixture materials will look intentional. At Suman Custom Carpentry, we discuss lighting alongside cabinet door profiles and countertop selections so everything ties together visually.
A brushed brass pendant reads very differently above a painted shaker island than above a stained walnut one, so plan these details together rather than treating lighting as a separate decision.
Build in flexibility for future changes
Tastes shift, and islands sometimes get repurposed over time. Installing a ceiling box with a junction cover alongside your main fixture locations gives you room to add or reposition lights later without opening the ceiling. Consider these flexible options early in your project:
- Smart dimmers for task-to-ambiance control
- Adjustable track systems for repositionable fixture heads
- Pre-wired locations for future pendants or recessed additions
2. Use three pendants for balanced, classic coverage
Three pendants above a kitchen island is one of the most reliable kitchen island lighting ideas you’ll find, and it’s popular for good reason. This layout distributes light evenly across the full surface and gives the space a polished, symmetrical look that suits most kitchen styles, from traditional to transitional.
Choose pendant sizes that match island scale
Pendant diameter should be roughly one-third of your island’s width or smaller. For a 48-inch island, that means pendants in the 12 to 16-inch range. Oversized fixtures crowd the space visually, while undersized ones look lost and underpowered against a long countertop.
Set pendant height at 30 to 36 inches above the top
Hang each pendant so the bottom of the shade sits 30 to 36 inches above the countertop. This range keeps light focused on the work surface without blocking sightlines across the island.
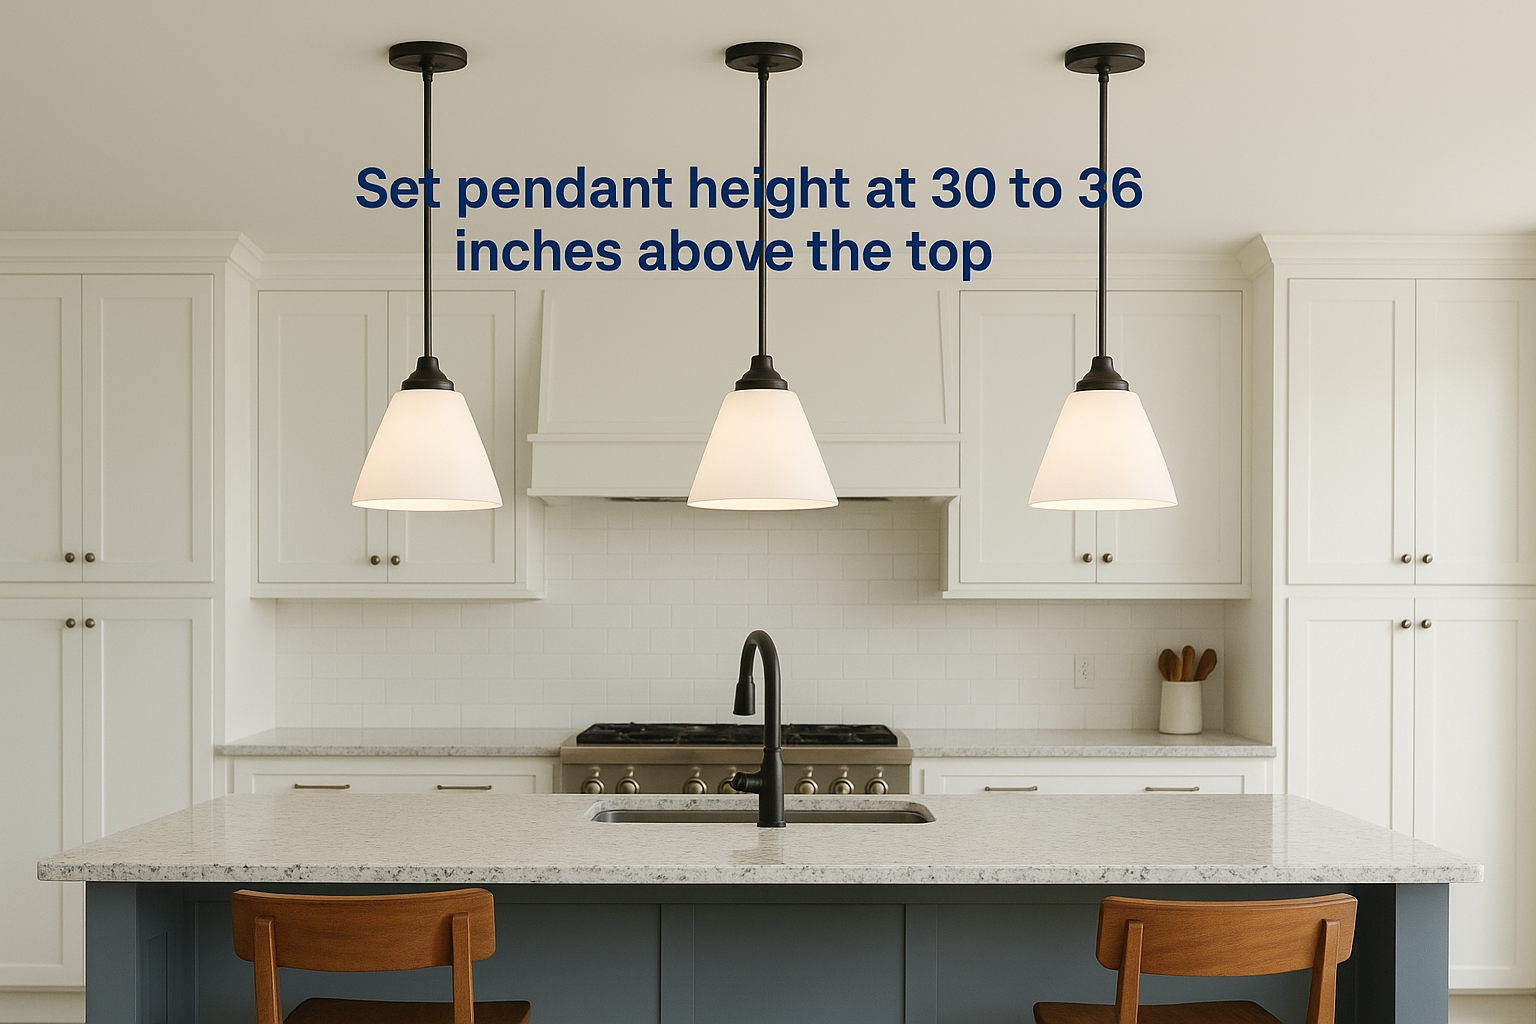
Drop pendants closer to 30 inches for pure task lighting and closer to 36 inches when you want a more open, decorative feel.
Space pendants 24 to 30 inches center to center
Keep center-to-center spacing between 24 and 30 inches to avoid gaps in coverage or fixtures that crowd each other. Mark each location on the ceiling before your electrician runs wire so you can confirm the layout visually before committing.
Pick finishes and shades that fit your kitchen style
Match your pendant finish to existing hardware like faucets, pulls, and cabinet hinges for a cohesive result. Opaque shades direct light downward for focused task coverage, while clear or seeded glass spreads light more broadly and adds visual warmth to the room.
3. Use two pendants to keep small islands open
Two pendants work well for shorter islands, typically those under 48 inches, where three fixtures would crowd the ceiling and overwhelm the space. This layout is one of the most practical kitchen island lighting ideas for compact kitchens because it keeps the overhead plan clean while still delivering enough light for everyday tasks.
Use slimmer silhouettes to protect sightlines
Choose pendants with narrow profiles and vertical shapes rather than wide drum shades. Skinny cylinder pendants or small cone shades preserve the open feel above a small island and avoid making the space look top-heavy.
Center the layout and keep clearance from the edges
Place your two fixtures so they sit equally spaced from the center of the island, and keep each pendant at least 6 inches from the island’s edge. This prevents the fixtures from feeling like they’re tumbling off either end of the countertop.
Mapping your fixture centers on the ceiling with painter’s tape before your electrician runs wire takes two minutes and saves real frustration later.
Prevent glare with diffusers and bulb choices
Frosted glass shades and diffuser-style bulbs scatter light more evenly than bare exposed bulbs, which reduces direct glare at eye level for anyone seated at the island.
Make two pendants feel intentional, not like a compromise
Two pendants look deliberate when the fixture style and spacing are matched carefully to the island’s proportions. Treat this as a design choice rather than a default, and it reads that way to anyone who walks into the room.
4. Install one linear fixture to light long islands evenly
A single linear pendant or bar fixture is one of the most underused kitchen island lighting ideas for islands that run 60 inches or longer. Instead of spacing multiple pendants and managing gaps between them, one continuous fixture covers the full surface with uniform light and keeps the ceiling plan simple.
Decide when linear beats multiple pendants
Linear fixtures work best when your island is 60 inches or longer and you want a cleaner look than three or more pendant cords create. If your kitchen has a strong horizontal design with long cabinet runs and low-profile hardware, a linear bar fixture reinforces that visual direction naturally.
A linear fixture above a long island reads as a deliberate design choice rather than a practical default.
Match fixture length to island length without overcrowding
Keep the fixture at two-thirds to three-quarters of your island’s total length. A 72-inch island pairs well with a 48 to 54-inch linear fixture. Going longer makes the fixture look oversized, while going shorter leaves the ends of the island underlit.
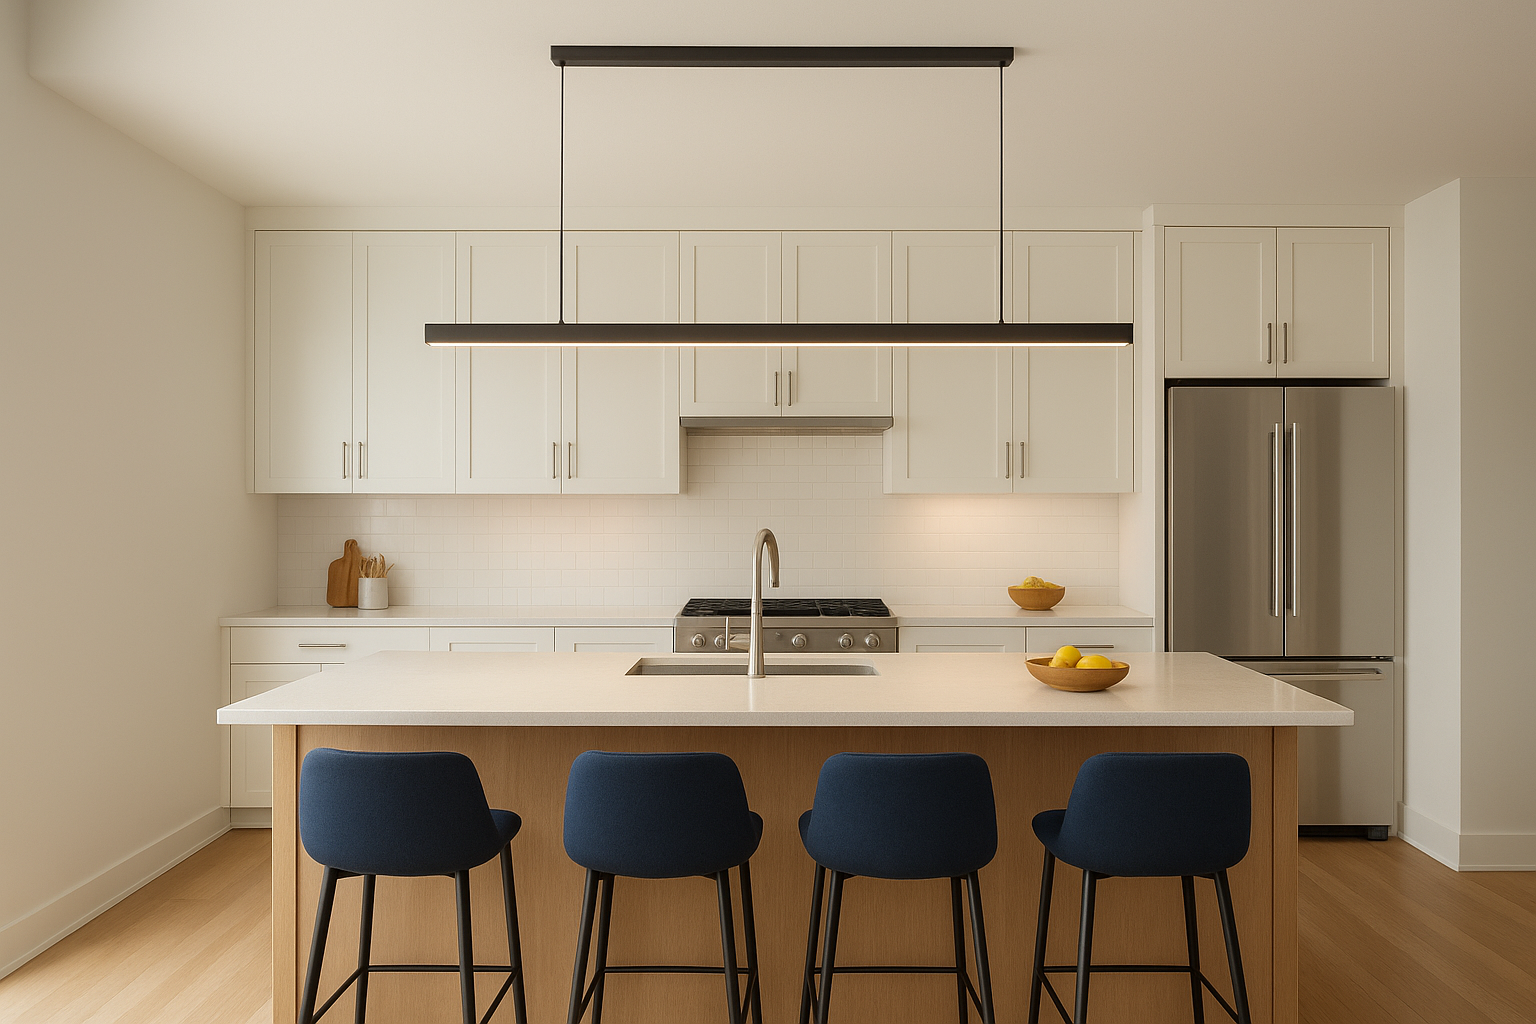
Use dimming to switch from task light to ambiance
Pair your linear fixture with a compatible dimmer switch so you can run it bright for food prep and dial it back for dinner. Most quality linear fixtures accept LED-compatible dimmers rated for their specific driver or bulb type.
Keep a clean ceiling plan in open-concept kitchens
In open-concept spaces, a single linear fixture anchors the kitchen zone visually without cluttering the shared ceiling with multiple cords. This approach keeps the overall room plan easy to read from any adjoining living or dining area.
5. Swap pendants for low ceilings and clean lines
Pendants are not always the right fit. When your ceiling sits at 8 feet or below, or when your kitchen calls for a minimal, uncluttered look, other kitchen island lighting ideas give you better results without the visual weight that hanging fixtures add to a tight space.
Use recessed lights for a minimal look and wide coverage
Recessed cans deliver clean, focused task light without taking up any visual space above the island. Space them 24 to 30 inches apart in a straight line centered over the island for even surface coverage with no shadow gaps.
Recessed lighting works best when you pair it with a dimmer so you can shift from bright prep light to a softer mood without swapping fixtures.
Aim track lighting for adjustable task and accent light
Track systems let you reposition individual heads after installation, which is useful if your island layout or daily use patterns change. Mount the track centered above the island and aim each head slightly inward to avoid glare at seated eye level.
Choose flush and semi-flush fixtures for tight spaces
Flush and semi-flush ceiling fixtures sit close to the ceiling and still deliver enough spread to cover a mid-sized island. Look for fixtures with frosted or opal diffusers to soften the light and prevent hotspots directly below.
Layer island lighting with under-cabinet and ambient light
No single fixture type covers every need on its own. Combine your primary ceiling source with under-cabinet strips along any upper cabinetry near the island to fill in shadows at the countertop level and create a richer, more functional overall result.
Next Steps
The right lighting turns a well-built island into a kitchen that works as well as it looks. These kitchen island lighting ideas give you a solid foundation, but your final decisions come down to your ceiling height, island size, and daily use patterns before you commit to any fixture.
Start by picking one approach from this list that fits your layout, then mark your fixture locations on the ceiling before your electrician rough-ins the boxes. Getting fixture placement confirmed early saves you from expensive corrections once drywall goes up. If three pendants feel like too much, scale down to two. If a linear bar fits your island better, plan that run into the ceiling before framing closes.
If you’re designing your island or planning a full kitchen renovation, lighting should happen alongside your cabinetry and countertop choices, not as an afterthought. At Suman Custom Carpentry, we work through every detail with you from the first consultation through final installation. Start your custom kitchen project with us and build an island worth lighting right.