
A kitchen island can completely change how your space works, and how it feels. Whether you’re after more counter space, a spot for bar stools, or a way to finally organize the chaos under your cabinets, the right kitchen island design ideas start with understanding what your kitchen actually needs. That’s something we think about every day at Suman Custom Carpentry, where we design and hand-build custom kitchens from our shop in Hyannis, Cape Cod.
Over the past seven-plus years, we’ve built islands in all shapes and sizes, from compact prep stations in galley kitchens to large multi-functional centerpieces in open-concept homes. What we’ve learned is that the best island designs aren’t just about looks. They solve real problems: awkward layouts, missing storage, nowhere to sit, no place to tuck appliances out of sight.
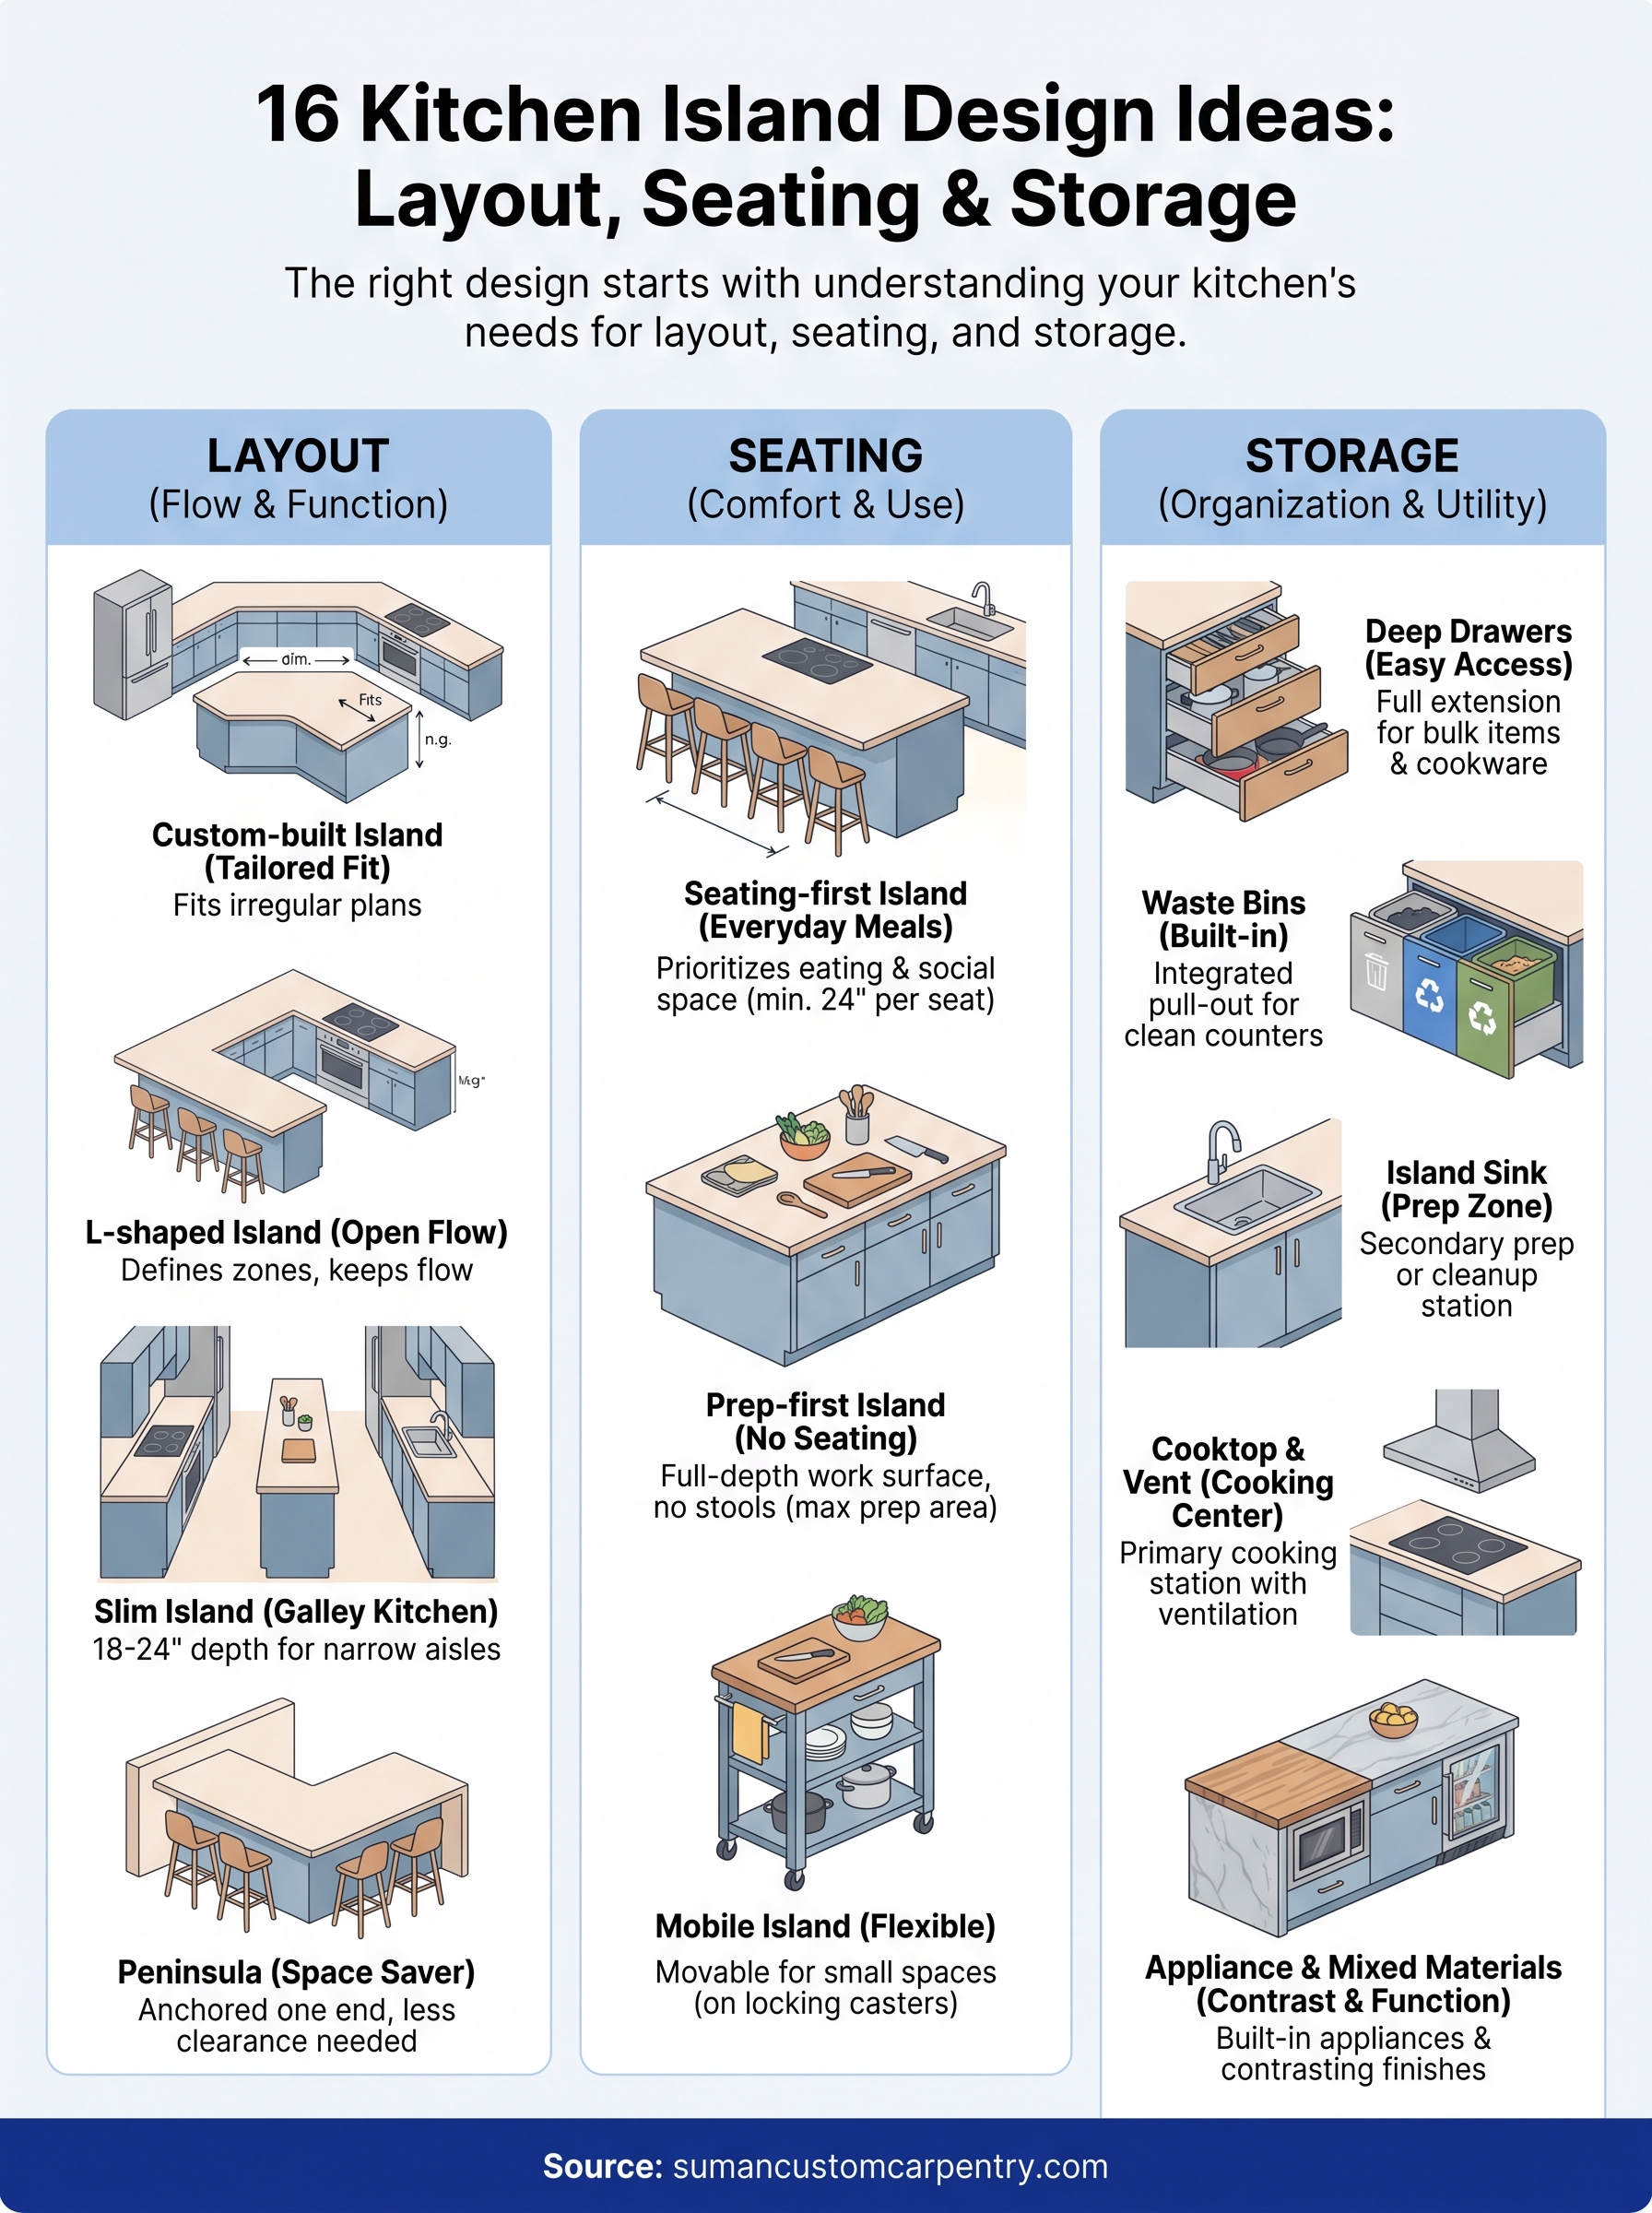
This article covers 16 kitchen island ideas organized around the three things that matter most: layout, seating, and storage. You’ll find practical options for different kitchen sizes and configurations, along with details on what makes each design work well in real life. If you’re planning a renovation or just starting to explore what’s possible, this is a solid starting point. And if something catches your eye, we’re always happy to talk through how it could work in your specific kitchen.
1. Custom-built island designed for your kitchen
A custom-built island is the most direct way to get exactly what your kitchen needs. Unlike stock or semi-custom options, a custom island is designed around your specific floor plan, your workflow, and your storage priorities. At Suman Custom Carpentry, every island we build starts with a conversation about how you actually use your kitchen, not just how you want it to look.
What it is
A custom-built kitchen island is a freestanding or anchored cabinet structure designed and built specifically for your space. The dimensions, cabinet configuration, countertop material, and finish are all chosen to match your kitchen’s layout and your personal style. Nothing is pulled from a catalog and forced to fit.
Every detail, from the drawer box depth to the toe kick height, is worked out with your actual kitchen in mind before a single board gets cut.
Best for
This option works best for homeowners who want a long-term solution built to fit their kitchen precisely. It is especially useful when your kitchen has an irregular floor plan, unusual ceiling heights, or specific storage needs that standard islands simply cannot meet. If you cook often, entertain regularly, or want your kitchen to feel like a single cohesive design rather than a collection of separate pieces, a custom build is the right direction.
A custom island built to your kitchen’s exact measurements will outperform any stock option in both function and fit.
Key dimensions and clearances
Most kitchen islands need at least 42 inches of clearance on all working sides, though 48 inches is better if multiple people cook together. Use these numbers as a baseline when planning your layout:
- Counter height (standard): 36 inches
- Bar height (for taller stools): 42 inches
- Clearance per side: 42 to 48 inches minimum
- Knee space per seat: 24 inches minimum
Your island should be long enough to serve its primary purpose without crowding the room.
Design notes and common mistakes
The most common mistake is sizing the island too large for the room. A bigger island is not always better. Prioritize clearance and workflow over raw square footage. Another mistake is skipping storage planning until after the build. If you figure out your drawer and shelf layout after the cabinet boxes are built, you lose usable space and end up with awkward voids.
Work with your builder to map out every drawer, shelf, and opening before construction starts. That planning step is where good kitchen island design ideas either come together or fall apart.
2. L-shaped kitchen island for open flow
An L-shaped island works with your kitchen’s existing layout rather than fighting it. If you have an open-concept space where the kitchen connects to a dining or living area, this configuration gives you more counter surface while keeping clear sight lines and natural traffic paths through the room.
What it is
An L-shaped island has two connected counter sections that form an L configuration, typically with one longer run and one shorter perpendicular section. The longer side usually handles prep or seating, while the shorter arm can serve as a transition zone, a bar counter, or additional storage facing the living area.
Best for
This layout works well in open-concept kitchens where one side of the island faces a great room or dining space. It gives you a natural divider between zones without closing them off. If you want seating on one arm and a clean prep surface on the other, the L-shape makes that split intuitive and functional.
An L-shaped island lets you define two separate functions within a single structure, without needing two separate pieces of furniture.
Key dimensions and clearances
Keep at least 42 inches of clearance on all working sides. The longer arm typically runs 60 to 84 inches, and the shorter arm ranges from 36 to 48 inches depending on your available floor space.
Design notes and common mistakes
The main mistake with L-shaped kitchen island design ideas is underestimating how much floor space the footprint actually takes. Measure your clearances before finalizing the design, and make sure the corner junction stays fully accessible for storage or seating, not just dead space.
3. U-shaped kitchen island that stays out of the way
A U-shaped island wraps around three sides, creating an enclosed work zone that keeps the cook centered and everything within reach. It is less common than a standard rectangular island, but in the right kitchen, it solves problems that a straight island simply cannot.
What it is
This configuration uses three connected sections to form a U, with the open end facing the main kitchen walkway. The enclosed area gives you a dedicated workspace with counter on three sides, which is useful for baking, prep, or any task that benefits from surrounding surface area. Storage runs along all three legs, so you get significantly more cabinet space than a single-run island of similar square footage.
Best for
A U-shaped island works best in larger open kitchens where you have enough floor space to keep the footprint from blocking traffic. It is a strong fit if one person does most of the cooking and wants a self-contained prep area that keeps tools, ingredients, and cutting surfaces all within arm’s reach.
If you cook seriously and want your workspace to feel organized and contained, a U-shaped island gives you that without requiring a full separate kitchen wing.
Key dimensions and clearances
Each leg of the U typically runs 36 to 48 inches long, and the open end should face a path with at least 48 inches of clearance. Interior working space inside the U needs a minimum of 42 inches to move comfortably.
Design notes and common mistakes
The most common mistake is building the U too tight. If the interior space feels cramped, the island works against you instead of for you. Plan your kitchen island design ideas around movement first, then counter space. Also avoid closing off the open end with seating, as it turns the workspace into a traffic bottleneck.
4. Slim island for a wider galley kitchen
A galley kitchen already has a clear linear workflow, with two parallel runs of cabinets and counter facing each other. Adding an island sounds counterintuitive, but a slim island placed on center can actually improve your workflow without cutting off movement between the two sides.
What it is
Slim islands run 18 to 24 inches deep, compared to the standard 24 to 30 inches of a full-width island. That reduced depth keeps the structure from dominating the corridor while still giving you usable counter space and cabinet storage on both sides.
Best for
This design works best in galley kitchens that run at least 10 feet wide, giving you enough room to maintain clear working aisles on both sides of the island. It also suits kitchens where extra prep surface is the main priority and seating is not part of the plan.
A slim island gives you more counter and storage without compressing the aisle space that makes a galley kitchen functional.
Key dimensions and clearances
Aim for 42 inches of clearance on each side of the island as a minimum. Common slim island dimensions include:
- Depth: 18 to 24 inches
- Length: 36 to 60 inches
- Height: 36 inches (standard counter height)
Design notes and common mistakes
One common mistake in kitchen island design ideas for galley layouts is pushing the island depth too far to gain more storage, then losing the aisle clearance that makes the layout actually work. Keep the depth controlled. Avoid adding seating unless your clearances genuinely support it, because bar stools in a tight corridor create a traffic hazard every time someone pulls one out.
5. Island for a one-wall kitchen layout
A one-wall kitchen packs all cabinets, appliances, and counter space along a single wall, leaving the rest of the room open. Adding an island directly opposite that wall gives you a functional work zone and storage that the layout would otherwise never have.
What it is
In this setup, a freestanding or anchored island sits parallel to the single cabinet wall, creating a defined corridor between the two. The island faces the main kitchen wall across an open aisle, giving you counter space on both sides of your kitchen without altering the original wall configuration.
Best for
This design works well in studio apartments, open lofts, or compact homes where the kitchen shares space with a living or dining area. It suits you if your primary needs are extra prep surface and storage, and if you want to define the kitchen zone without enclosing it with walls or additional cabinetry.
An island opposite a one-wall kitchen effectively doubles your usable counter space without requiring a full kitchen renovation.
Key dimensions and clearances
Keep at least 42 to 48 inches of clearance between the island and the main cabinet wall. Standard island dimensions for this layout include:
- Depth: 24 inches
- Length: 48 to 72 inches
- Height: 36 inches standard, 42 inches for bar seating
Design notes and common mistakes
The most frequent mistake with kitchen island design ideas in one-wall layouts is placing the island too close to the main wall. That narrow corridor forces you to work in tight quarters and makes it difficult to open appliance doors fully. Keep your clearances generous, and position seating on the side facing away from the kitchen wall to keep traffic moving cleanly.
6. Peninsula instead of an island
A peninsula gives you many of the same benefits as a freestanding island, but stays anchored to the wall or existing cabinetry on one end. If your kitchen doesn’t have enough floor space for a full island, a peninsula is often the smarter choice.
What it is
A peninsula is a counter extension that connects to your existing cabinets or wall on one side, leaving three sides accessible. It functions like an island in terms of seating and prep space, but because one end is anchored, it requires less clearance overall and creates a natural boundary between the kitchen and an adjacent room or dining area.
Best for
This layout works well if you want seating and extra counter space but your kitchen can’t support 42-inch clearance on all four sides of a freestanding island. It’s also a strong fit when you want a visual separation between the kitchen and a connected living or dining space without adding a wall.
A peninsula gives you the function of a kitchen island with a smaller footprint, which makes it one of the more practical kitchen island design ideas for mid-size kitchens.
Key dimensions and clearances
Aim for at least 42 inches of clearance on all open sides. Common peninsula dimensions include:
- Depth: 24 to 30 inches
- Length: 36 to 72 inches
- Overhang for seating: 12 to 15 inches
Design notes and common mistakes
The main mistake is treating a peninsula like an afterthought and tacking it onto existing cabinetry without planning the storage layout inside. Map out your drawers and shelves before construction starts, and make sure the open sides face the direction that best supports your daily workflow.
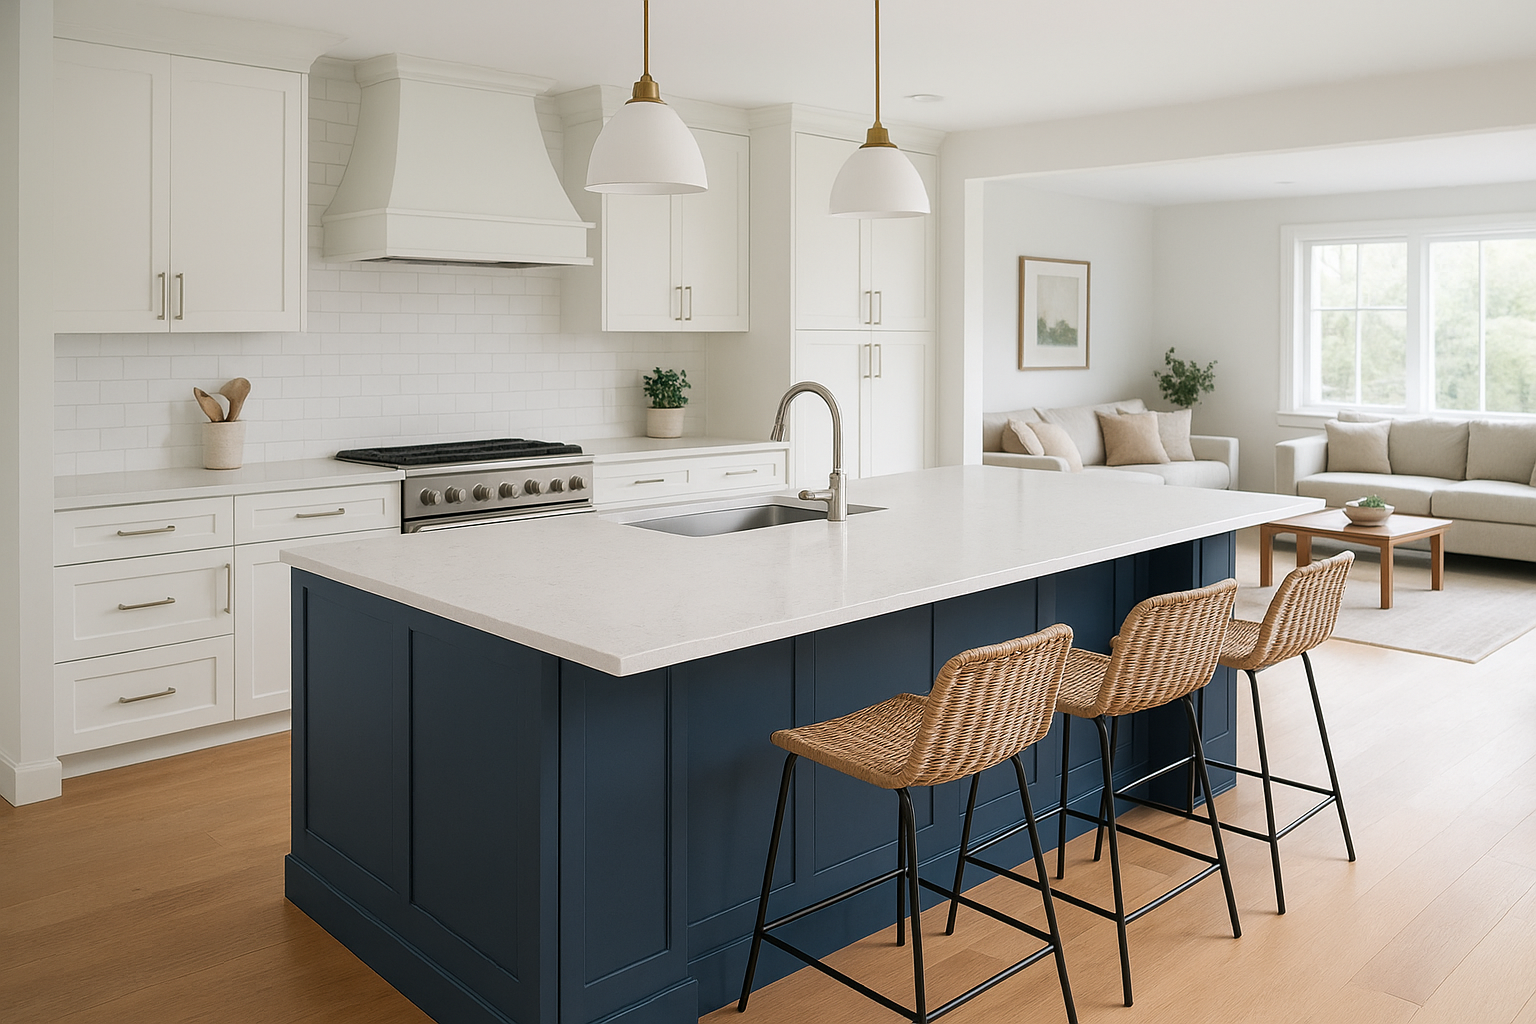
7. Seating-first island for everyday meals
Some kitchens need a place where people can actually sit down, eat breakfast, help with homework, or keep the cook company without getting in the way. A seating-first island puts that function at the center of the design rather than treating it as an afterthought bolted onto the end.

What it is
A seating-first island is designed around the number of seats you need, with the counter overhang, height, and length all sized to support daily use at the island. Storage and prep space are still part the design, but the seating configuration drives the overall dimensions rather than the other way around.
Best for
This design works best for households that eat casually at the island rather than at a formal dining table. It suits families with kids, homes where the kitchen doubles as a social hub, and anyone who wants a flexible surface that handles both quick meals and casual entertaining.
If your family spends more time at the island than at the dining table, build the island around that reality from the start.
Key dimensions and clearances
Plan 24 inches of counter width per seat as a minimum. Use these numbers to guide your layout:
- Counter height with standard stools: 36 inches, with a 9- to 12-inch overhang
- Bar height with taller stools: 42 inches, with a 12- to 15-inch overhang
- Clearance behind seated guests: 36 to 44 inches
Design notes and common mistakes
The most common mistake in kitchen island design ideas built for seating is choosing the wrong stool height for the counter. Measure your finished counter height first, then select stools. Also avoid placing seating on a high-traffic side of the island, since pulled-out stools block movement every time someone sits down or stands up.
8. Prep-first island with no seating
Not every island needs bar stools. If you cook frequently and want a workspace that genuinely supports serious prep, removing seating from the equation opens up the entire island surface for cutting, staging, and working without interruption.
What it is
A prep-first island is a full-depth counter structure designed purely to support cooking tasks. There is no overhang for seating, no consideration for stool clearance, and no counter height compromise. The entire surface and all storage underneath is built around what the cook actually needs to prepare meals efficiently.
Best for
This approach works well for avid home cooks and anyone who uses the kitchen as a serious workspace rather than a social gathering spot. It also suits households with a separate dining area that do not need the island to double as a casual eating surface.
If cooking is your priority, a prep-first island gives you more usable workspace than any seating-focused design of the same footprint.
Key dimensions and clearances
Without seating, you can use the full counter depth for prep and still maintain clean clearances around the island. Standard dimensions include:
- Depth: 24 to 30 inches
- Height: 36 inches standard, or 32 inches if you prefer a lower chopping surface
- Clearance per side: 42 to 48 inches
Design notes and common mistakes
One of the most practical kitchen island design ideas in the prep-first category is using the deeper counter to house specialty storage like a knife drawer, spice pullout, or built-in cutting board. The common mistake is leaving the full depth as open counter space when dedicated inserts would make that surface far more functional every day.
9. Storage-packed island with deep drawers
Most kitchen islands waste storage potential by defaulting to a handful of doors hiding a single shelf. A storage-packed island built around deep drawers gives you far more accessible, organized space than that approach ever will.
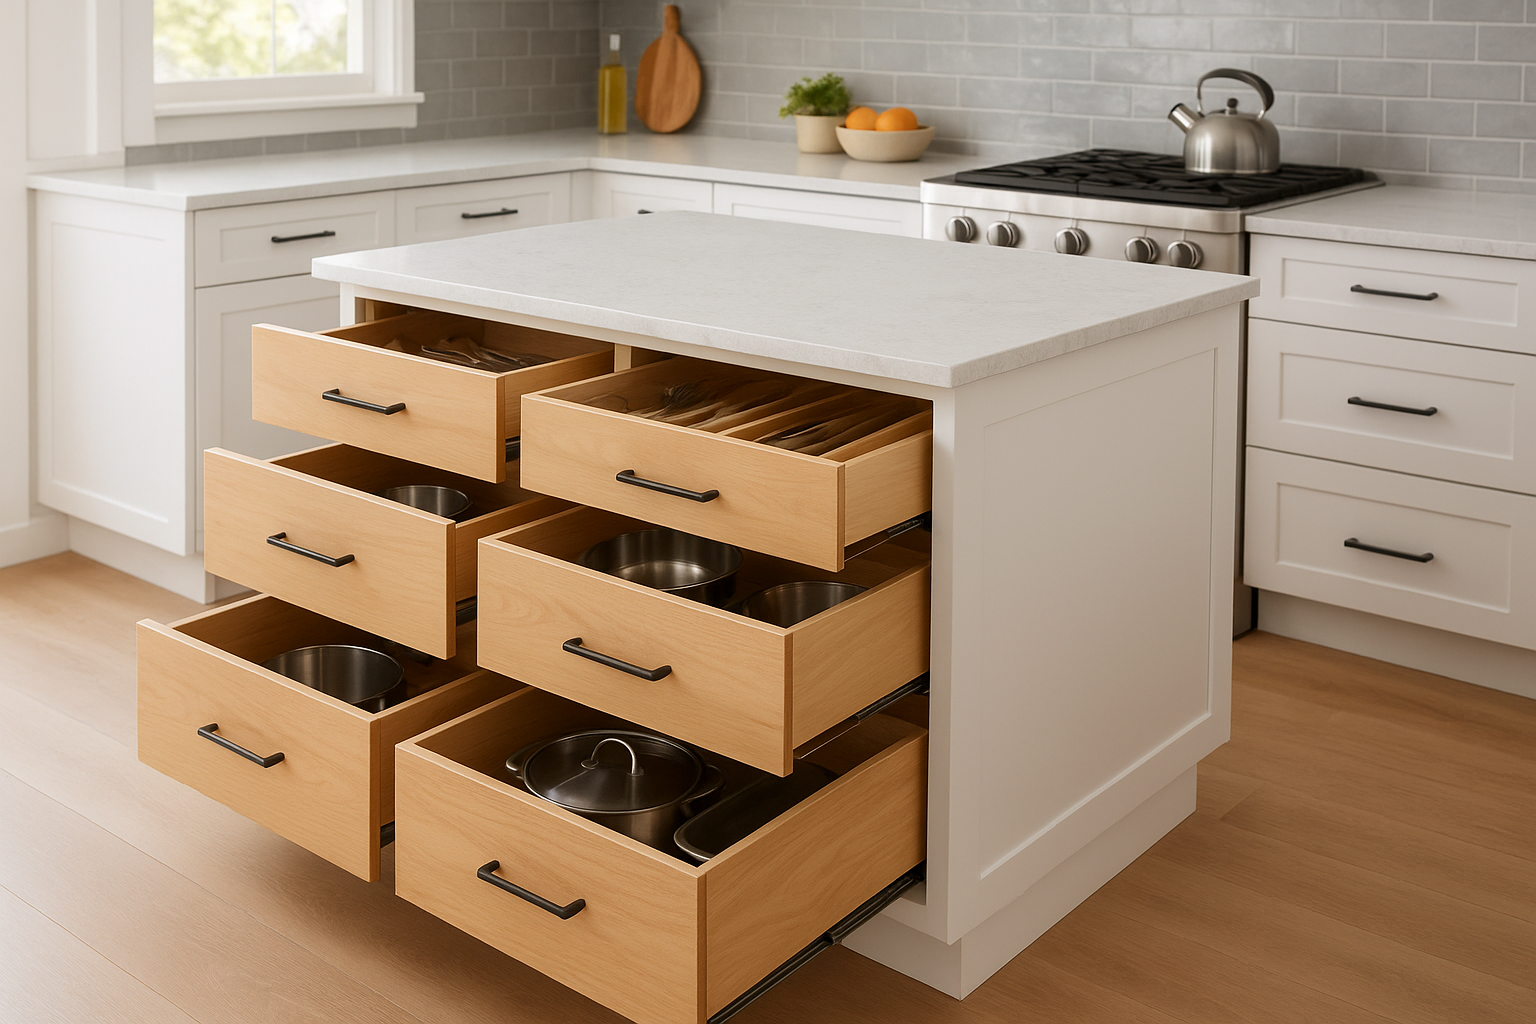
What it is
A storage-packed island replaces most or all of the cabinet doors with deep drawer stacks, typically three drawers per column running 18 to 24 inches deep. That configuration lets you pull everything out and see it at once, rather than digging past the front of a shelf to reach what’s sitting in the back. You can configure different drawer heights within each column to match what you store, with shallower top drawers for utensils and deeper lower drawers for pots, pans, and bulk items.
Best for
This design suits households that do a lot of cooking and need their kitchen equipment organized and immediately accessible. It works especially well when you lack sufficient drawer space in your perimeter cabinets and want the island to carry the bulk of your kitchen storage load.
Deep drawer islands consistently outperform door-and-shelf configurations in day-to-day usability, especially for heavy cookware.
Key dimensions and clearances
Plan 42 to 48 inches of clearance on all sides, and size drawer depths to match what you’re storing. Standard drawer heights include 5 to 6 inches for utensils, 8 to 10 inches for mid-size items, and 12 to 16 inches for large pots.
Design notes and common mistakes
Among kitchen island design ideas focused on storage, the most common mistake is skipping the interior layout planning and building uniform drawer heights throughout. Map out exactly what goes in each drawer before the build, and add full-extension soft-close slides so heavy drawers open smoothly every time.
10. Island with trash, recycling, and compost built in
Waste management is one of the most overlooked parts of kitchen island design ideas, yet it affects how smoothly your kitchen runs every single day. Building your trash, recycling, and compost directly into the island puts waste exactly where you generate it, at the prep surface, rather than across the room under a sink cabinet.
What it is
A waste-integrated island includes pull-out or tilt-out bins housed inside a dedicated cabinet section, sized and positioned to handle your household’s actual waste volume. A typical setup fits a large trash bin, a mid-size recycling bin, and a small compost container side by side in a single pull-out drawer unit, all accessible with one hand while you’re working at the counter.
Best for
This design works best for households that do significant daily cooking and want to keep counters clear of freestanding cans and bins. It also suits kitchens where the sink is positioned at the perimeter and pulling waste across the room after every task adds friction to an otherwise efficient workflow.
Putting waste management inside the island keeps your counters clean and your workflow direct, which makes a meaningful difference during daily cooking.
Key dimensions and clearances
Standard pull-out waste units typically require a cabinet opening of 15 to 21 inches wide to accommodate a two- or three-bin configuration. Allow for full drawer extension clearance on the access side, at least 42 inches minimum, so bins pull out completely without obstruction.
Design notes and common mistakes
The most common mistake is sizing the waste cabinet too small and forcing undersized bins into the space. Measure your existing bins first or select your bins before finalizing the cabinet dimensions. Also, choose a pull-out unit with a soft-close mechanism, since waste drawers take more abuse than any other cabinet in the kitchen.
11. Island with a sink for prep and cleanup
Adding a sink to your island is one of the most functional upgrades you can make to a kitchen layout. It pulls washing and prepping away from the perimeter wall and puts them directly at your main work surface, which shortens the distance you travel during cooking and cleanup.
What it is
An island sink setup integrates a undermount or farmhouse-style basin directly into the island countertop, connected to your home’s plumbing through the subfloor. The sink can sit centered on one side or positioned toward one end of the island, depending on how you want to balance prep space and seating across the surface.
Best for
This design works best for kitchens where two or more people cook at the same time, since it creates a second functional station separate from the perimeter sink. It also suits you if your existing sink sits in front of a window and you want to preserve that view while still having a closer wash station during active cooking.
An island sink turns your counter into a self-contained prep zone, which makes it one of the most practical kitchen island design ideas for households that cook regularly.
Key dimensions and clearances
Plan 42 to 48 inches of clearance on all working sides. Plumbing rough-in should run through the floor before the island is set. Standard sink cabinet widths run 24 to 36 inches to accommodate the basin and trap.
Design notes and common mistakes
The most common mistake is skipping a dedicated garbage disposal or drain board when adding an island sink. Also, confirm your island has enough counter length on both sides of the sink so you’re not left with cramped prep space after the basin is installed.
12. Island with a cooktop and smart ventilation
A cooktop island moves your primary cooking station to the center of the room, which opens up sightlines and keeps the cook connected to the rest of the space during meal preparation. It is a significant commitment that requires careful planning before a single cabinet gets built.
What it is
An island cooktop setup integrates a gas or induction cooktop directly into the island countertop, with a ventilation system positioned above to capture heat, smoke, and grease before they spread through the room. The ventilation is typically a ceiling-mounted range hood or downdraft system routed through the island structure and into your home’s exhaust system.
Best for
This design works well for open-concept kitchens where the cook wants to face the room while preparing meals rather than working toward a wall. It suits households that cook daily and want the island to function as the primary cooking station rather than a secondary prep area.
Moving the cooktop to the island makes the most sense when your kitchen layout already has a perimeter sink and enough ceiling clearance for proper ventilation.
Key dimensions and clearances
Plan 42 to 48 inches of clearance on all sides. Standard cooktop openings run 30 to 36 inches wide. Ceiling-mounted hoods typically require 24 to 30 inches of clearance above the cooking surface for effective capture.
Design notes and common mistakes
Among kitchen island design ideas that incorporate appliances, cooktop islands carry the highest installation complexity. The most common mistake is skipping a licensed HVAC professional when routing the exhaust, which leads to poor capture performance and lingering smoke throughout the kitchen.
13. Island with a microwave or beverage fridge
Building appliances like a microwave or beverage fridge into your island keeps frequently used items accessible without sacrificing counter space or taking up room in your perimeter cabinets. It also pulls these appliances out of high-traffic wall zones and positions them exactly where you need them during cooking and entertaining.
What it is
An appliance-integrated island includes a dedicated cabinet cutout sized for a drawer-style microwave, an under-counter beverage fridge, or both. Drawer microwaves sit flush with the cabinet face and open downward, keeping the appliance below counter level. Beverage fridges fit into standard 15- to 24-inch-wide openings and are particularly useful for households that entertain regularly or want drinks accessible outside the main refrigerator.
Best for
This setup works best for households that use a microwave constantly but want it off the counter and out of sight. A beverage fridge in the island suits kitchens where guests gather around the island and you want drinks reachable without opening the main fridge repeatedly during a gathering.
Positioning a beverage fridge on the seating side of the island lets guests serve themselves without stepping into your active workspace.
Key dimensions and clearances
Standard drawer microwaves require a 24-inch-wide opening at minimum. Beverage fridges typically fit in 15- to 24-inch openings. Keep at least 42 inches of clearance on all working sides.
Design notes and common mistakes
Among kitchen island design ideas that integrate appliances, the most common mistake is placing the microwave on the same side as seating, which puts hot food directly over seated guests. Position the microwave drawer on a working side of the island and reserve the seating overhang for the opposite face.
14. Island that mixes materials for contrast
Mixing materials on a single island is one of the most effective kitchen island design ideas for making the structure feel intentional rather than generic. When you combine two different surfaces or finishes, the island reads as a deliberate design decision rather than a standard box with a countertop dropped on top.
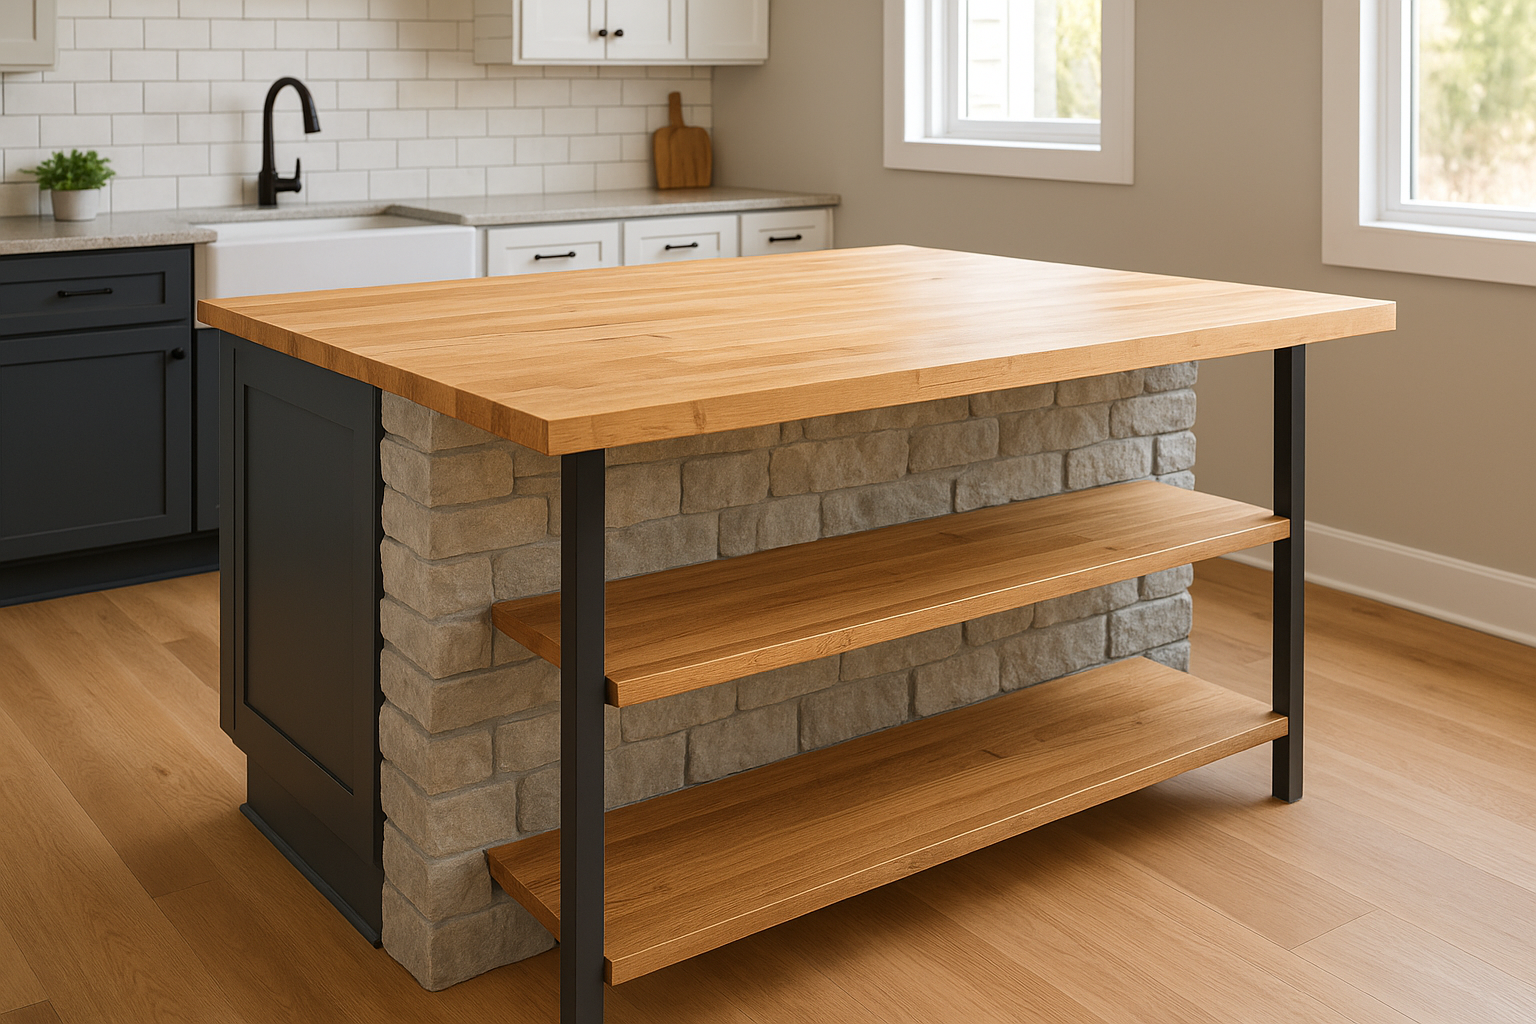
What it is
A mixed-material island uses two or more distinct surfaces across the same structure, such as a butcher block countertop paired with a stone-wrapped base, or a painted lower cabinet with a raw wood or metal shelf running along one face. The contrast draws the eye and gives the island visual weight that a single-material design rarely achieves.
Best for
This approach works well for homeowners who want their island to serve as a focal point in the kitchen rather than blend into the background. It suits open-concept spaces where the island is visible from multiple angles and needs to hold its own visually against surrounding finishes.
Mixing materials works best when one element is neutral and the other carries the visual interest, rather than competing surfaces fighting for attention.
Key dimensions and clearances
Standard clearances still apply: 42 to 48 inches on all working sides. Material transitions typically occur at a natural break point, such as the counter edge, a shelf line, or the base cabinet face.
Design notes and common mistakes
The most common mistake is combining too many materials and creating visual noise instead of contrast. Limit yourself to two primary materials, and make sure they share at least one common element, such as tone, texture, or undertone, so the combination feels cohesive rather than random.
15. Island lighting that actually supports cooking
Lighting is one of the most functional elements of any kitchen island, yet it gets treated as decoration far too often. The right fixture placement directly affects how well you see what you’re cutting, measuring, and cooking, and getting it wrong means working in shadow even when your kitchen feels bright overall.
What it is
Island lighting typically means pendant lights hung above the counter surface, spaced evenly across the island’s length. Pendants provide focused, downward light directly over your workspace without requiring ceiling-mounted fixtures to carry all the load.
For larger islands, a linear suspension fixture covers the full length more evenly than individual pendants and keeps the look clean when the island runs longer than six feet.
Best for
This applies to any kitchen island design ideas where the counter handles regular cooking and prep. It is especially useful in kitchens with high ceilings where recessed lights sit too far above the island to cast focused task light where you need it most.
Pendant lights work best when they hang 30 to 36 inches above the counter surface, low enough to light your work without sitting at eye level.
Key dimensions and clearances
Use these numbers as a baseline:
- Pendant height above counter: 30 to 36 inches
- Spacing between pendants: 24 to 30 inches apart
- Pendant diameter: no more than one-third of the island’s total width
Design notes and common mistakes
The most common mistake is choosing oversized pendants that crowd the space visually without improving light quality. Select fixtures with a diffused or downward-directed shade to push light onto the counter rather than scattering it sideways into the room.
16. Mobile island ideas for small kitchens
Not every kitchen has the floor space for a fixed structure. A mobile island on locking casters gives you counter space and storage on demand, then rolls out of the way when you need the floor back. It is one of the most flexible kitchen island design ideas available for compact spaces.
What it is
A mobile island is a freestanding cabinet unit mounted on heavy-duty locking casters, typically with a butcher block or hardwood top that doubles as a prep surface. You roll it into position when you cook and lock the wheels, then move it aside when you need the room for another purpose.
Best for
This option works best for small kitchens under 150 square feet where a fixed island would permanently block traffic flow. It also suits renters who cannot modify their space or homeowners who want flexible kitchen configurations depending on the occasion.
A mobile island works hardest in kitchens where the available floor space changes depending on what you’re doing.
Key dimensions and clearances
Keep your mobile island compact enough to store cleanly against a wall when not in use. Common dimensions include:
- Depth: 18 to 24 inches
- Length: 24 to 48 inches
- Caster height: 3 to 4 inches added to standard cabinet height
Design notes and common mistakes
The most common mistake is buying a mobile island that is too large to store out of the way, which defeats the entire purpose of the movable design. Choose a unit with solid locking casters rated for the cabinet’s loaded weight, since a mobile island that shifts while you’re cutting is both frustrating and unsafe.
Your next step
Every kitchen is different, and the right island for your space depends on your layout, how you cook, and what problems you actually need to solve. These kitchen island design ideas give you a solid foundation, but a list can only take you so far. The next step is applying those ideas to your specific kitchen, with real measurements and a build plan that fits both your budget and your goals.
At Suman Custom Carpentry, we design and hand-build every island in our Hyannis shop, from the first sketch to the final installation. We have built islands for all kinds of kitchens across Cape Cod, and we back every cabinet with a lifetime warranty on the box and doors. If you are ready to move from inspiration to an actual plan, talk to us about your custom kitchen island and we will walk you through what makes sense for your space.