
A bathroom remodel can completely change how your home feels, and how it functions every single day. But before you start pulling up tile or shopping for fixtures, you need a clear vision. That’s where solid bathroom remodel ideas come in. Whether you’re working with a tight powder room or a spacious primary bath, the right layout, vanity, and material choices make the difference between a renovation you tolerate and one you genuinely love using for decades.
At Suman Custom Carpentry, we build custom vanities, cabinetry, and millwork for homeowners across Cape Cod, all hand-crafted in our Hyannis shop. We’ve seen firsthand how a well-planned bathroom remodel adds both daily comfort and long-term value to a home. We’ve also seen what happens when people rush into decisions without thinking through layout, storage, or material durability in a coastal environment like ours.
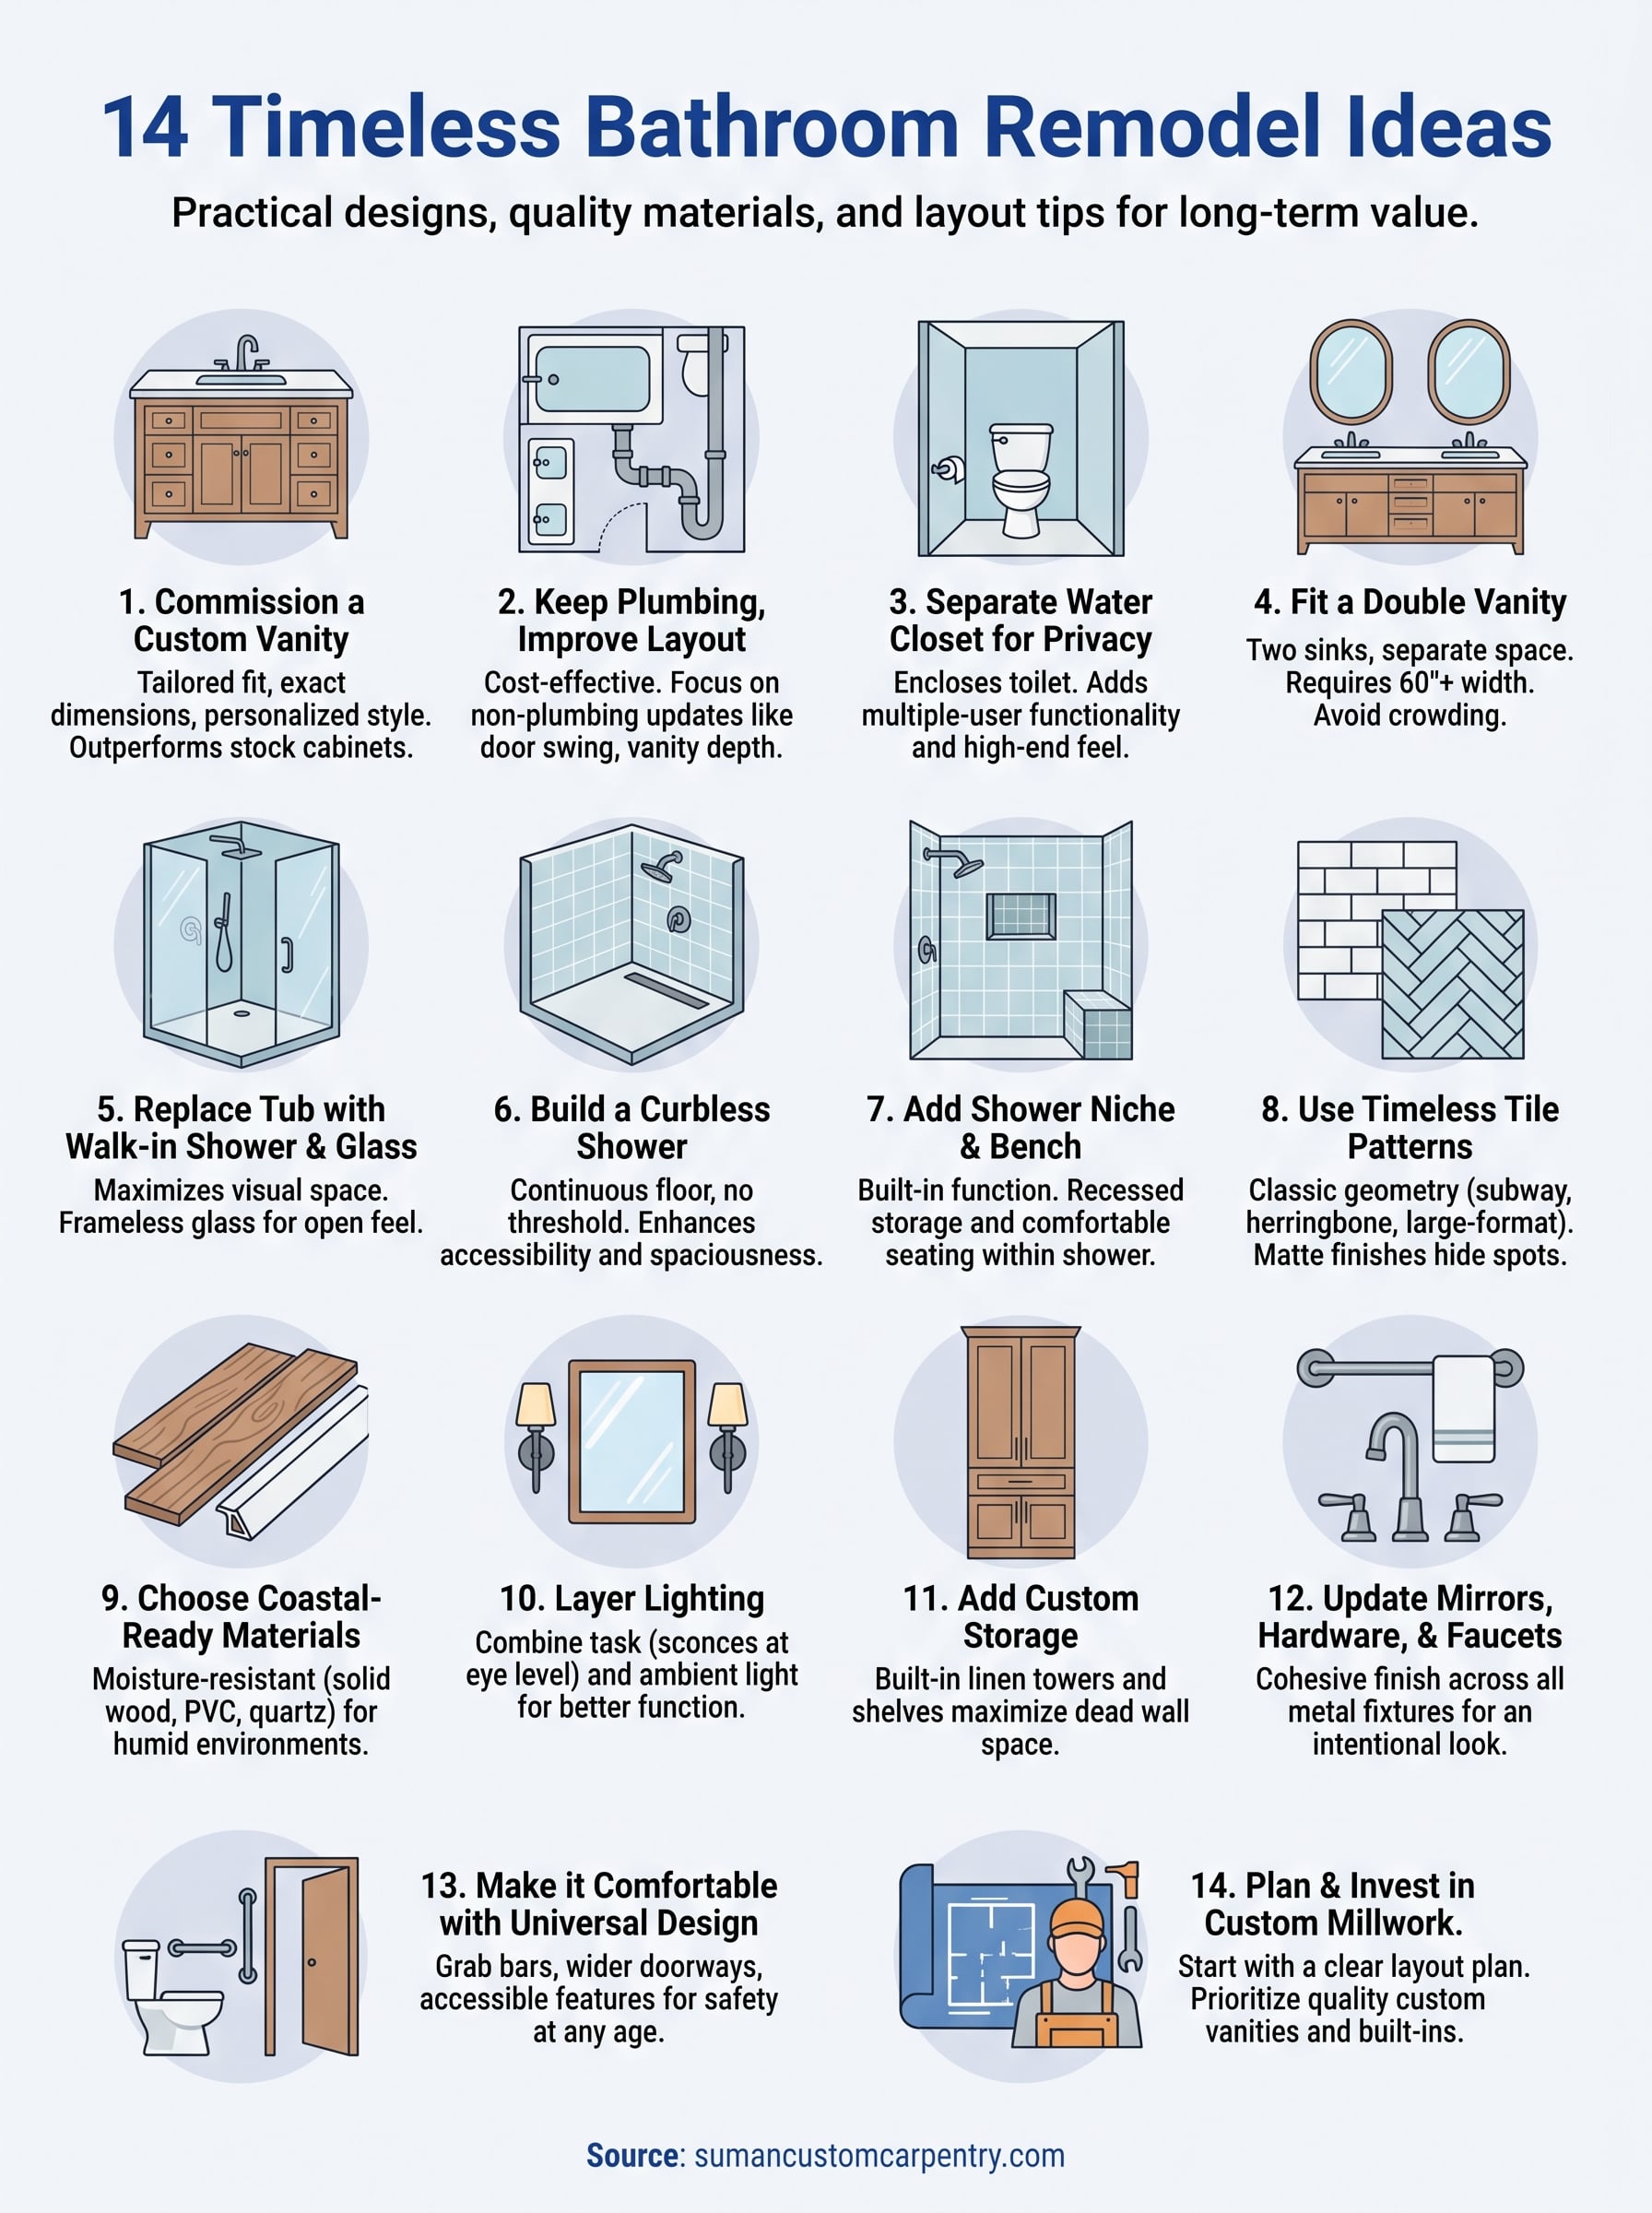
This guide covers 14 timeless bathroom remodel ideas, from layout configurations and vanity styles to storage solutions and finish selections. Each one is practical, proven, and designed to hold up over time. You’ll find inspiration whether you’re planning a full gut renovation or a focused upgrade to one key area. We wrote this to help you walk into your remodel with confidence, a clear plan, and the kind of ideas that won’t feel dated five years from now.
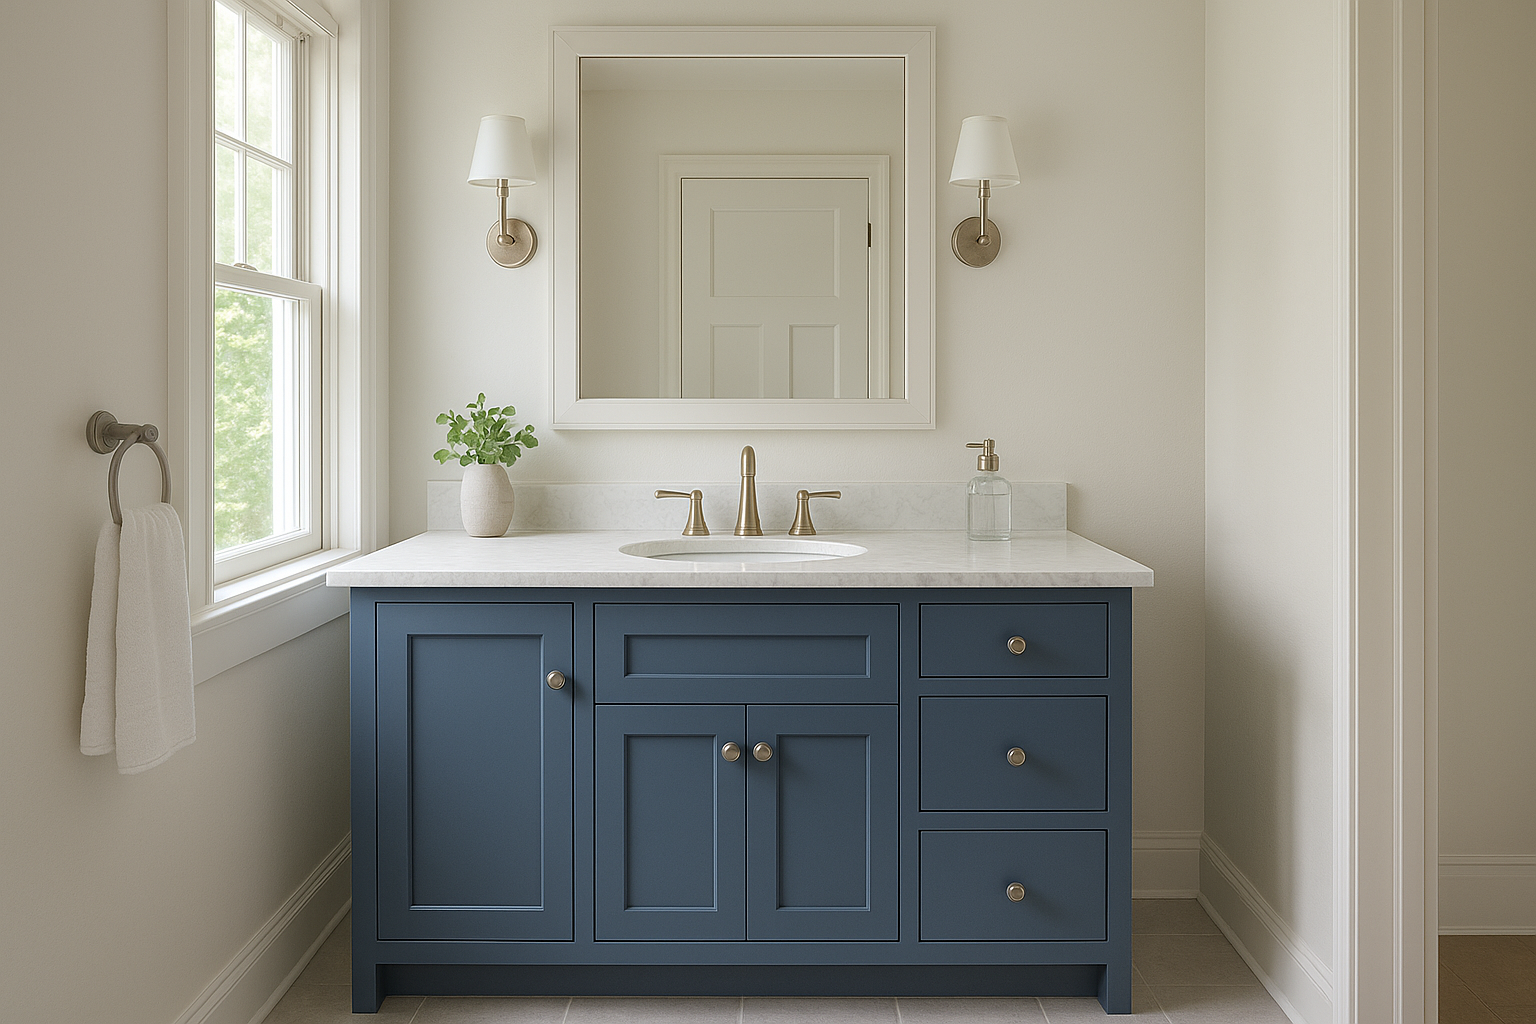
1. Commission a custom vanity built for your space
A custom vanity is the single upgrade that transforms a bathroom from generic to genuinely personal. Unlike stock cabinets from a big-box store, a custom-built vanity fits your exact wall width, accommodates your plumbing, and reflects your style from top to bottom. If you’re collecting bathroom remodel ideas and have budget for one major custom element, this is where to put it.
Why this idea stays timeless
Custom vanities have anchored well-designed bathrooms for decades because they solve a problem pre-made furniture never can: your bathroom is not a standard size. Every wall runs slightly different, every plumbing configuration has its quirks, and every homeowner has unique storage needs. A hand-built vanity accounts for all of it.
A custom vanity built to your exact dimensions will always outperform a stock piece trimmed to fit.
Stock vanities force you to work around them. A custom piece works around you, which is why homeowners who commission one rarely go back to buying off the shelf.
Key dimensions and layout rules
Before a single board gets cut, you need accurate measurements. The standard vanity height sits between 32 and 36 inches, with 34 to 36 inches being the more comfortable range for most adults. Allow at least 21 inches of clearance between the front of the vanity and the opposite wall, though 30 inches feels far more comfortable in a primary bath.
For double sink configurations, plan for at least 60 inches of total vanity width to give each person adequate counter space. If your vanity sits between two walls, build it to within a half inch of the opening and fill the gap with a scribe strip for a clean, built-in appearance.
Materials and finish options
For Cape Cod homes, moisture resistance drives your material decisions. Solid wood species like maple and poplar hold up well when properly sealed and painted. Plywood boxes outperform MDF in humid coastal conditions because they resist swelling at the joints. Painted finishes in whites, soft greiges, and deep navy tones remain the most durable choices and repaint cleanly when you want a refresh years later.
Cost and timeline reality check
A custom-built vanity for a primary bathroom typically runs between $3,000 and $8,000 depending on size, wood species, and hardware. At Suman Custom Carpentry, design through installation generally takes six to ten weeks. Budget time for countertop fabrication separately, as stone tops often add two to three weeks to the overall schedule.
2. Keep the plumbing wall and improve the layout
Moving plumbing is one of the most expensive decisions in any bathroom renovation. Before you budget for pipe relocation, consider whether you can keep the plumbing wall intact and redirect your energy toward improving everything else. Most homeowners are surprised by how much better a bathroom feels after optimizing the layout around existing plumbing rather than fighting it.
Why this idea stays timeless
Contractors and designers consistently recommend keeping wet walls in place because relocation costs can add $1,500 to $5,000 to a project without delivering visible results. Smart bathroom remodel ideas work with the structure of your home, not against it.
The best layout is often the one that keeps pipes where they are and rethinks everything else.
Key dimensions and layout rules
Focus on the non-plumbing decisions: door swing, vanity depth, and traffic flow. A 36-inch clearance in front of the toilet meets code and feels comfortable. Switching from a standard door to a pocket door can instantly free up floor space without touching a single pipe.
Materials and finish options
Fresh tile, new lighting fixtures, and updated hardware deliver the biggest visual payoff when working within your existing layout. Choose large-format floor tiles (12×24 inches or bigger) to make the room read as larger without any structural changes.
Cost and timeline reality check
A layout refresh that keeps plumbing in place typically costs $8,000 to $20,000 for a full primary bath renovation. You also gain time: projects that avoid pipe relocation generally finish two to four weeks faster than those that don’t.
3. Add a separate water closet for privacy
A separate water closet encloses the toilet in its own small room within the larger bathroom, giving multiple people the ability to use the space at the same time. This layout upgrade appears in high-end primary bathrooms more than almost any other configuration, and for good reason.
Why this idea stays timeless
Shared bathrooms create friction in every household. A water closet solves that friction without requiring a second full bathroom. When you’re gathering bathroom remodel ideas, this one consistently ranks among the upgrades homeowners say they wish they had added sooner.
Separating the toilet from the rest of the bathroom is one of the most practical decisions you can make in a primary bath renovation.
Key dimensions and layout rules
The minimum interior size for a water closet is 30 inches wide by 60 inches deep, but 36 by 66 inches feels far more comfortable for daily use. Your door should swing outward or use a pocket door to preserve usable floor space inside the enclosure.
Materials and finish options
Keep the water closet simple and durable: a painted wall finish, a small wall-mounted light fixture, and a properly vented exhaust fan are all you need. Porcelain tile on the floor resists moisture and cleans easily, which matters in a high-use enclosed space.
Cost and timeline reality check
Adding a water closet to an existing bathroom typically costs between $2,500 and $6,000 depending on framing, door selection, and finishes. The work generally adds one to two weeks to your overall renovation timeline.
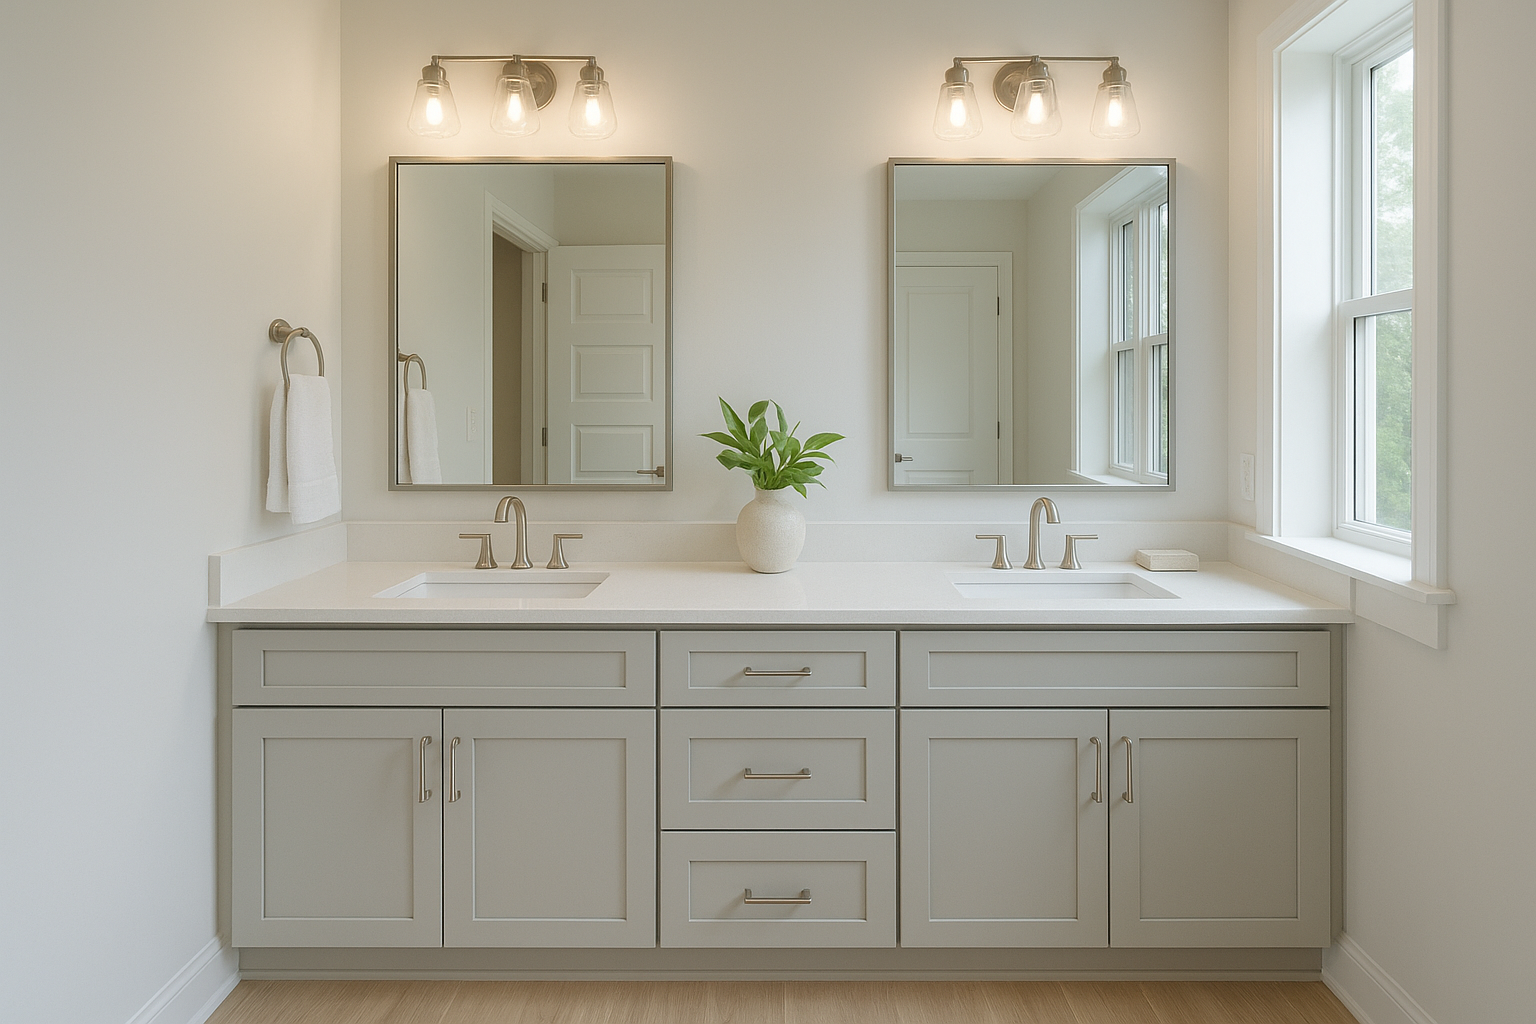
4. Fit a double vanity without crowding the room
A double vanity gives two people their own sink, mirror, and counter space, which removes one of the most common sources of friction in a shared bathroom. The challenge is fitting two sinks into a room without making it feel cramped. With the right proportions and layout plan, you can achieve this in more bathrooms than you’d expect.
Why this idea stays timeless
Buyers consistently respond well to double sink vanities during home appraisals and resale, so this upgrade pays back in ways beyond daily convenience. It serves as a functional solution for families and couples while adding visual presence and balance to a primary bathroom that single-sink layouts rarely match.
A double vanity works in any bathroom where you can maintain at least 30 inches of clear floor space in front of the cabinet.
Key dimensions and layout rules
The minimum width for a comfortable double vanity is 60 inches, which gives each person 30 inches of usable space. Aim for 72 inches when your wall allows it. If your bathroom runs shorter than 8 feet, a floating vanity raises the cabinet off the floor and helps the room read as larger than it is.
Materials and finish options
Plywood-box construction holds up far better than particleboard in a high-humidity bathroom. Painted finishes in muted tones like warm white or soft gray keep the visual weight balanced across a wide vanity without overwhelming the room. Avoid very dark stains on lower cabinets in small spaces, as they absorb light and make walls feel closer.
Cost and timeline reality check
A custom double vanity typically costs between $4,000 and $10,000, depending on width, wood species, and hardware. Plan for six to ten weeks from design through installation when working with a custom builder.
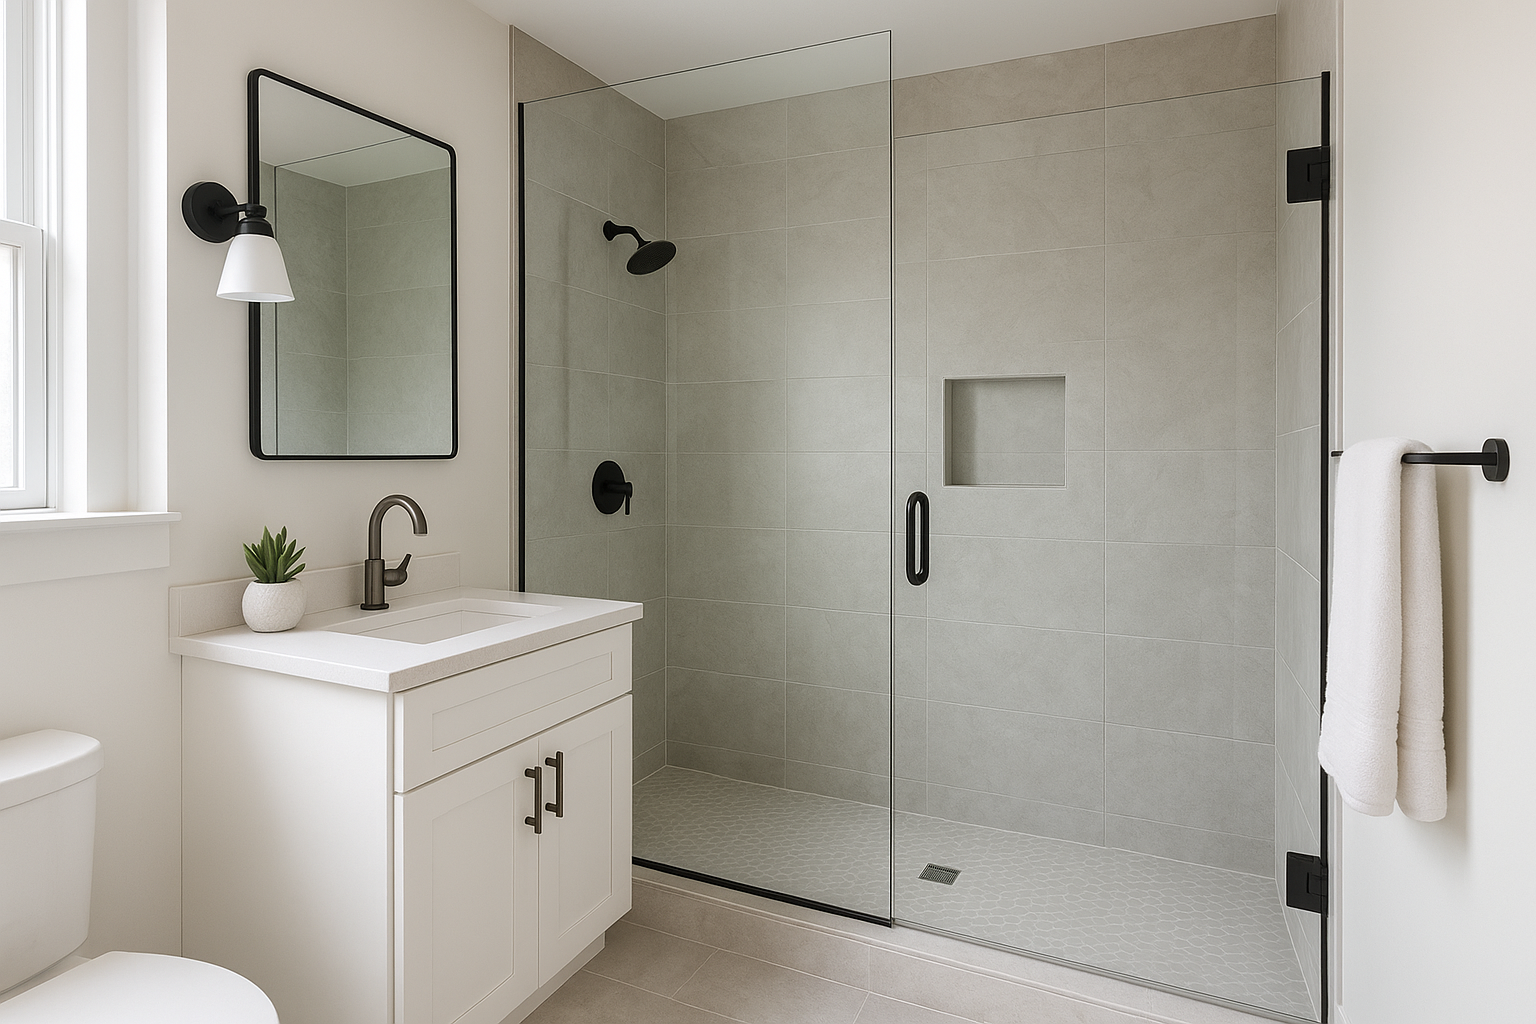
5. Replace a tub with a walk-in shower and glass
Swapping out a rarely-used tub for a walk-in shower with glass enclosure is one of the most popular bathroom remodel ideas among homeowners who want a primary bath that feels open and easy to use every day. If your freestanding tub sits untouched most of the year, converting that footprint into a proper shower makes far better use of your square footage.
Why this idea stays timeless
Walk-in showers with frameless glass panels have appeared in well-designed bathrooms for decades because they maximize visual space without physical expansion. Glass pulls the eye across the room rather than stopping it, which makes even a modest bathroom feel significantly larger. The design also ages well because it pairs with almost any tile or fixture style you choose.
A walk-in shower with a clear glass enclosure delivers more usable space than a tub in nearly every primary bathroom situation.
Key dimensions and layout rules
The minimum comfortable shower size is 36 by 36 inches, but 36 by 48 inches gives you room to move without feeling confined. A frameless glass door requires at least 24 inches of clear opening, so plan your enclosure width around that requirement before finalizing your layout.
Materials and finish options
Porcelain and ceramic tiles perform reliably in walk-in showers and come in hundreds of finishes. Pair them with brushed nickel or matte black hardware to anchor the look without dating it. Avoid highly polished chrome in coastal homes, as salt air accelerates water spotting on mirror-bright surfaces.
Cost and timeline reality check
A tub-to-shower conversion with frameless glass typically costs between $4,000 and $12,000 depending on tile selection and glass thickness. Most projects complete within two to three weeks once materials are on-site.
6. Build a curbless shower for a seamless floor
A curbless shower eliminates the raised threshold at the shower entry and lets the floor tile run continuously from the main bathroom into the shower zone. This creates a clean, uninterrupted visual line that makes any bathroom feel more spacious and intentional. If you’re researching bathroom remodel ideas that serve multiple generations of a household, this layout earns its place near the top of the list.
Why this idea stays timeless
Curbless showers appear in well-designed bathrooms across every decade because they solve both an aesthetic problem and a practical one. The absence of a curb removes a tripping hazard, simplifies daily cleaning, and opens the floor plane so the room reads larger than it actually is.
A continuous floor from bathroom to shower is one of the clearest signs of a well-thought-out renovation.
Key dimensions and layout rules
Your shower floor needs a minimum slope of one-quarter inch per foot toward the drain to move water away from the main floor. A linear drain along one wall handles this more efficiently than a center drain and requires less aggressive sloping across the tile surface. Plan for a shower area of at least 36 by 48 inches so the layout feels generous rather than tight.
Materials and finish options
Use small-format tiles (mosaic or 4×4 inch) on the shower floor to build in more grout lines, which improves grip on a wet, sloped surface. Porcelain or through-body tile resists moisture at the edges and holds color well in a coastal environment where humidity stays elevated year-round.
Cost and timeline reality check
A curbless shower installation typically costs between $5,000 and $14,000 depending on drain type, tile selection, and waterproofing system. Budget for three to four weeks of work once your contractor begins the floor prep.
7. Add a shower niche and bench that feels built-in
A recessed shower niche and built-in bench turn a plain shower enclosure into something that feels custom and considered. These two additions rank among the most practical bathroom remodel ideas you can execute inside an existing shower footprint because they add function without requiring more square footage.
Why this idea stays timeless
Recessed niches and benches have appeared in well-built showers for generations because they serve a genuine daily need: a place to store products and rest without cluttering the floor or hanging awkward wire racks. Builders and designers keep specifying them because they hold up stylistically regardless of which tile trend comes next.
A niche framed into the wall and tiled to match the surround looks like it was always meant to be there.
Key dimensions and layout rules
Your niche should sit between two studs, which gives you a standard rough opening of about 14 inches wide. The most functional height for a niche is between 48 and 60 inches from the floor, putting it within easy reach while showering. For a bench, plan for a depth of 15 to 18 inches and a height of 17 to 19 inches so it functions comfortably as a seat.
Materials and finish options
Tile the niche interior to match or complement your shower walls for a seamless look. A bench built from a mortar bed with a tile surface outperforms wood in a wet environment and requires no sealing beyond the grout lines.
Cost and timeline reality check
Adding a niche and tiled bench to a shower during a full renovation typically adds $800 to $2,500 to the tile labor and materials budget. Most contractors build both features into the standard shower installation timeline without extending the project.
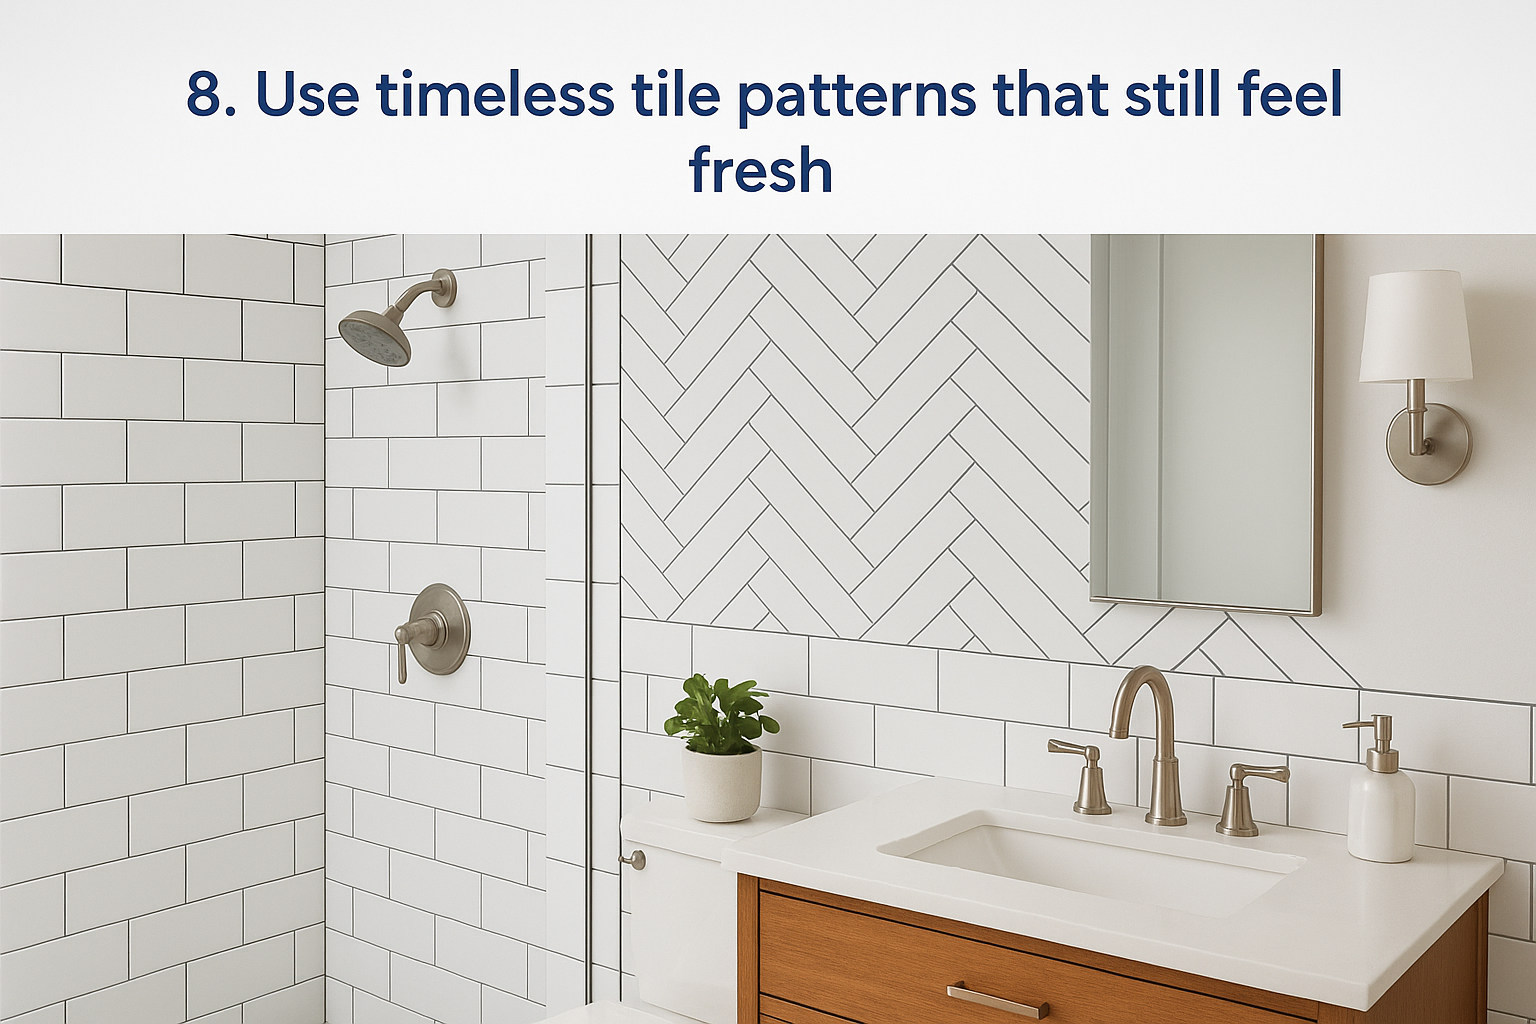
8. Use timeless tile patterns that still feel fresh
Tile selection shapes the entire mood of a bathroom, and the wrong pattern choice can make a renovation feel dated within a few years. The good news is that several tile patterns have proven staying power across decades of bathroom remodel ideas, and they still look sharp in newly completed projects today.
Why this idea stays timeless
Certain patterns endure because they rely on geometry rather than trend. Subway tile, herringbone, and large-format grid layouts work across traditional, transitional, and modern bathrooms because the shapes themselves are neutral. Choosing one of these patterns gives you a design foundation that holds up regardless of how fixture styles shift over time.
Timeless tile patterns succeed because they complement your other design choices rather than competing with them.
Key dimensions and layout rules
Standard 3×6 subway tile works on walls up to about 8 feet tall before the pattern starts to feel repetitive. For floors, 12×24 inch or larger tiles laid in a horizontal stacking pattern make a room read wider without requiring additional square footage. Keep grout joints between one-eighth and three-sixteenth of an inch for a clean, refined finish.
Materials and finish options
Porcelain tile outperforms ceramic in wet areas because it absorbs less moisture at the surface. Matte and satin finishes hide water spots and soap residue far better than high-gloss surfaces, which matters in a bathroom used daily. For coastal homes, a matte finish also reduces the visual effect of mineral deposits from hard water.
Cost and timeline reality check
Material costs for porcelain tile typically run between $3 and $18 per square foot, depending on format and finish. Labor for tile installation adds another $7 to $15 per square foot, and most tile work for a full bathroom wraps up within one to two weeks.
9. Choose coastal-ready materials that resist moisture
Cape Cod bathrooms face elevated humidity, salt air, and temperature swings that standard materials handle poorly. If you’re planning bathroom remodel ideas for a home near the water, material selection isn’t just an aesthetic decision, it’s a durability one.
Why this idea stays timeless
Coastal living puts unique demands on every surface in your bathroom. Materials that perform well in humid environments have stayed relevant across decades of renovation projects because they solve a real problem rather than following a trend. Homeowners who skip this step end up replacing warped cabinets and corroded hardware far sooner than they expected.
Choosing moisture-resistant materials from the start costs less than replacing failed ones two years into ownership.
Key dimensions and layout rules
Focus on ventilation and surface exposure when planning your layout. Your exhaust fan should move at least one CFM per square foot of bathroom area, and it should vent directly to the exterior rather than into an attic or wall cavity. Position the fan close to the shower or tub where steam concentrates most heavily.
Materials and finish options
Solid wood with a proper moisture-resistant finish, PVC trim, and porcelain tile outperform MDF, particleboard, and natural stone in coastal conditions. For hardware, choose marine-grade or powder-coated finishes over polished chrome, which pits and corrodes faster in salt-air environments. Quartz countertops resist moisture at the seams better than most natural stone options.
Cost and timeline reality check
Upgrading to coastal-ready materials adds roughly 10 to 20 percent to your material budget but extends the life of your renovation significantly. Most contractors can source these materials within your standard project lead time without pushing your schedule.
10. Layer lighting for makeup, shaving, and ambiance
Most bathrooms rely on a single overhead fixture that casts unflattering shadows and leaves the mirror zone too dim for precision tasks. A layered lighting plan fixes this by combining multiple light sources, each one doing a specific job, so your bathroom works well at 6 a.m. and winds down comfortably at night.
Why this idea stays timeless
Good lighting shows up in every list of durable bathroom remodel ideas because bad lighting undermines every other design decision you make. A beautiful custom vanity looks flat under a single recessed can. Layered lighting has stayed in well-designed bathrooms across decades because it solves a function problem, not just an aesthetic one.
Lighting that serves both tasks and ambiance will outperform any single-source setup you install.
Key dimensions and layout rules
Place sconce fixtures at eye level on either side of the mirror rather than above it. A height of 60 to 65 inches from the floor to the center of the sconce puts light directly where you need it for makeup and shaving. Add a dimmer switch to your overhead fixture so you can control the mood independently from the task lighting.
Materials and finish options
Choose wet-rated fixtures for any light installed within three feet of the shower or tub. Matte black and brushed nickel finishes both hold up well in humid environments and coordinate easily with most hardware styles without competing for attention.
Cost and timeline reality check
A full layered lighting upgrade typically costs between $800 and $2,500 depending on the number of fixtures and whether you need an electrician to add circuits. Most electrical work for a bathroom renovation wraps up within two to four days.
11. Add storage with custom linen towers and built-ins
Bathrooms lose function fast when storage runs short. A custom linen tower or a set of built-in shelving units solves that problem permanently by turning dead wall space into organized, accessible storage that works with your layout rather than competing with it. This ranks among the most overlooked bathroom remodel ideas that deliver an immediate improvement to daily use.
Why this idea stays timeless
Built-in storage has anchored well-designed bathrooms for decades because it solves a practical problem that freestanding furniture never fully addresses. When your storage is built into the wall or framed around existing architecture, it stays put, keeps the floor clear, and makes the room feel larger rather than cluttered.
Custom built-ins look like they belong in the room because they were designed specifically for it.
Key dimensions and layout rules
A standard linen tower runs between 12 and 18 inches deep and anywhere from 18 to 36 inches wide. Plan for a minimum of 12 inches of clear space between the tower and any door swing. If you’re building shelving into a recessed wall cavity, a depth of 4 to 6 inches handles folded linens and toiletry bottles without pulling floor space from the room.
Materials and finish options
Match your linen tower finish to your vanity for a cohesive, intentional look throughout the bathroom. Plywood-box construction with painted solid wood doors handles humidity far better than particleboard in a coastal environment where moisture stays elevated.
Cost and timeline reality check
A custom linen tower typically costs between $1,200 and $3,500. Built-in shelving units run similarly depending on size and complexity. Both fit within your standard renovation timeline without adding significant time to the schedule.
12. Update mirrors, hardware, and faucets the right way
Small hardware decisions carry more visual weight than most homeowners expect. Swapping out dated mirrors, mismatched faucets, and builder-grade hardware consistently ranks among the most cost-effective bathroom remodel ideas because these changes are visible every time you enter the room.
Why this idea stays timeless
Mirrors, faucets, and hardware function as the jewelry of a bathroom, meaning they pull the design together or undermine it. Updating these elements works across every era of bathroom design because the principle stays constant: cohesive finishes read as intentional while mismatched ones read as neglected.
Matching your hardware finish across faucets, towel bars, and cabinet pulls is one of the fastest ways to make a bathroom feel fully renovated.
Key dimensions and layout rules
Your mirror should be as wide as your vanity or slightly narrower, not wider. For a single vanity, a mirror between 28 and 36 inches wide sits proportionally. Position it so the bottom edge clears the faucet by at least 5 inches and the top edge doesn’t crowd the ceiling.
Materials and finish options
Choose one finish and apply it consistently across every metal surface in the room: faucets, towel bars, toilet paper holders, and cabinet pulls. Brushed nickel and matte black both perform well in high-humidity coastal bathrooms without showing water spots or corroding quickly.
Cost and timeline reality check
A full hardware and faucet refresh typically costs between $400 and $1,800 depending on fixture quality and quantity. Most homeowners complete this update in a single weekend without hiring a contractor.
13. Make it comfortable with universal design upgrades
Universal design incorporates features that make a bathroom safer and easier to use for everyone, regardless of age or ability. These upgrades show up consistently among the most practical bathroom remodel ideas because they serve you today and continue serving you as your household’s needs change over the years.
Why this idea stays timeless
Grab bars, wider doorways, and barrier-free entries belong in bathrooms across every design era because the human body’s needs do not change with trends. Designing for comfort and accessibility from the start costs far less than retrofitting a finished bathroom later.
A bathroom built with universal design principles works for a toddler, a guest with limited mobility, and an aging parent without requiring separate renovations for each.
Key dimensions and layout rules
Your doorway should measure at least 32 inches clear to accommodate a wheelchair or walker comfortably. A turning radius of 60 inches inside the bathroom gives someone using a wheelchair full maneuverability without difficulty. Place grab bars in the shower and near the toilet at heights between 33 and 36 inches from the finished floor.
Materials and finish options
Choose matte or textured floor tiles that maintain grip when wet rather than smooth polished surfaces. Lever-style faucet handles and door hardware outperform knobs for people with limited hand strength and add no meaningful cost over comparable knob styles in the same finish family.
Cost and timeline reality check
Universal design upgrades typically add $1,500 to $5,000 to a renovation budget depending on scope. Most changes integrate cleanly into your standard renovation timeline without extending the project by more than a few days.
Next steps
You now have 14 bathroom remodel ideas that hold up over time, whether you’re planning a full gut renovation or targeting one high-impact upgrade. The key is moving from inspiration to a concrete plan before you spend a dollar on materials or labor. Start with your layout, decide which fixtures stay in place, and work outward from there.
Your vanity, storage, and built-in millwork deserve the most attention because they determine how your bathroom functions every single day. Stock cabinets fill a space, but custom-built pieces fit it exactly and carry a lifetime warranty when you work with the right craftsman. If you’re ready to talk through what a custom vanity or built-in could look like in your bathroom, reach out to Suman Custom Carpentry. We design and hand-build every piece in our Hyannis shop and work with homeowners across Cape Cod from initial concept through final installation.