
Building a cabinet box seems simple until you’re standing in your garage with a sheet of plywood and no idea where to make the first cut. How to build a cabinet box correctly comes down to accurate dimensions, square corners, and joinery that won’t loosen up after a few years of slamming doors and loading shelves.
This guide walks you through the process from start to finish: choosing the right plywood thickness, cutting your panels to size, laying out dado joints, and assembling everything so the box stays square. You’ll get real measurements, a materials list, and the tool setup you need before you start cutting, whether you’re making one box or building custom kitchen cabinets for a full remodel.
We build cabinets by hand every day in our Hyannis shop, and the difference between a box that lasts decades and one that sags within a year almost always comes down to these early steps. If you decide the project is bigger than a weekend job, or you’d rather leave it to people who build custom kitchen cabinets for a living, that’s exactly what we do for Cape Cod homeowners.
Tools, materials, and dimensions you’ll need
Before you touch a saw, get your shop set up right. Cabinet box construction fails more often from missing tools or wrong material choices than from bad cuts, so take twenty minutes to gather everything below and confirm your dimensions before the plywood gets loaded onto the table saw.
Tools you actually need
You don’t need a full cabinet shop to build a solid box, but a few specific tools make the difference between square corners and a frustrating afternoon. Here’s what to have on hand:
- Table saw or track saw for straight, repeatable rip cuts
- Circular saw with a straight edge guide if you don’t own a table saw
- Dado blade set (or a router with a straight bit) for grooves
- Pocket hole jig (Kreg-style) for fast, strong joinery without dados
- Drill/driver and impact driver for screws
- Framing square and tape measure for layout and squaring checks
- Clamps (at least four 24-inch bar clamps)
- Wood glue rated for interior use
A square box starts with a square cut, not a square clamp-up.
Materials for a standard cabinet box
Plywood grade matters more than most first-time builders realize. Cabinet-grade plywood with a hardwood veneer face (birch or maple) gives you a stable, screw-holding panel that won’t chip out when you cut dados. Skip construction-grade plywood; the voids inside the layers will show up right where you need strength most.
| Material | Recommended spec | Use |
|---|---|---|
| Plywood | 3/4-inch birch or maple, cabinet-grade | Sides, top, bottom, shelves |
| Plywood (back panel) | 1/4-inch or 1/2-inch | Back panel |
| Hardwood | 3/4-inch solid poplar or maple | Face frame |
| Edge banding | Iron-on veneer, matched species | Exposed plywood edges |
| Fasteners | 1 1/4-inch pocket screws, 2-inch wood screws | Assembly |
| Adhesive | Titebond II or III wood glue | All glued joints |
| Hardware | Cabinet hinges, drawer slides (as needed) | Doors and drawers |
Order about 10 percent more plywood than your cut list calls for. Sheet goods aren’t perfectly flat, and you’ll want spare material for test cuts on your dado setup before you commit to the good panels.
Standard cabinet box dimensions
Once your materials are staged, lock in your dimensions before cutting a single piece. Base cabinets, wall cabinets, and vanities each follow different industry-standard sizes, and matching these lets your custom box accept off-the-shelf doors, hinges, and countertops down the road.
| Cabinet type | Height | Depth | Standard width range |
|---|---|---|---|
| Base cabinet | 34 1/2 inches | 24 inches | 12 to 36 inches |
| Wall cabinet | 30 to 42 inches | 12 inches | 12 to 36 inches |
| Vanity cabinet | 31 1/2 to 34 1/2 inches | 21 inches | 24 to 60 inches |
These numbers assume a 3/4-inch countertop or a separate face frame adding to the finished height, so double-check against your specific counter or vanity top before finalizing. If you’re building a run of cabinets rather than a single box, write out every width on paper first. A single miscalculation on box number three throws off your whole layout once you start installing doors and fillers.
Step 1. Measure and cut your plywood panels
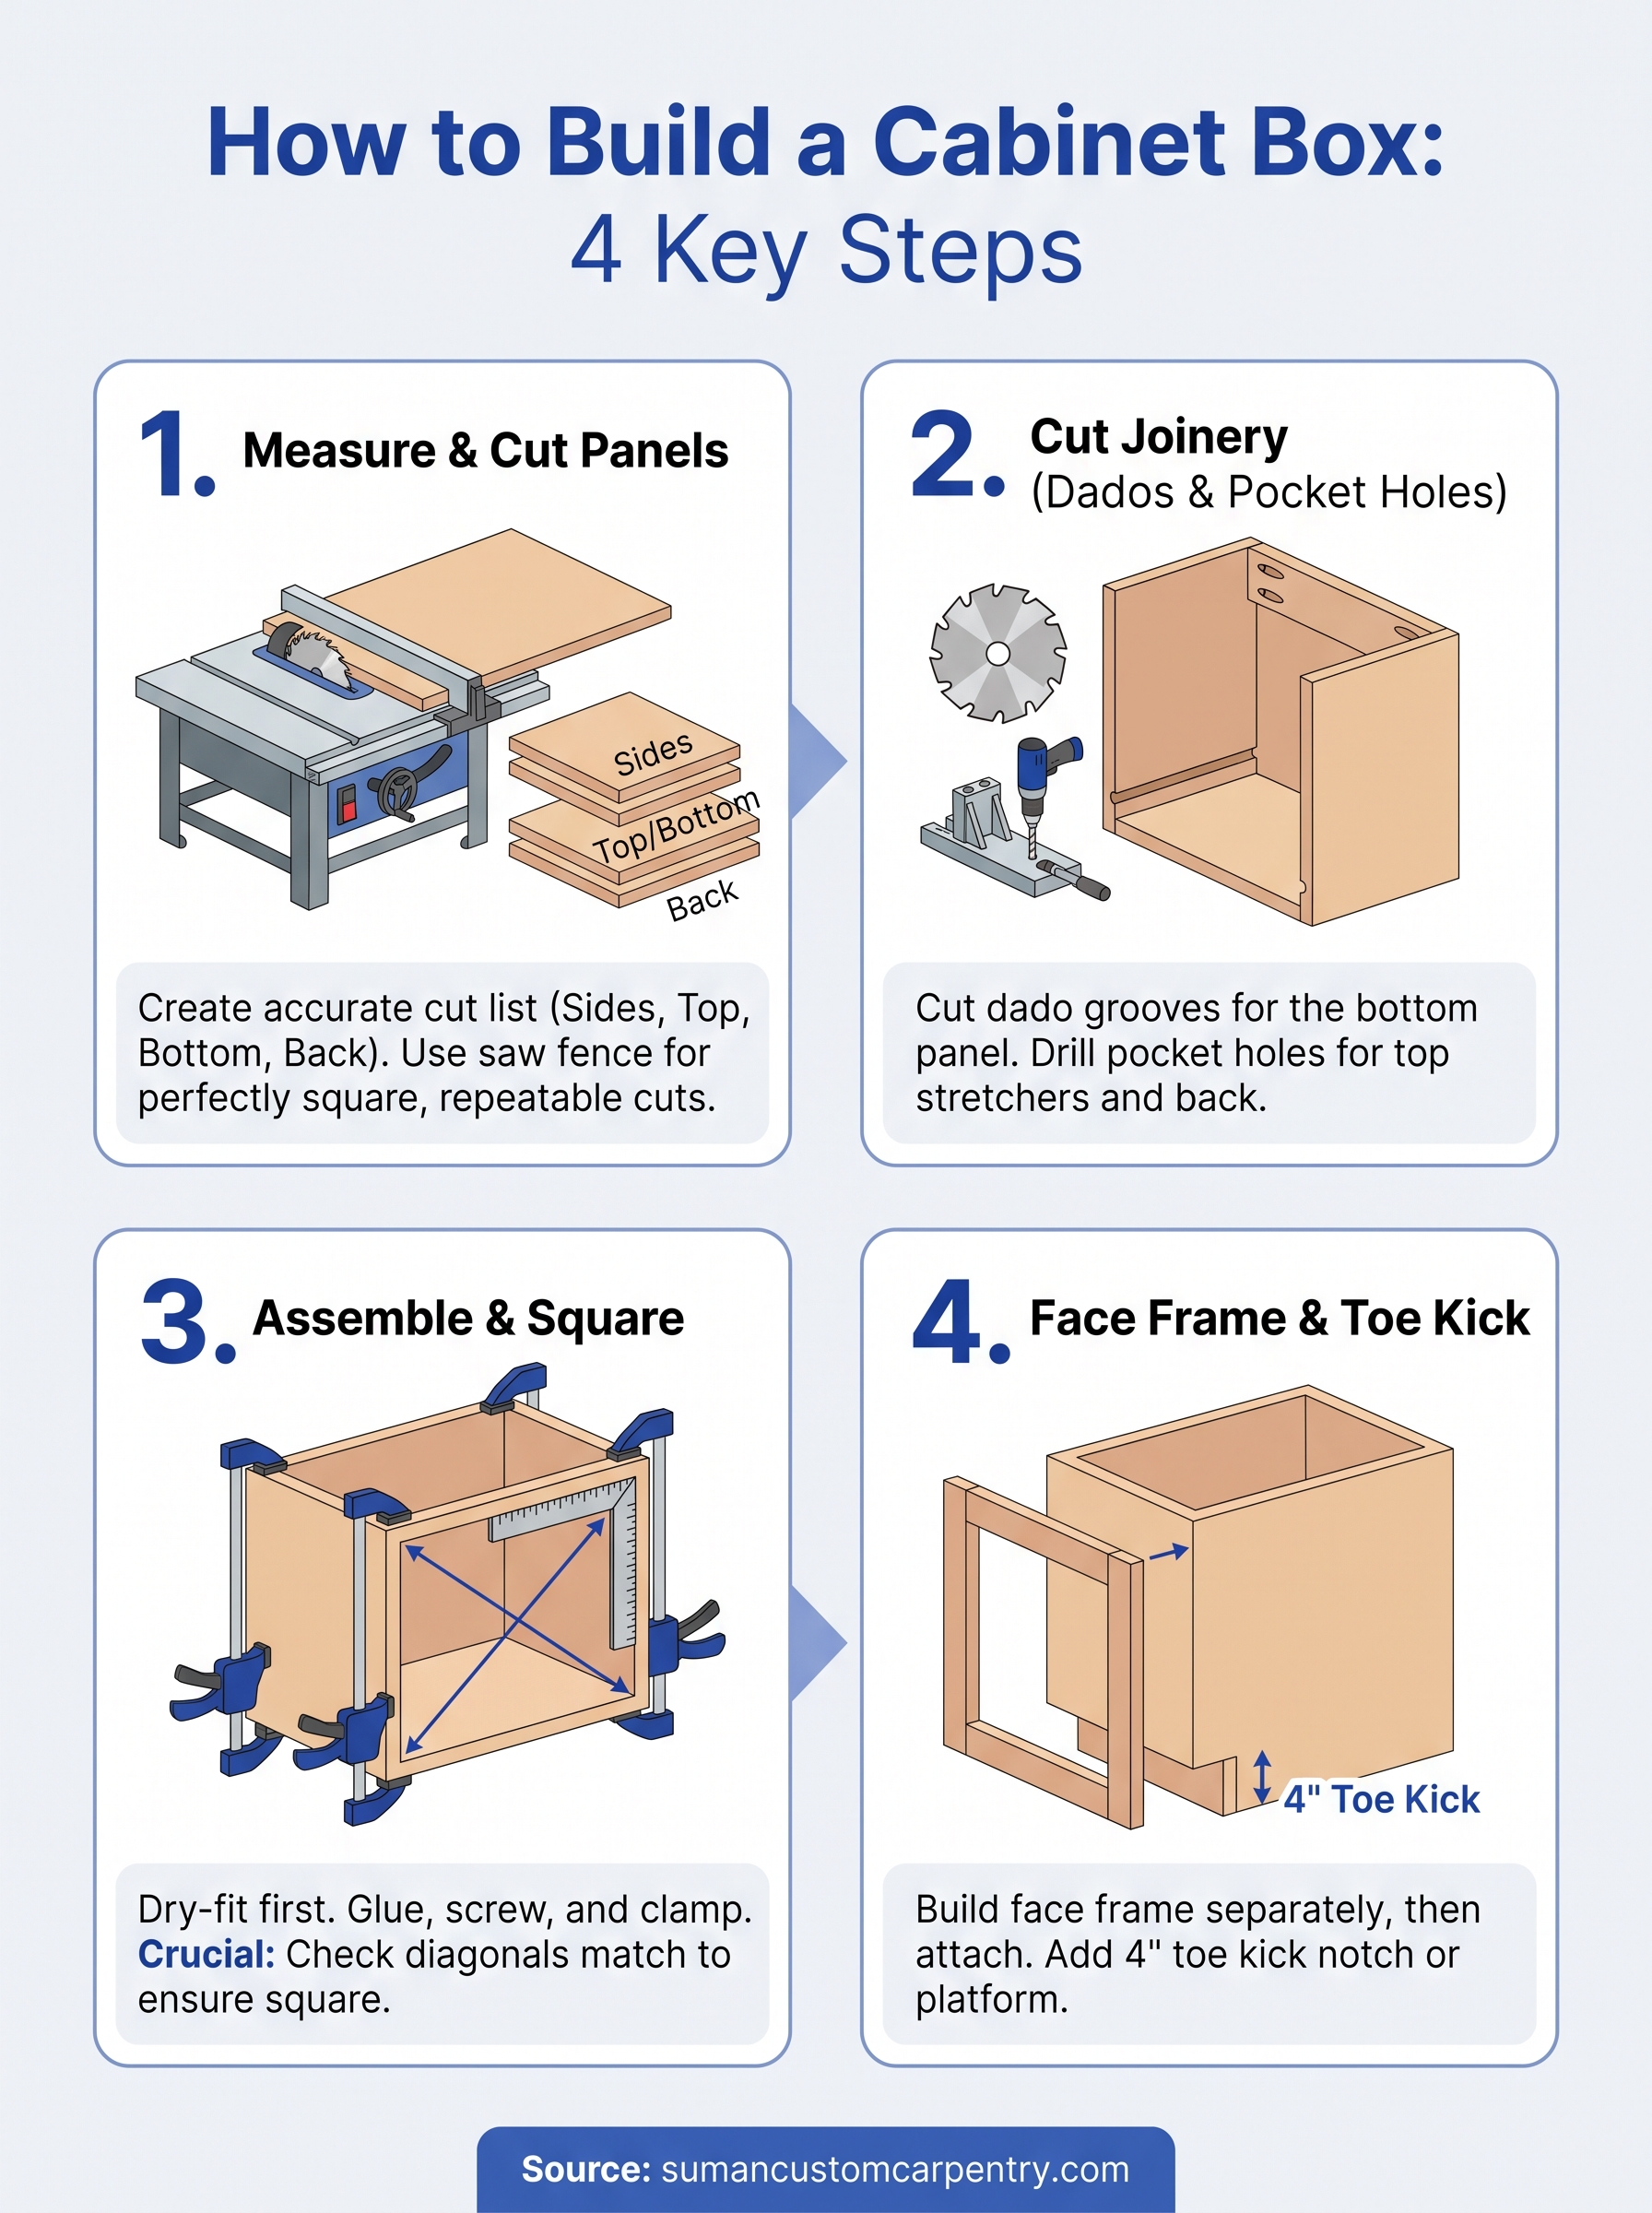
With your dimensions locked in, translate them into an actual cut list before you touch the saw. A basic cabinet box needs five panels: two sides, a top, a bottom, and a back. Write out every measurement on paper or a cut sheet, then double-check the math twice. Once the saw is running, mistakes are expensive.
Build your cut list
Start with a 24-inch deep, 34 1/2-inch tall, 24-inch wide base cabinet box as your working example. Here’s how that breaks down:
| Panel | Quantity | Dimensions | Material |
|---|---|---|---|
| Side panel | 2 | 34 1/2" x 23" | 3/4" plywood |
| Bottom panel | 1 | 22 1/2" x 23" | 3/4" plywood |
| Top stretchers | 2 | 4" x 22 1/2" | 3/4" plywood |
| Back panel | 1 | 34 1/2" x 22 1/2" | 1/4" or 1/2" plywood |
Notice the depth on the bottom and back panels runs 1 inch shorter than the side panel depth. That inch accounts for the back panel sitting in a rabbet or dado, plus clearance so the box doesn’t bind against the wall. Standard cabinet box dimensions like these keep your layout compatible with pre-made doors and drawer boxes later.
Cutting technique that keeps panels square
Set your table saw fence and lock it before ripping a single board. Recheck the measurement with a tape after locking, since fences can creep half a hair when you tighten them.
- Rip all side panels first, using the same fence setting for both, so they match exactly
- Reset the fence and cut the bottom panel and top stretchers together
- Cut the back panel last, since it’s thinner stock and cuts differently
- Support long panels with an outfeed table or a helper; a panel that tips mid-cut ruins the edge
Two panels cut from the same fence setting will always match better than two panels measured by hand.
Check every panel with a framing square immediately after cutting. If you don’t own a track saw, clamp a straight edge guide to the sheet and run your circular saw against it for the same result. Label each panel with painter’s tape and a marker as you go. Once you have four or five identical-looking plywood pieces stacked on a bench, it’s easy to lose track of which side is which, and that mix-up costs you a repeat trip to the lumber yard.
Step 2. Cut dado grooves and drill pocket holes
With your panels cut and labeled, decide on your joinery method before you drill anything. Dado joints give you a mechanically locked box that resists racking even before the glue sets, while pocket holes get you there faster with fewer setup steps. Most shops, including ours, use a mix of both: dados for the bottom panel and pocket screws for the top stretchers and back.
Laying out and cutting dado grooves
Set your dado blade stack to match your plywood thickness exactly, usually 3/4 inch, and test the width on a scrap piece before touching a good panel. A dado that’s too loose won’t hold glue well, and one that’s too tight will split the mating panel when you force it together.
- Mark the dado location 3/4 inch up from the bottom edge on both side panels
- Set the blade depth to 3/8 inch, half the thickness of your plywood
- Run both side panels through with the same fence setting so the grooves line up
- Cut a rabbet at the back edge of each side panel for the back panel to sit in
Cut your test dado in scrap plywood first; a loose groove is a wasted panel, not a fixable mistake.
A router with a straight bit and an edge guide works just as well if you don’t have a dado stack, though it takes a few extra passes to reach full depth.
Drilling pocket holes for fast, strong joints
Pocket holes handle the joints where a dado doesn’t make sense, like attaching the top stretchers to the side panels. Set your Kreg-style jig to match your plywood thickness, usually the 3/4-inch setting, and clamp it firmly before drilling.
Pocket hole settings for 3/4-inch plywood:
- Jig depth setting: 3/4
<iframe src="https://www.youtube.com/embed/zGPEXr5VmCk" width="560" height="315" title="How to Build a Cabinet Box: A Step-by-Step Guide" frameborder="0" allow="accelerometer; autoplay; clipboard-write; encrypted-media; gyroscope; picture-in-picture; web-share" referrerpolicy="strict-origin-when-cross-origin" allowfullscreen></iframe>
## Step 3. Assemble the cabinet box
With your dados cut and pocket holes drilled, dry-fit every panel before glue touches wood. Stand the two side panels up, slide the bottom panel into its dado grooves, and check that everything sits flush without forcing it. This dry run catches sizing mistakes while they're still fixable, and it's the step most first-time builders skip because they're eager to see the box come together.
### Dry-fit before you glue
Zero clamping pressure should be needed to seat the bottom panel into its dado. If you're wrestling a panel into place, stop and check your dado width again rather than forcing it and risking a split. Confirm the top stretchers reach both side panels at the pocket hole locations, and set the back panel into its rabbet to make sure the whole assembly closes up square.
- Slide the bottom panel into both side dados
- Set the top stretchers across the top edges, pocket holes facing up
- Drop the back panel into the rear rabbet
- Measure both diagonals corner to corner; they should match within 1/16 inch
> If your diagonals don't match, your box isn't square yet, no matter how good the joints look.
### Gluing and clamping the assembly
Once the dry fit checks out, disassemble just enough to run a bead of Titebond II or III along each dado groove and mating edge. Reassemble the same way you dry-fitted it, then drive pocket screws into the top stretchers before the glue skins over. Clamp across the width of the box near the bottom panel to pull the dado joint tight, and let the glue cure for at least 30 minutes before you move the box.
Recheck the diagonals immediately after clamping, since clamping pressure can pull a box out of square even after a perfect dry fit. Nail the back panel into its rabbet with 1-inch brad nails every 6 inches for extra rigidity, especially if the box will carry heavy drawer slides. Squeeze out any excess glue from inside the box with a damp rag before it hardens; dried glue beads inside the box interfere with drawer boxes and shelf pins later.
Wait a full hour before standing the box upright or moving it to your assembly bench. **Building custom kitchen cabinets** in volume means you'll repeat this exact sequence for every box, so getting the rhythm down on your first one pays off across the whole run.
## Step 4. Attach the face frame and toe kick
Once the box is square and dry, you're ready to add the two pieces that turn a plain plywood box into something that looks like a finished cabinet: the face frame and the toe kick. **Face frame construction** ties directly into how your doors and drawers will hang later, so measure the opening twice before you cut a single piece of frame stock.
### Building and attaching the face frame
Cut your face frame stiles and rails from 3/4-inch solid hardwood, ripped to 1 1/2 or 2 inches wide depending on your design. Join the pieces with pocket screws or biscuits on a flat bench first, rather than building the frame piece by piece on the front of the cabinet. Working the **cabinet box construction** in this order gives you a square frame that won't fight you during glue-up, and it's the same sequence we use when building custom kitchen cabinets in the shop.
- Cut stiles to match the box height, adding 1/8 inch overhang top and bottom
- Cut rails to the box width minus twice the stile width
- Assemble with pocket screws, checking diagonals before the glue sets
- Attach the frame to the box front with glue and 1 1/4-inch pocket screws, flush at both edges
> A face frame that's out of square will telegraph through every door gap in the finished cabinet.
### Adding the toe kick
Toe kick height follows a near-universal standard across kitchen and vanity cabinets: 4 inches tall, set back 3 inches from the front of the box. Notch the bottom of each side panel before assembly if you planned ahead in your cut list, or build a separate toe kick platform and attach it underneath a finished box if you didn't. Either approach works structurally, but cutting the notch into your original panels saves a step now and keeps the box lighter to move.
Screw a 3/4-inch plywood platform to the bottom of the box, recessed 3 inches from the front edge, then nail a finished toe kick panel across the front once the cabinet sits in its final position against the wall. Check the box for level side to side and front to back before you fasten it permanently, since a toe kick can't correct a floor that isn't flat.
## From a basic box to custom-built cabinetry
Get one box square, glued, and framed, and you've got the template for every cabinet in your kitchen. The steps don't change whether you're building a single vanity or **building custom kitchen cabinets** for a full remodel: measure twice, cut once, dado or pocket-screw your joints, and check those diagonals before the glue sets. Where most DIY projects run into trouble is scale. Building one box on a Saturday is satisfying. Building fifteen matching boxes with consistent reveals, square face frames, and doors that line up across a whole kitchen takes shop equipment and time most homeowners don't have.
That's the point where a lot of Cape Cod homeowners call us instead of buying another sheet of plywood. We hand-build every cabinet in our Hyannis shop, and we back the work with a lifetime warranty. If your project has outgrown the garage, [reach out to Suman Custom Carpentry](https://sumancustomcarpentry.com) and let's talk about your kitchen.