
A kitchen can have beautiful cabinets and still feel frustrating to use. The difference usually comes down to layout, where cabinets are placed, how they relate to each other, and whether the design accounts for how you actually cook and move. That’s why kitchen cabinet layout tips matter more than most homeowners realize when planning a renovation. Poor placement creates daily friction, from awkward reaches for spices to doors that collide when two people are working at the same time.
At Suman Custom Carpentry, we design and hand-build custom kitchens at our shop in Hyannis, Cape Cod. Over seven-plus years of building cabinetry from scratch, we’ve seen firsthand how small layout decisions shape the entire experience of a kitchen. A few inches here, a different door swing there, these details compound. They’re the reason one kitchen feels effortless and another feels like a puzzle you never quite solve. We bring that perspective into every project we take on.
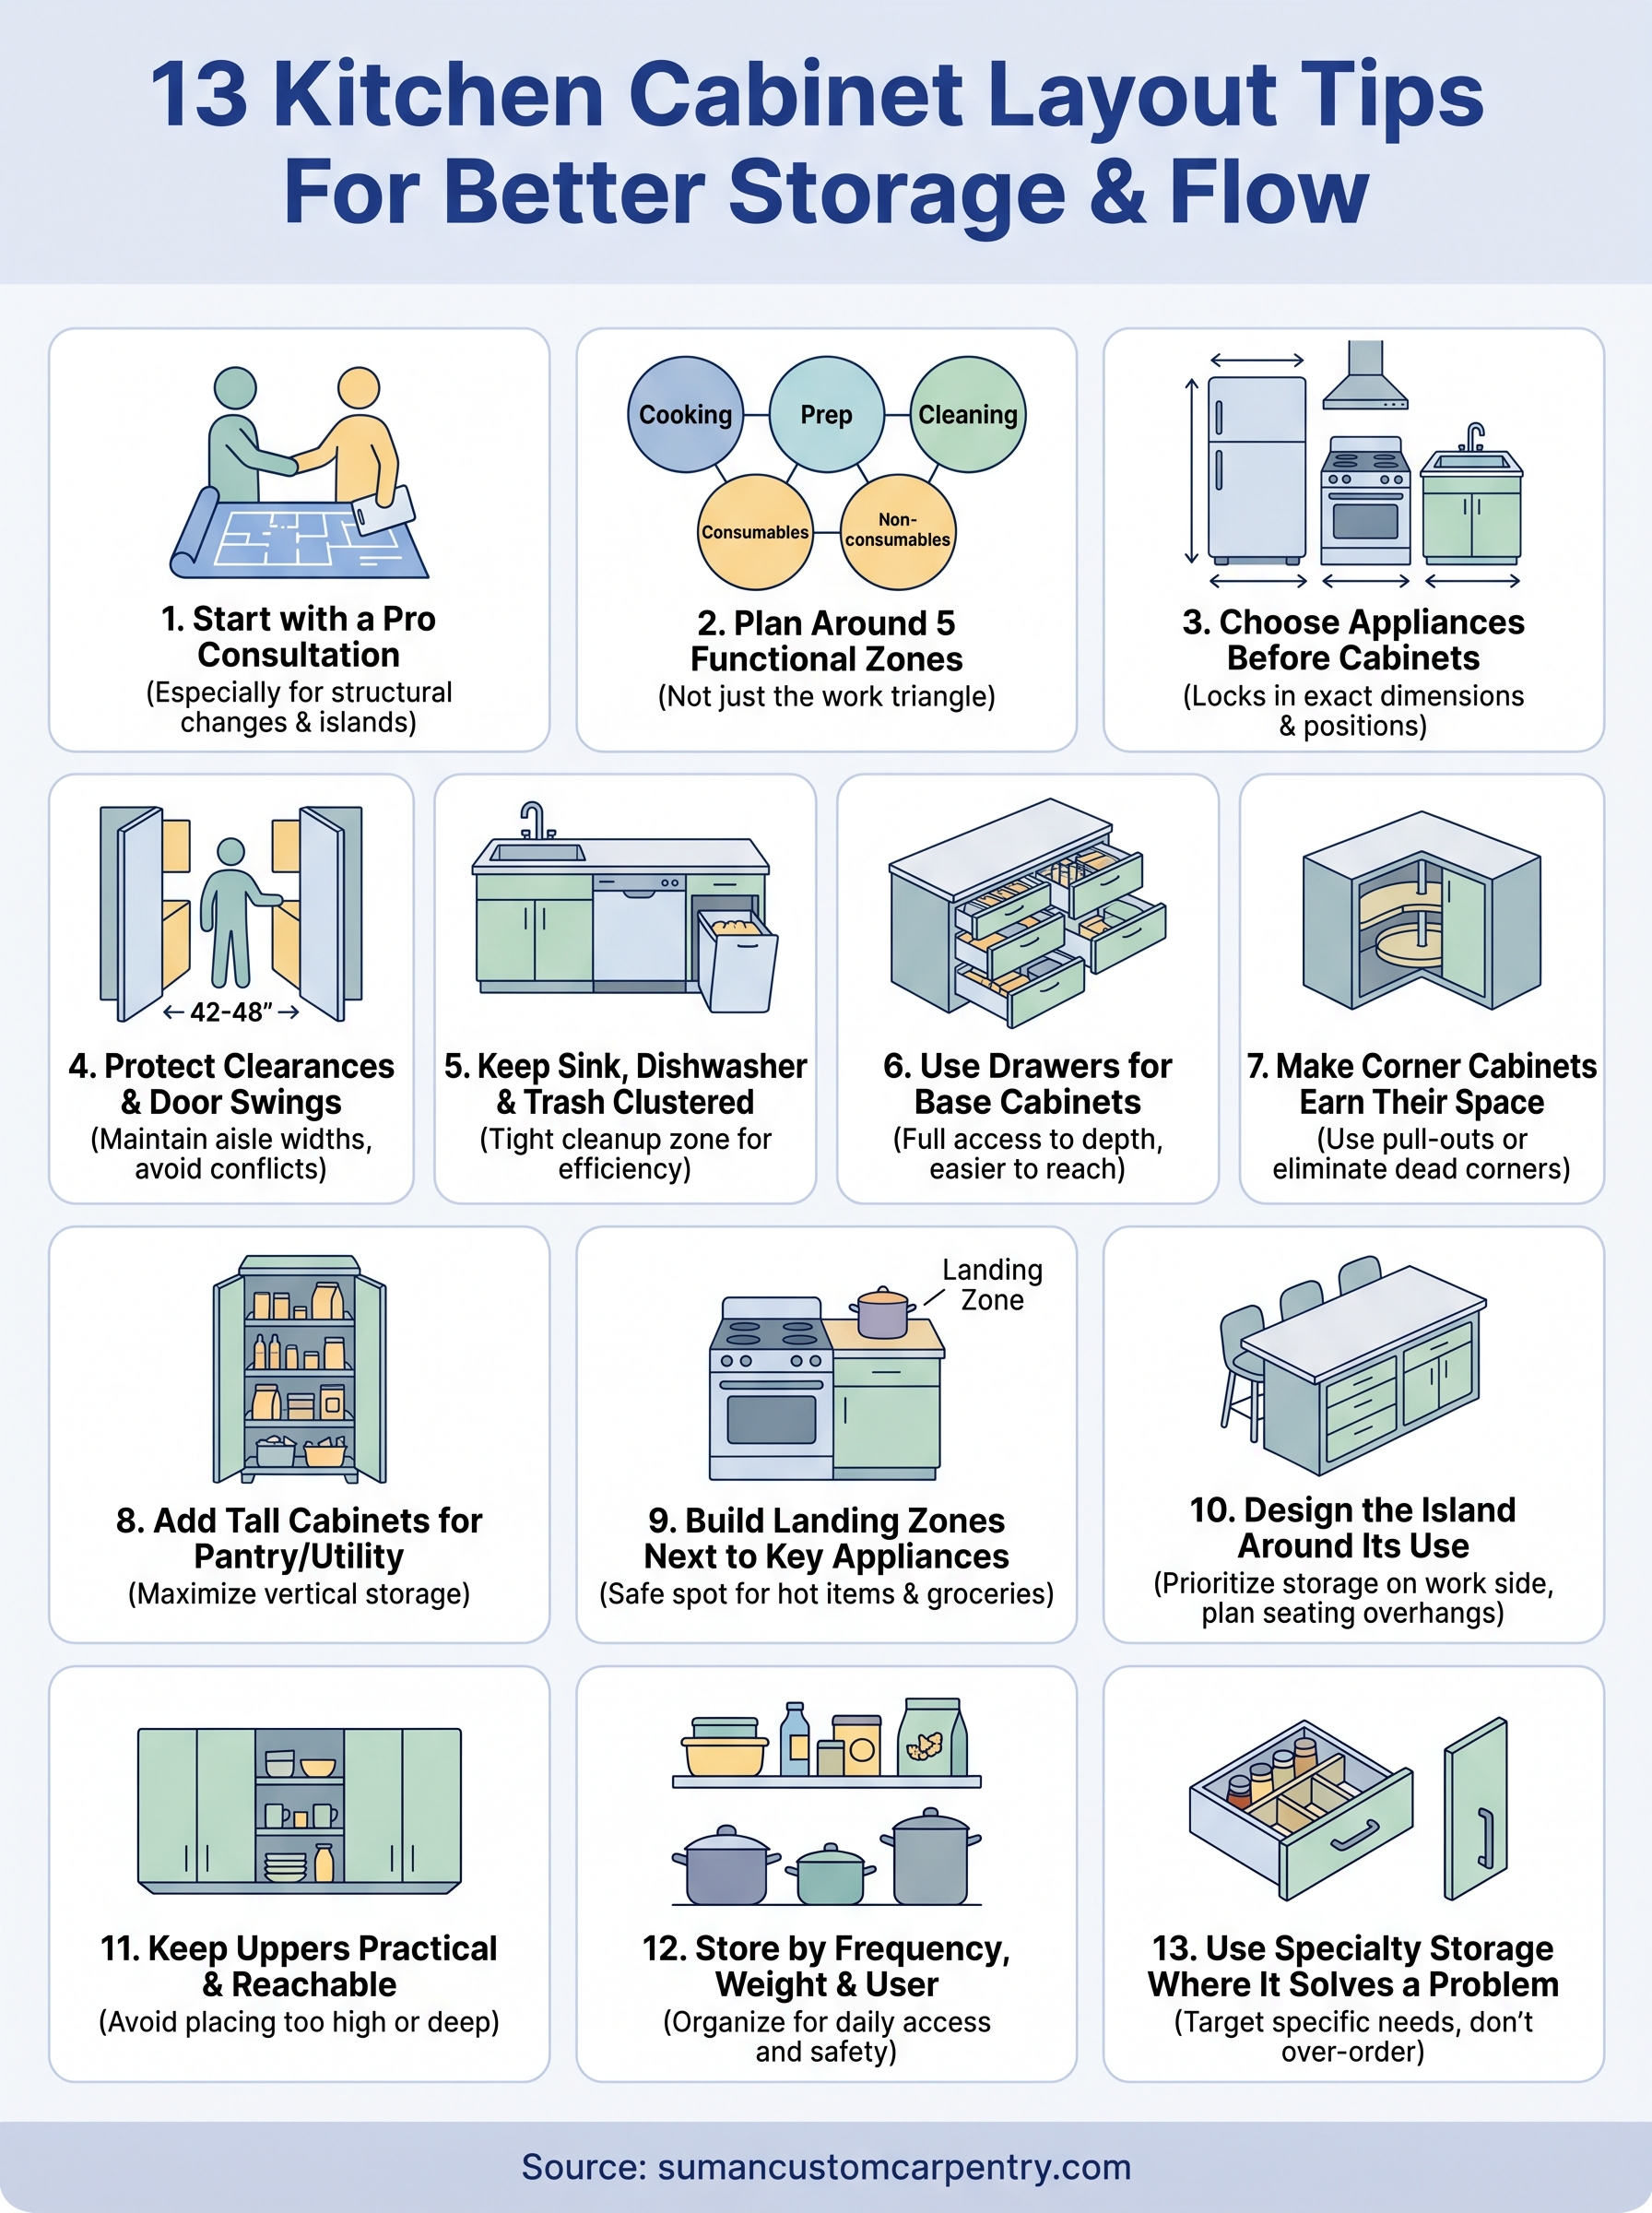
This article covers 13 practical layout principles that improve storage capacity, workflow, and everyday function. Whether you’re starting a full kitchen renovation or rethinking your current setup, these tips will help you plan a cabinet arrangement that actually works, not just one that looks good on paper. Let’s get into the specifics that make the difference.
1. Start with a cabinet layout consult with a local pro
A professional consultation is one of the most overlooked kitchen cabinet layout tips, and it’s often the step that saves the most money. Before you finalize measurements or commit to a cabinet configuration, sitting down with a local cabinetmaker gives you access to practical knowledge that design software can’t replicate. A good pro will ask how you cook, who uses the kitchen, and what frustrates you about your current setup, and those answers shape the layout in ways a floor plan alone never captures.
When a pro layout pays off and when it doesn’t
Consulting a pro makes the most sense when you’re reconfiguring walls, relocating appliances, or adding an island. Structural changes and custom millwork both benefit from a professional review before you lock in dimensions. If you’re replacing cabinets like-for-like with no layout changes, a consultation is less critical, though it can still surface better options you hadn’t considered.
A consultation delivers the most value before demolition starts, not after, when changing course gets expensive.
What to bring to the consultation to move fast
Bring accurate measurements of your kitchen, including ceiling height, window and door locations, and appliance specs. Photos of your current kitchen along with a clear list of what you want more of (storage, prep space, counter room) will keep the conversation focused. If you have inspiration images, be ready to explain the function behind what you like, not just the look.
- Accurate room measurements with ceiling height noted
- Window, door, and electrical outlet locations
- Current appliance make, model, and dimensions
- A short list of what your current layout gets wrong
What a cabinetmaker can spot that drawings miss
A cabinetmaker who builds in-house understands material behavior, structural constraints, and real-world tolerances that a general contractor or designer may not. They’ll catch problems like a cabinet door that will always hit a window frame, or a corner configuration that eats usable space.
Drawings don’t show weight, depth, or swing conflicts the way hands-on experience does. A builder who works in three dimensions daily will identify conflicts in your plan that look fine on paper but fail in practice.
Where to get help on Cape Cod
If you’re based on Cape Cod or the surrounding Massachusetts area, Suman Custom Carpentry offers design consultations directly with owner Dieyson Suman. You get direct access to the person who will build your cabinets, which means layout decisions connect to the build process from the first conversation.
That direct line matters more than most homeowners expect. When the designer and the builder are the same person, nothing gets lost between the planning stage and the shop floor.
2. Plan around zones, not just the work triangle
The classic work triangle connects sink, stove, and refrigerator, but it doesn’t account for how modern kitchens actually function. Planning your layout around functional zones gives you a stronger framework for placing cabinets where you need them and matching storage directly to the tasks happening in each area.
The five zones to map in every kitchen
Every efficient kitchen contains five core zones: cooking, prep, cleaning, consumables, and non-consumables. Mapping these zones before placing any cabinets ensures your storage decisions support how the space functions day to day, not just how it looks on paper.

- Cooking zone: Range or cooktop with adjacent space for pots, pans, and tools
- Prep zone: Counter space with knives, cutting boards, and mixing tools close by
- Cleaning zone: Sink, dishwasher, and trash or recycling grouped together
- Consumables zone: Refrigerator, pantry, and dry goods storage near the kitchen entry
- Non-consumables zone: Dishes, glassware, and utensils positioned close to the dishwasher
How zones change for cooks vs entertainers
A serious cook needs more prep counter depth and stronger cooking zone storage, while someone who entertains frequently benefits from accessible dish storage and a larger consumables zone. These priorities directly affect which cabinet types you choose and where they land in the room.
Zone priorities also shift with kitchen size. In a smaller kitchen, consolidating zones reduces steps. In a larger layout, separating them more deliberately prevents the space from feeling disorganized during heavy use.
Your lifestyle should drive your zone priorities before you finalize any layout.
How to avoid cross-traffic between zones
Cross-traffic happens when two common tasks force people through the same path simultaneously. Keeping the cleaning zone separate from the cooking zone, and placing consumables near the entry point, is one of the most practical kitchen cabinet layout tips for reducing that daily friction. Separating these paths prevents collisions and makes a shared kitchen significantly easier to navigate.
3. Choose and place appliances before you draw cabinets
Most homeowners design cabinets first and fit appliances in afterward. That sequence creates problems, because appliance dimensions dictate cabinet openings. Locking in cabinet positions before you know your appliance specs leads to gaps, filler strips, or a layout that simply doesn’t work.
Appliance sizes that drive cabinet dimensions
Standard appliances come in set widths, and your cabinet layout needs to reflect those exactly. A 36-inch range needs a 36-inch clear opening, and a counter-depth refrigerator has a different footprint than a standard-depth model. Confirm every appliance spec before you finalize cabinet positions.
- Refrigerators: 30-36 inches wide, with significant depth variation by model
- Ranges and cooktops: typically 30 or 36 inches wide
- Dishwashers: almost always 24 inches wide
- Built-in microwaves: vary by brand and require dedicated framing
How to place fridge, range, and sink for fewer steps
Position these three appliances so your most common kitchen movements stay short. Placing the refrigerator near the kitchen entry reduces steps when unloading groceries, while grouping the sink and range within a short run supports the prep-to-cook sequence without unnecessary travel. This is one of the core kitchen cabinet layout tips that pays off every single day.
Reducing travel between the fridge, sink, and range by even a few feet noticeably changes how efficient a kitchen feels.
Vent hood and ducting considerations that affect layout
The vent hood position locks in your range location, and ducting paths determine which wall or ceiling route is viable. Plan the duct run early, because routing it after cabinets are placed forces expensive workarounds. A straight, short duct path improves ventilation performance and keeps your layout from working around a problem that could have been solved from the start.
4. Protect your clearances and door swings
Locking in cabinet positions without accounting for clearances and door swings is one of the most common planning mistakes homeowners make. Tight aisles and conflicting door swings create daily frustration that no amount of good storage can fix. Getting these dimensions right before you finalize your layout is one of the most practical kitchen cabinet layout tips you can apply at the design stage.
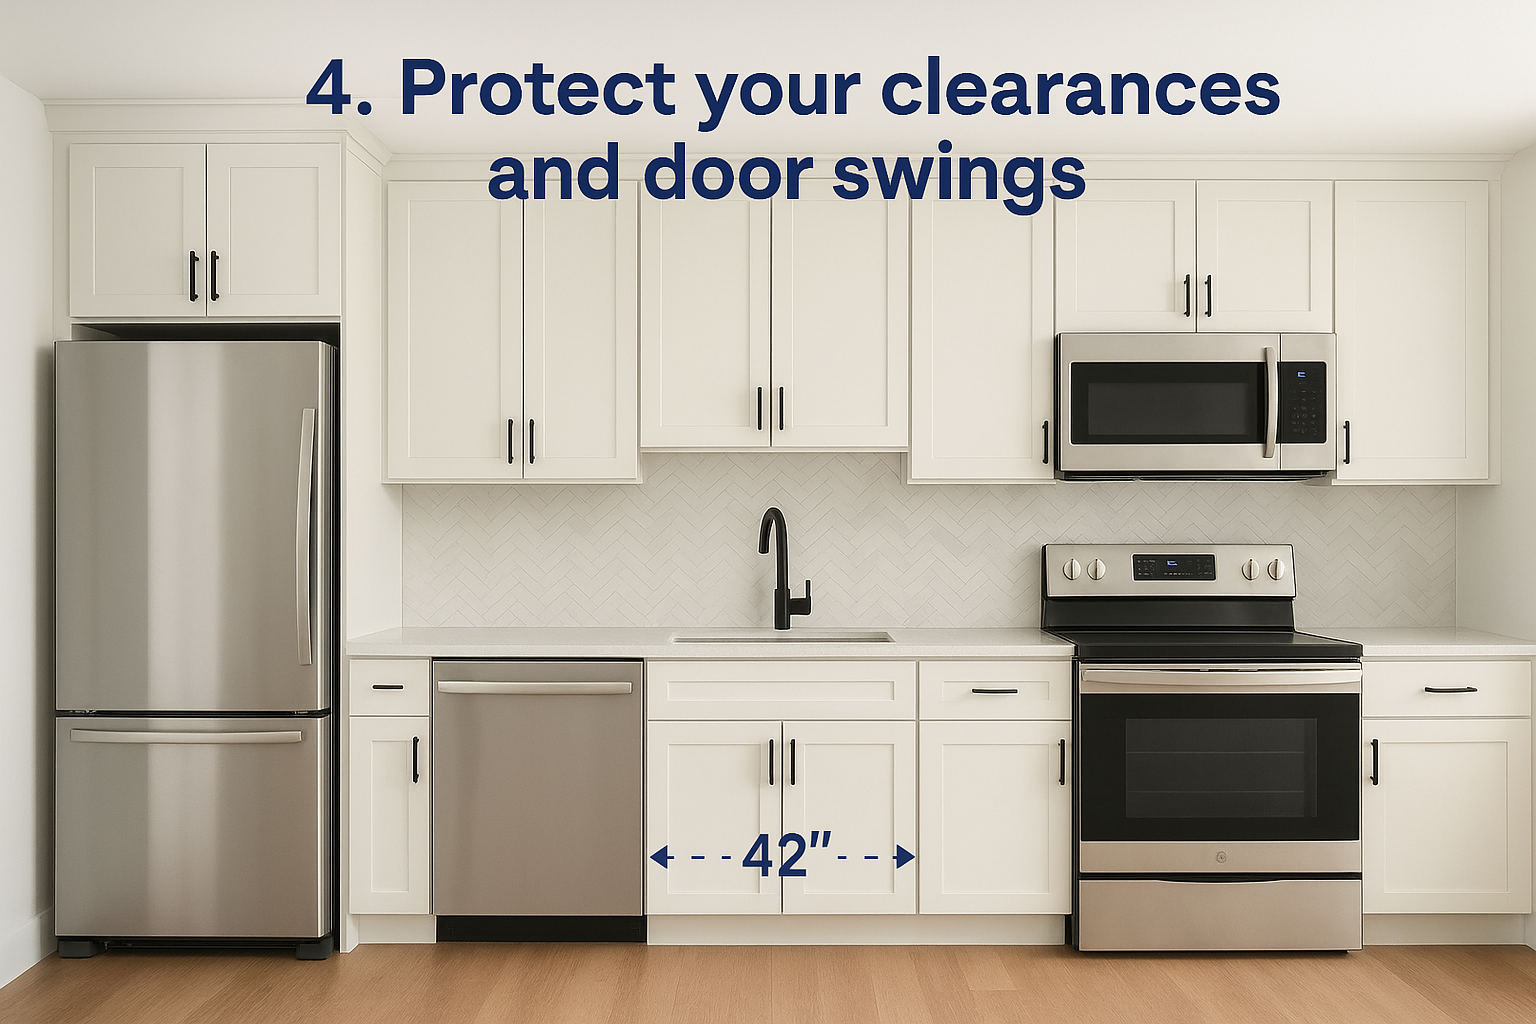
Aisle widths to target for one cook vs two
For a single-cook kitchen, a minimum aisle width of 42 inches gives you enough room to open cabinets and move comfortably. If two people frequently cook together, target 48 inches between opposing counters or cabinet faces. Tighter aisles force people to step around each other constantly, and that friction compounds over years of daily use.
Dishwasher, oven, and fridge door conflicts to prevent
These three appliances have the widest door swings in any kitchen, and placing them too close to each other or to adjacent cabinet doors causes constant conflicts. A dishwasher that blocks the sink cabinet when open, or an oven door that cuts off access to a nearby pantry, are problems you can solve completely at the planning stage. Check door swing paths on your floor plan before any cabinets are ordered.
Appliance door conflicts are far easier to prevent on paper than they are to fix after installation.
How to handle tight kitchens without feeling cramped
In a compact kitchen, choosing full-overlay cabinet doors recovers swing clearance without sacrificing storage capacity. Pulling the refrigerator out of the main run and placing it in a dedicated alcove also frees up aisle width significantly. Prioritizing vertical storage with taller cabinets compensates for the square footage you give up when you protect proper aisle clearance.
5. Keep sink, dishwasher, and trash in one tight cluster
Clustering your sink, dishwasher, and trash in one tight run is one of the most effective kitchen cabinet layout tips for cutting cleanup time. When these three elements are spread across the kitchen, you carry dishes past obstacles and make extra steps every single meal. Grouping them together creates a self-contained cleanup zone that handles rinsing, loading, and disposal without you ever leaving a two- or three-foot radius.
The most efficient sink-side sequence for clean-up
The ideal sequence runs from trash to sink to dishwasher. Scraping and rinsing happen at the sink, while the dishwasher sits right next to it so you can load directly without pivoting. This linear flow keeps dirty dishes moving in one direction without any backtracking, and it prevents cross-traffic with people working in the prep or cooking zones.
Which side the dishwasher should go on and why
Place the dishwasher on the side of the sink closest to where dishes are stored. If your plates and glasses live to the right of the sink, put the dishwasher on the right so unloading is a short reach rather than a long carry. Most people load with their dominant hand, so a right-side placement works for the majority of households, but your storage layout should make the final call.
A dishwasher placed on the wrong side of the sink adds unnecessary steps hundreds of times a year.
Compost, recycling, and trash pull-out placement that works
A three-bin pull-out positioned directly under or beside the sink handles compost, recycling, and trash in one cabinet. Keeping all three bins in a single pull-out eliminates the scattered-can problem and keeps your floor clear. Put the pull-out on the same side as your prep area so scraps travel straight from the cutting board to the bin without crossing the sink.
6. Use drawers for base cabinets whenever you can
Drawers are one of the most underused upgrades in kitchen design. Most base cabinet layouts default to doors with interior shelves, but drawers give you full access to the entire cabinet depth without kneeling or reaching past items stacked in the back. Choosing drawers over shelves wherever possible is one of the more impactful kitchen cabinet layout tips you can apply at the planning stage.
Why drawers beat shelves for everyday storage
A drawer pulls the contents toward you rather than forcing you to dig into a dark cavity. You see everything from above at a glance, which eliminates the habit of stacking and shifting to find what’s buried behind the front row. Drawers make every inch of cabinet depth genuinely usable, which shelves with doors rarely do in practice.
- Drawers reduce bending and reaching compared to shelf-and-door configurations
- Full-extension slides give you access to 100% of the drawer depth
- Items stay organized because they don’t shift or tip when the drawer opens
Best drawer stack for plates, bowls, and utensils
A three-drawer stack works well for dishware storage. Place utensils in a shallow top drawer, everyday plates and bowls in a wide middle drawer, and less-used items below. Positioning this stack near the dishwasher cuts your unloading time significantly because everything travels directly from the rack to the drawer in one move.
Locating your dishware drawers next to the dishwasher turns unloading from a chore into a 60-second task.
Deep drawer planning for pots, pans, and small appliances
Deep base drawers handle heavy cookware better than any shelf setup. A single wide drawer positioned below the cooktop keeps pots, pans, and lids organized exactly where you need them. For small appliances, plan drawer depth around your tallest item first so nothing ends up permanently parked on the counter because it won’t fit anywhere else.
7. Make corner cabinets earn their square footage
Corner cabinets are one of the most misused spaces in any kitchen layout. Dead corners waste significant square footage when they’re filled with a standard shelf-and-door configuration that nobody actually reaches into. Treating corners as a deliberate storage decision rather than an afterthought is one of the most underrated kitchen cabinet layout tips you can apply during the planning phase.
The corner solutions that actually feel usable
Lazy Susans, pull-out drawers, and L-shaped drawer inserts are the three options that consistently deliver accessible storage in a corner. A well-built lazy Susan keeps items visible and within reach without forcing you to dig. Pull-out corner drawers go further, bringing the entire cabinet contents to the opening so nothing stays buried in the back.
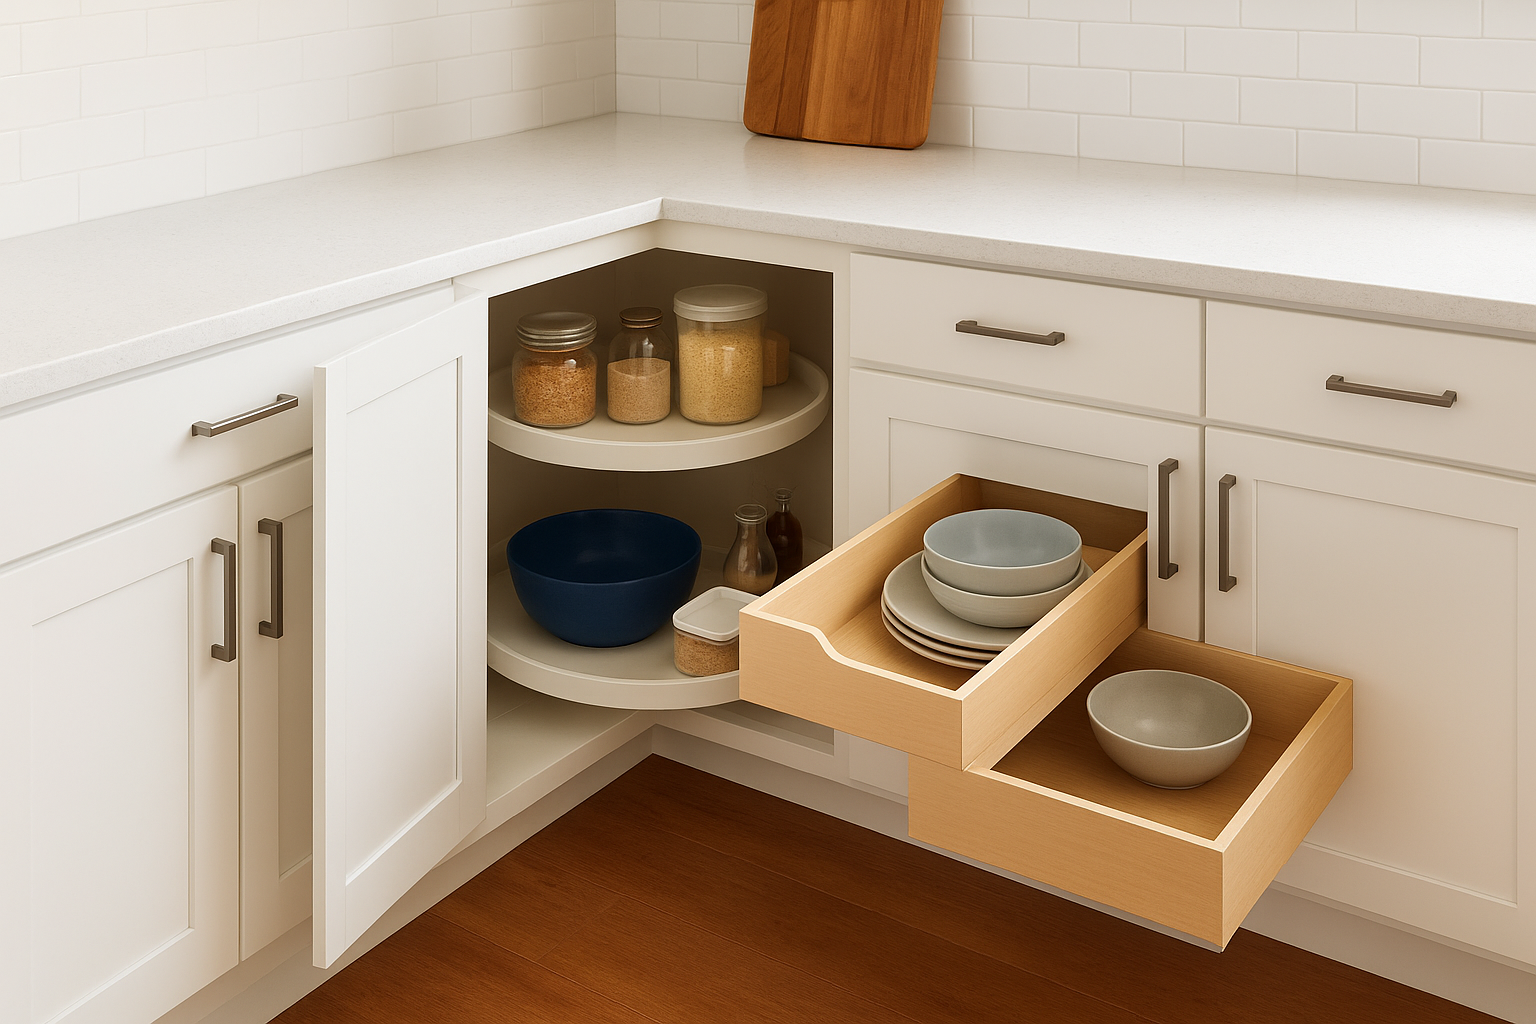
A corner cabinet that functions well adds meaningful storage; one that doesn’t gets filled with items you never use.
When to avoid a corner cabinet entirely
Sometimes the best option is to eliminate the corner cabinet completely. Turning a dead corner into a small appliance garage or open display niche can serve your kitchen better than a storage box nobody opens. If your layout allows it, ending a run of cabinets short of the corner and adding a floating shelf or countertop extension recovers usable prep space without the access problems a corner box creates.
How to keep corners from stealing landing space
Corners often sit right where you need a landing zone next to a range or refrigerator. Pulling the corner cabinet back slightly or using a diagonal corner configuration preserves that counter run so it stays functional. Plan the corner position relative to your appliances first, then choose the cabinet solution that fits the remaining space.
8. Add tall cabinets for pantry and utility storage
Tall cabinets are one of the most efficient ways to maximize vertical space in a kitchen without expanding the footprint. A well-placed pantry or utility cabinet captures storage that would otherwise end up on counters or in awkward base cabinet configurations. Incorporating tall cabinets into your plan is a kitchen cabinet layout tip that pays off in both capacity and daily organization.
Pantry cabinet layouts that reduce clutter on counters
A full-height pantry cabinet keeps dry goods, small appliances, and bulk items off your counters and behind closed doors. Position it near the consumables zone, close to where groceries enter the kitchen, so putting away a grocery run takes seconds rather than minutes. Adjustable interior shelving lets you reconfigure the space as your storage needs change, which a fixed-shelf pantry box never allows.
A pantry cabinet placed at the kitchen entry point cuts your unloading and restocking time significantly.
Broom, mop, and vacuum storage that doesn’t waste space
Utility items are often forgotten during the planning phase and end up propped in a corner or crammed into a closet down the hall. A tall broom cabinet, typically 18 to 24 inches wide, handles mops, brooms, and a handheld vacuum with a dedicated plug inside. Planning this cabinet into the original layout prevents the workaround storage solutions that clutter a kitchen over time.
Mixing open shelves and closed storage without chaos
Combining open and closed tall storage works when you assign each type a clear purpose. Closed cabinets handle items that look messy or need protection from dust. Open sections work for frequently grabbed items and display pieces you actively want visible. Keep open shelving to one or two defined sections so the overall wall reads as intentional rather than unfinished.
9. Build landing zones next to every key appliance
Landing zones are the counter spaces immediately adjacent to your appliances, and skipping them in the planning phase is one of the most common mistakes homeowners make. Without adequate landing space, you end up setting hot pans on the floor, balancing groceries on your arm, or crowding items onto a counter two steps away. Adding planned landing zones to your layout is a practical kitchen cabinet layout tip that makes every appliance interaction faster and safer.
Fridge landing zone for unloading groceries fast
Position at least 18 inches of counter space on the handle side of your refrigerator so you can set bags down while you load shelves. A landing zone on the wrong side forces an awkward reach across the open door, which adds unnecessary strain every time you unload groceries. Keeping this counter clear of permanent appliances makes it available when you actually need it.
A dedicated fridge landing zone on the correct side eliminates one of the most common daily friction points in any kitchen.
Range and oven landing zone for hot pans and trays
Your range and oven both need a minimum of 12 inches of clear counter on at least one side to handle hot cookware safely. A 15-inch landing zone on each side is better if your layout allows it. Placing pull-out shelves or wide drawers directly below this counter keeps pot holders and trivets immediately at hand when you need them most.
Microwave and small-appliance landing zone that stays clear
A microwave mounted above the range or built into cabinetry still needs 12 inches of open counter below or beside it for setting down plates and bowls. Small appliances like toasters and coffee makers need the same treatment. Reserve this counter specifically for active use rather than filling it with decorative items that reduce the working space you planned for.
10. Design the island around how you really use it
An island adds counter space and storage, but only if you plan it around how you actually use the kitchen rather than what fits in the room. Many homeowners choose island size based on available floor space without first deciding what the island needs to do. That sequence produces an island that looks balanced on the floor plan but creates friction every single day. This is one of the more specific kitchen cabinet layout tips because the island directly intersects every zone around it.
When the island should hold the sink vs stay clear
Adding a sink to your island suits open-plan layouts where your prep area faces the room and you want to stay connected with guests while cooking. It also works well when the island becomes your primary cleaning station. A sink, however, requires dedicated plumbing beneath the island floor, which adds cost and limits how easily you can reposition the island if your needs change down the road.
Reserve island sink placement for layouts where it genuinely improves your workflow, not just the visual balance of the space.
Island storage priorities that increase daily speed
Base drawers on the kitchen-facing side of the island should hold your most-used prep tools, serving pieces, and everyday cookware. Keep the seating side free of cabinet doors that guests can block during meal prep. Concentrating storage on the work side means everything you reach for stays accessible without stepping around people seated at the counter.
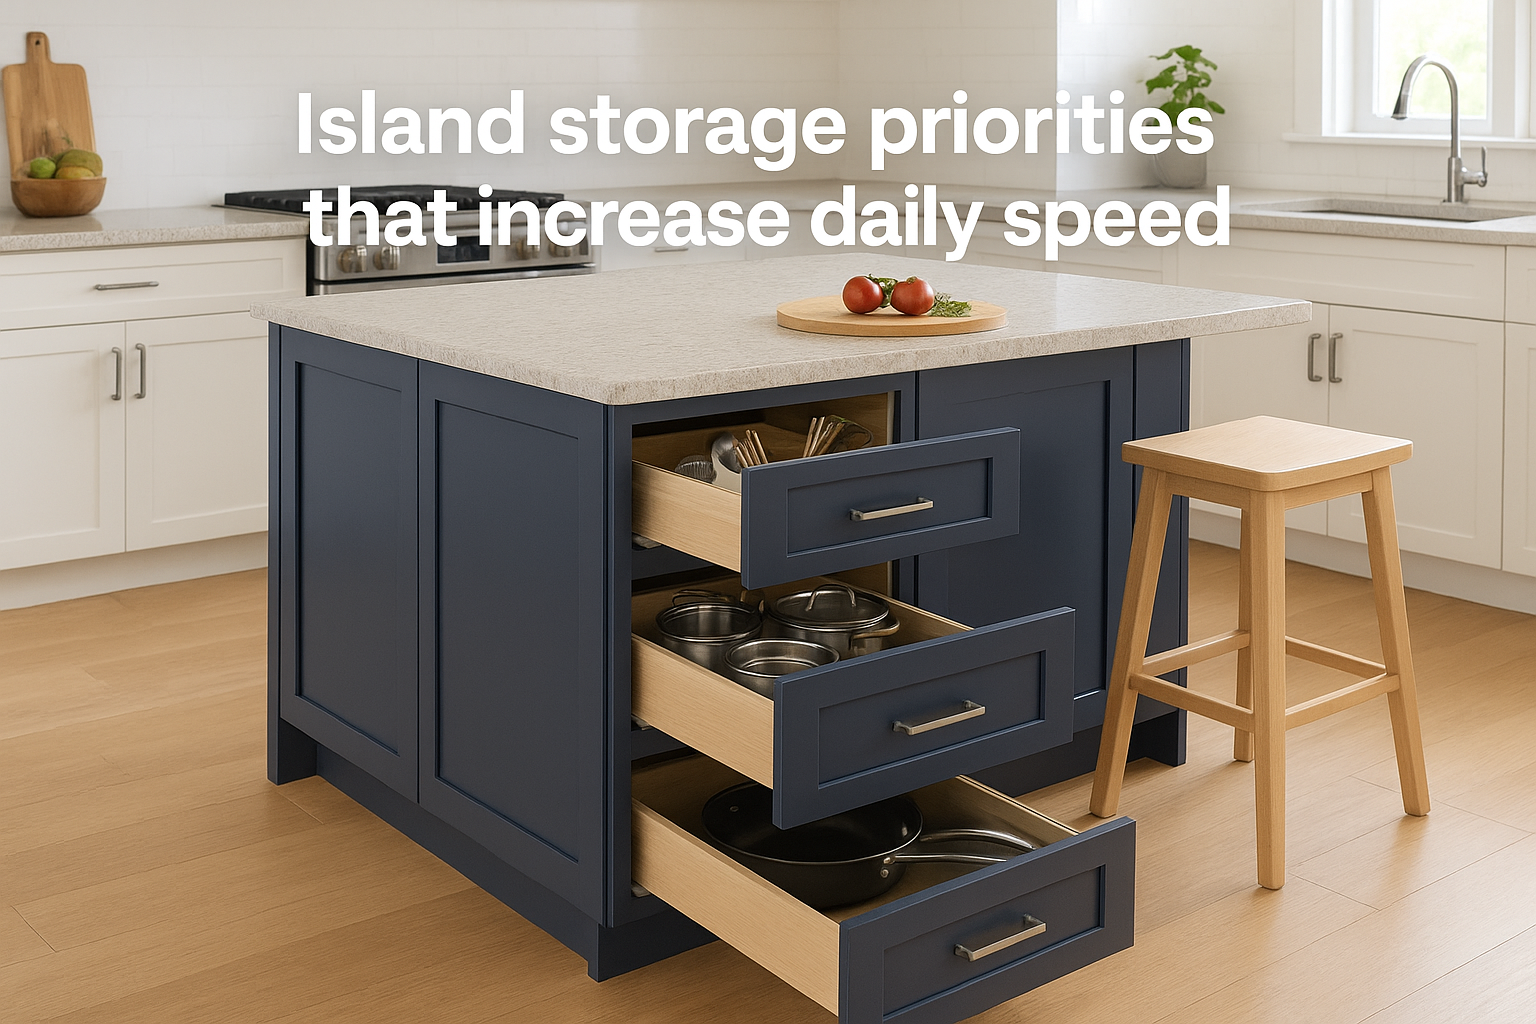
- Prep tools and everyday cookware on the work-facing side
- Serving pieces near the end closest to the dining area
- No door or drawer openings facing the seating side
Seating and overhang planning without knee-banging
Standard counter-height seating at 36 inches requires a minimum 12-inch overhang to give knees enough clearance beneath the counter. Bar-height seating at 42 inches needs at least 15 inches. Confirm stool dimensions before finalizing cabinet sizing so the finished island is genuinely comfortable to sit at, not just comfortable to look at.
- Counter height (36 in): 12-inch overhang minimum
- Bar height (42 in): 15-inch overhang minimum
- Verify stool seat depth against your overhang length before ordering
11. Keep uppers practical and reachable
Upper cabinets cover a lot of wall space, and how you configure their height, depth, and door style shapes whether that space works for you daily or holds items you forget you own. Applying a few straightforward kitchen cabinet layout tips to your uppers prevents the common result of beautiful cabinetry that nobody uses above the second shelf.
Upper cabinet height and depth rules that prevent headaches
Standard upper cabinets run 12 inches deep, which keeps the cabinet face from pushing into your head while you work at the counter. Mounting the bottom of uppers at 18 inches above the countertop gives you usable wall space for backsplash and keeps the cabinet opening at a comfortable reach for most adults. Going taller than 42 inches in cabinet height means the top shelf requires a step stool, so reserve that upper space for seasonal or rarely used items rather than everyday storage.
Upper cabinet depth beyond 12 inches creates a storage box that blocks light and forces you to lean over the counter to see inside.
Where open shelving helps and where it backfires
Open shelving works well directly beside or above the range for oils, spices, and tools you grab constantly during cooking. It backfires near the sink or cooktop, where grease and moisture accumulate quickly and turn an attractive shelf into a maintenance problem. Limit open sections to one or two defined spots rather than running them across the full upper wall.
How to use uppers for display without losing function
Reserve the top third of any display section for objects you own intentionally, not overflow storage in disguise. Keep the lower two shelves of your display uppers holding items you actually reach for weekly so the section stays both functional and intentional, rather than becoming a place where random clutter collects behind a styled front row.
12. Store by frequency, weight, and who uses it
Organizing your cabinets by how often you use items, how heavy they are, and who reaches for them is one of the most practical kitchen cabinet layout tips for long-term function. Most kitchens get cluttered not because of poor cabinet quantity but because the wrong items end up in the wrong places from day one.
The "everyday zone" and what belongs in it
Your everyday zone covers the cabinets and drawers within easy arm’s reach between your prep area and the range. Items you use at least several times a week belong here: daily plates, go-to pans, coffee mugs, and your most-used utensils. Seasonal items and specialty tools move to upper shelves or deeper base cabinets so they stay accessible without taking up prime space.
Reserve your best cabinet real estate for items you touch every single day, and push everything else to the perimeter.
Kid-friendly storage that doesn’t disrupt workflow
Place snacks, small plates, and cups kids use daily in a low drawer or base cabinet they can reach without your help. Keeping this section away from your main prep and cooking zone means children can grab what they need without stepping into your workflow during meal prep.
Heavy-item storage rules to reduce strain and breakage
Store heavy items like cast iron, stand mixers, and bulk containers in base cabinets or deep drawers at counter height rather than in uppers. Pulling heavy cookware down from an elevated shelf increases the risk of drops and physical strain over time. Placing heavy items low and close to where you use them keeps your kitchen safer and reduces the effort every meal requires.
13. Use specialty storage only where it solves a problem
Specialty storage inserts are easy to over-order during a renovation. Pull-outs, dividers, and custom organizers add cost quickly, and not all of them earn their place in a finished kitchen. One of the most practical kitchen cabinet layout tips is to evaluate each specialty upgrade against a specific problem you actually have, rather than adding them because a showroom made them look appealing.
Pull-outs worth considering and where they belong
Base cabinet pull-outs work best under the sink, in deep corner solutions, and in pantry cabinets where items would otherwise get buried. A pull-out shelf beneath the sink turns a dark cavity into genuinely usable cleaning supply storage. Avoid installing pull-outs in every base cabinet, because they add mechanical parts that wear over time and reduce the interior capacity of each box.
Pull-outs solve specific access problems well, but they are not a universal upgrade worth applying to every cabinet in your layout.
Spices, trays, cutting boards, and lids that stay organized
A vertical tray divider built into a base cabinet handles cutting boards, baking sheets, and pan lids without the sliding and stacking that makes these items frustrating to retrieve. Spice drawers with a slight angled insert keep labels visible without requiring you to remove every jar to find what you need. Both of these inserts address a real daily problem, which makes them worth the cost.
Upgrades that look great but hurt storage and flow
Glass-front cabinet doors create visual appeal but require you to keep interior contents deliberately arranged at all times. Appliance garages look clean in photos but often reduce accessible counter space directly in front of them. Evaluate both against how you actually use your kitchen before committing.
Next steps for your cabinet layout
These kitchen cabinet layout tips give you a strong foundation, but applying them well requires knowing your specific room dimensions, appliance specs, and how your household actually uses the kitchen. Reading through a list is a starting point, not a finished plan. The details that matter most, door swing paths, zone placement, drawer configurations, only become clear once someone walks through your space and asks the right questions.
If you’re planning a kitchen renovation on Cape Cod or the surrounding Massachusetts area, Suman Custom Carpentry designs and hand-builds custom cabinetry from our shop in Hyannis. Every project starts with a direct conversation with owner Dieyson Suman, so your layout decisions connect straight to the build process from the first meeting. No intermediaries, no guesswork between design and construction. Reach out to Suman Custom Carpentry to start your project with a consultation that takes your kitchen from a floor plan to a finished space.