
Your master bathroom should feel like the best room in the house, not the one you’ve been avoiding because the vanity is falling apart and the layout stopped making sense years ago. If you’re searching for master bathroom remodel ideas, you’re probably ready to turn that outdated space into something that actually matches the rest of your home. The good news: a well-planned renovation doesn’t have to mean gutting everything to get a high-end result.
At Suman Custom Carpentry, we build custom vanities, cabinetry, and built-ins for homeowners across Cape Cod, and bathrooms are where smart design choices make the biggest visual impact. From the vanity you see every morning to the storage that keeps clutter out of sight, the details matter. We’ve seen firsthand how the right custom millwork elevates a bathroom from basic to resort-level.
Below, we’re sharing six ideas that blend luxury aesthetics with real-world function. Whether you’re planning a full remodel or targeting a few key upgrades, these concepts will give you a clear starting point. Each one is designed to help you create a master bathroom that looks high-end, and holds up to daily life on the coast.
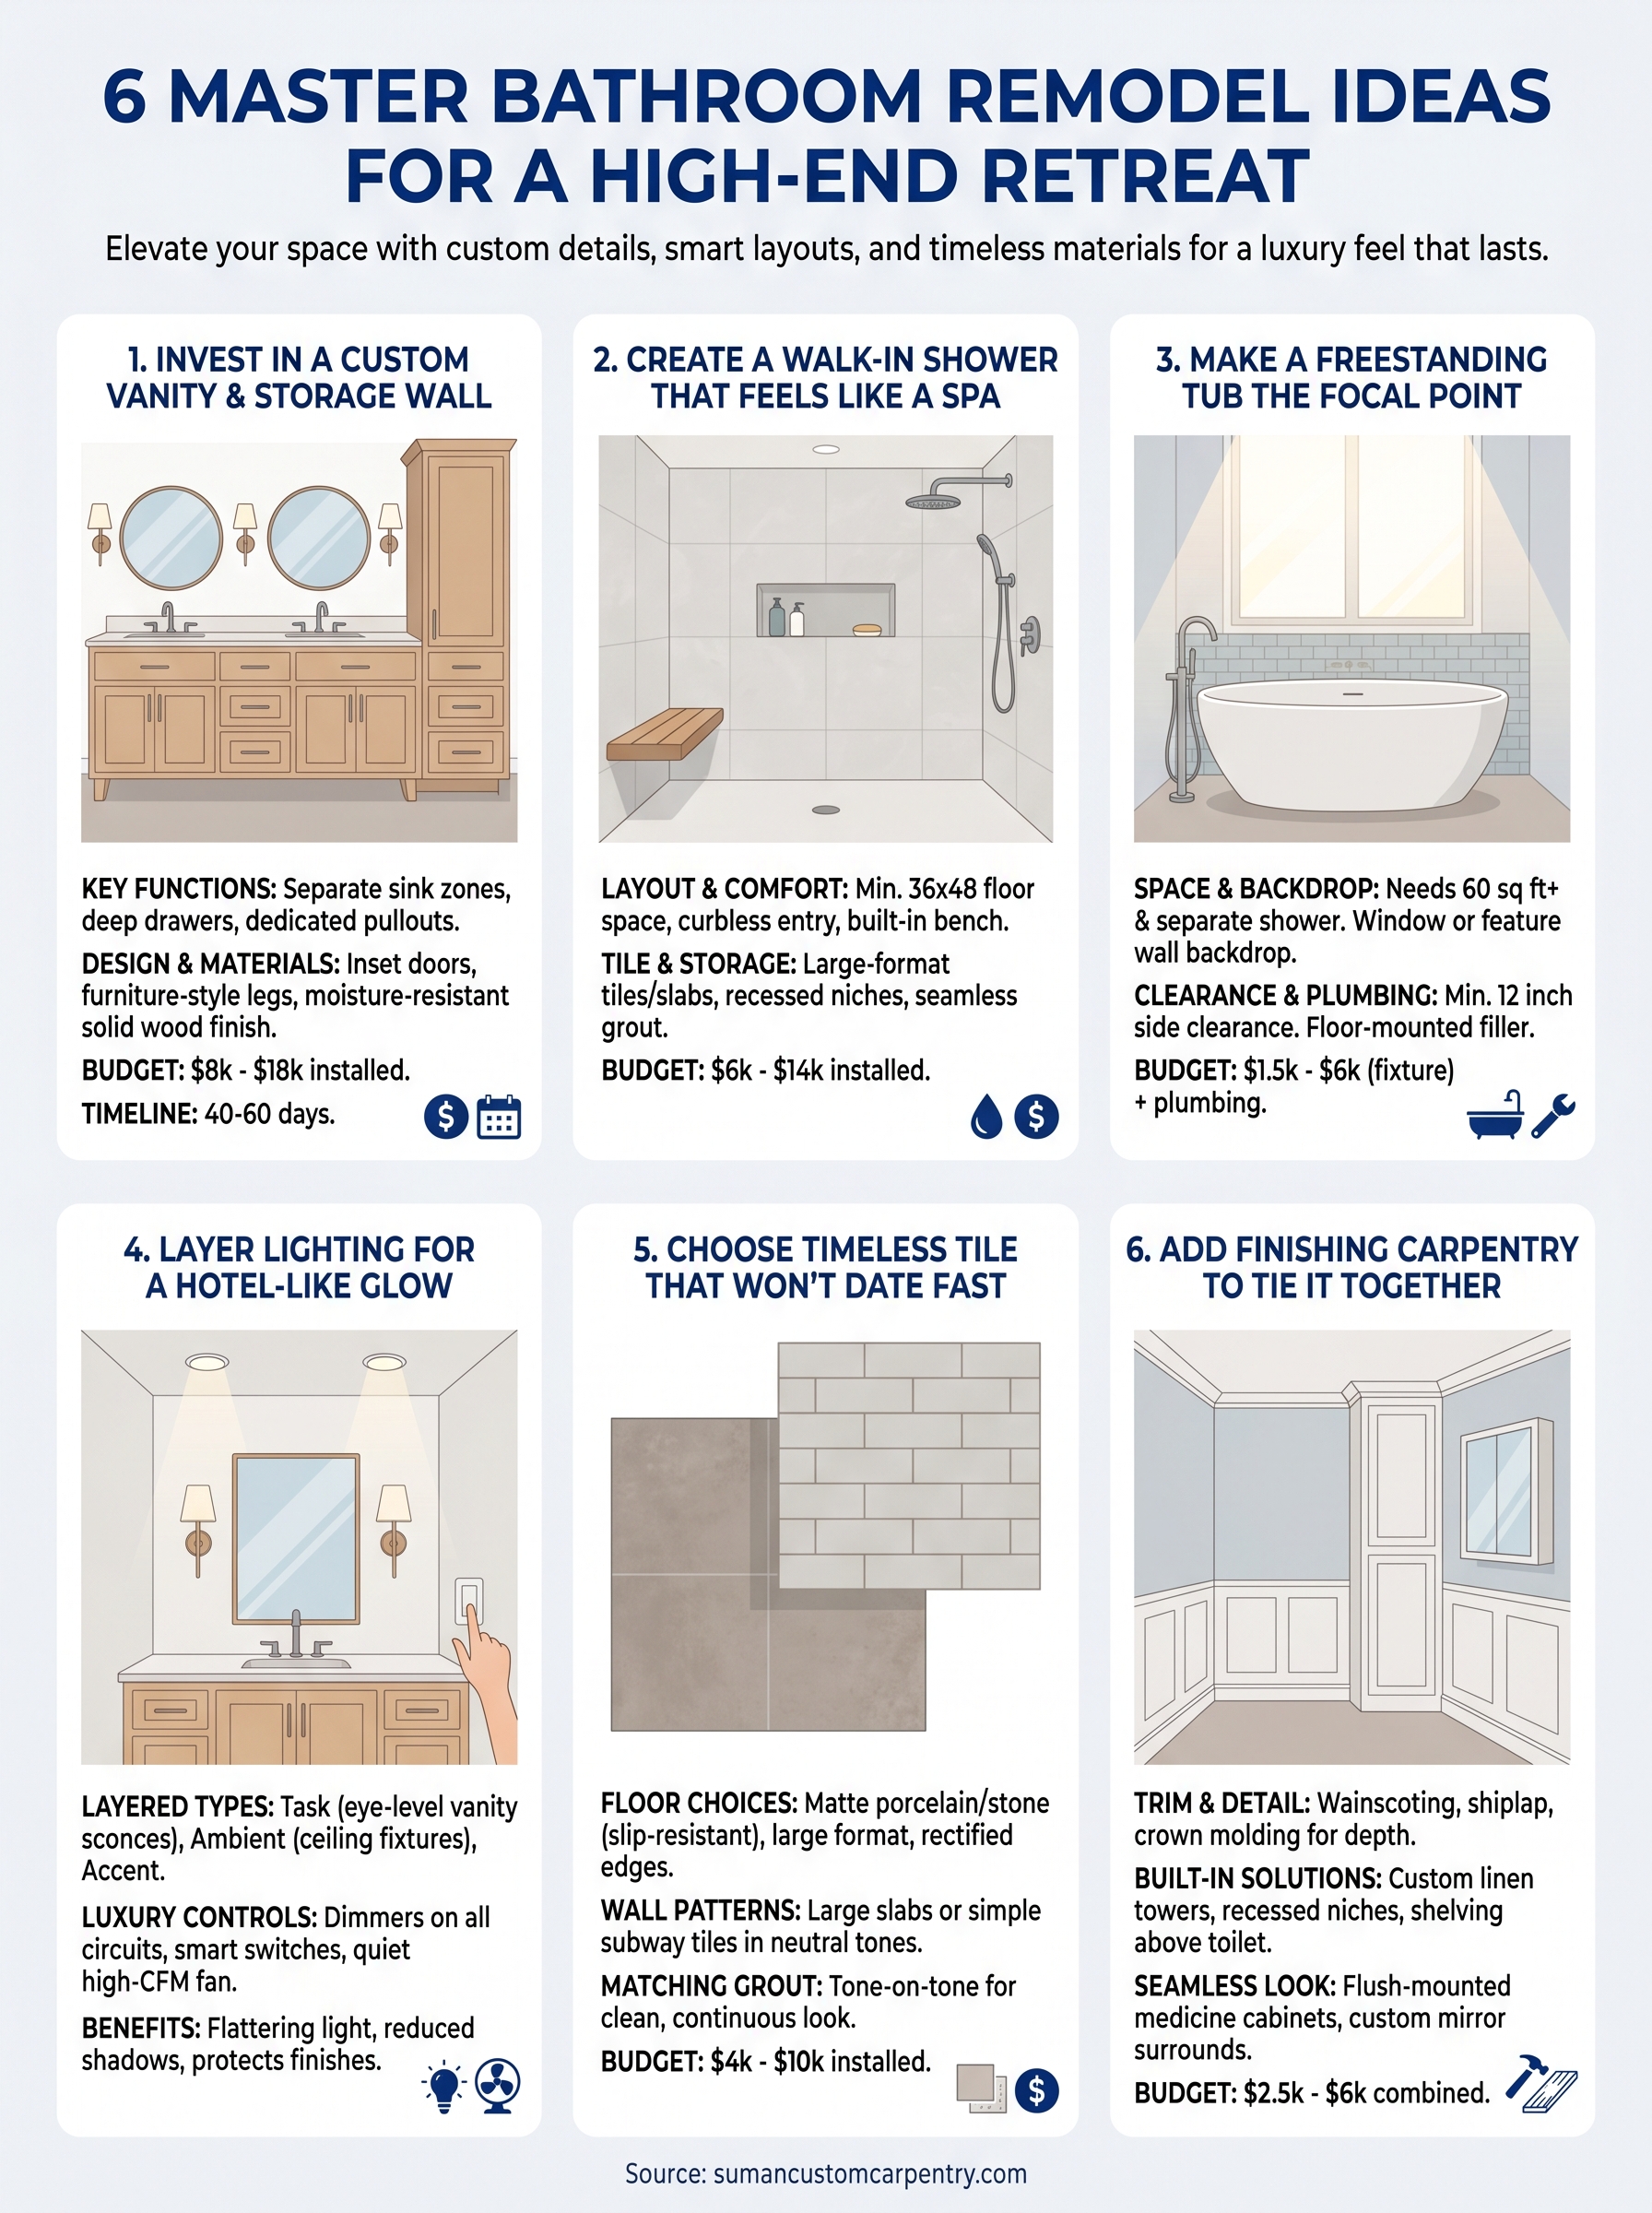
1. Invest in a custom vanity and storage wall
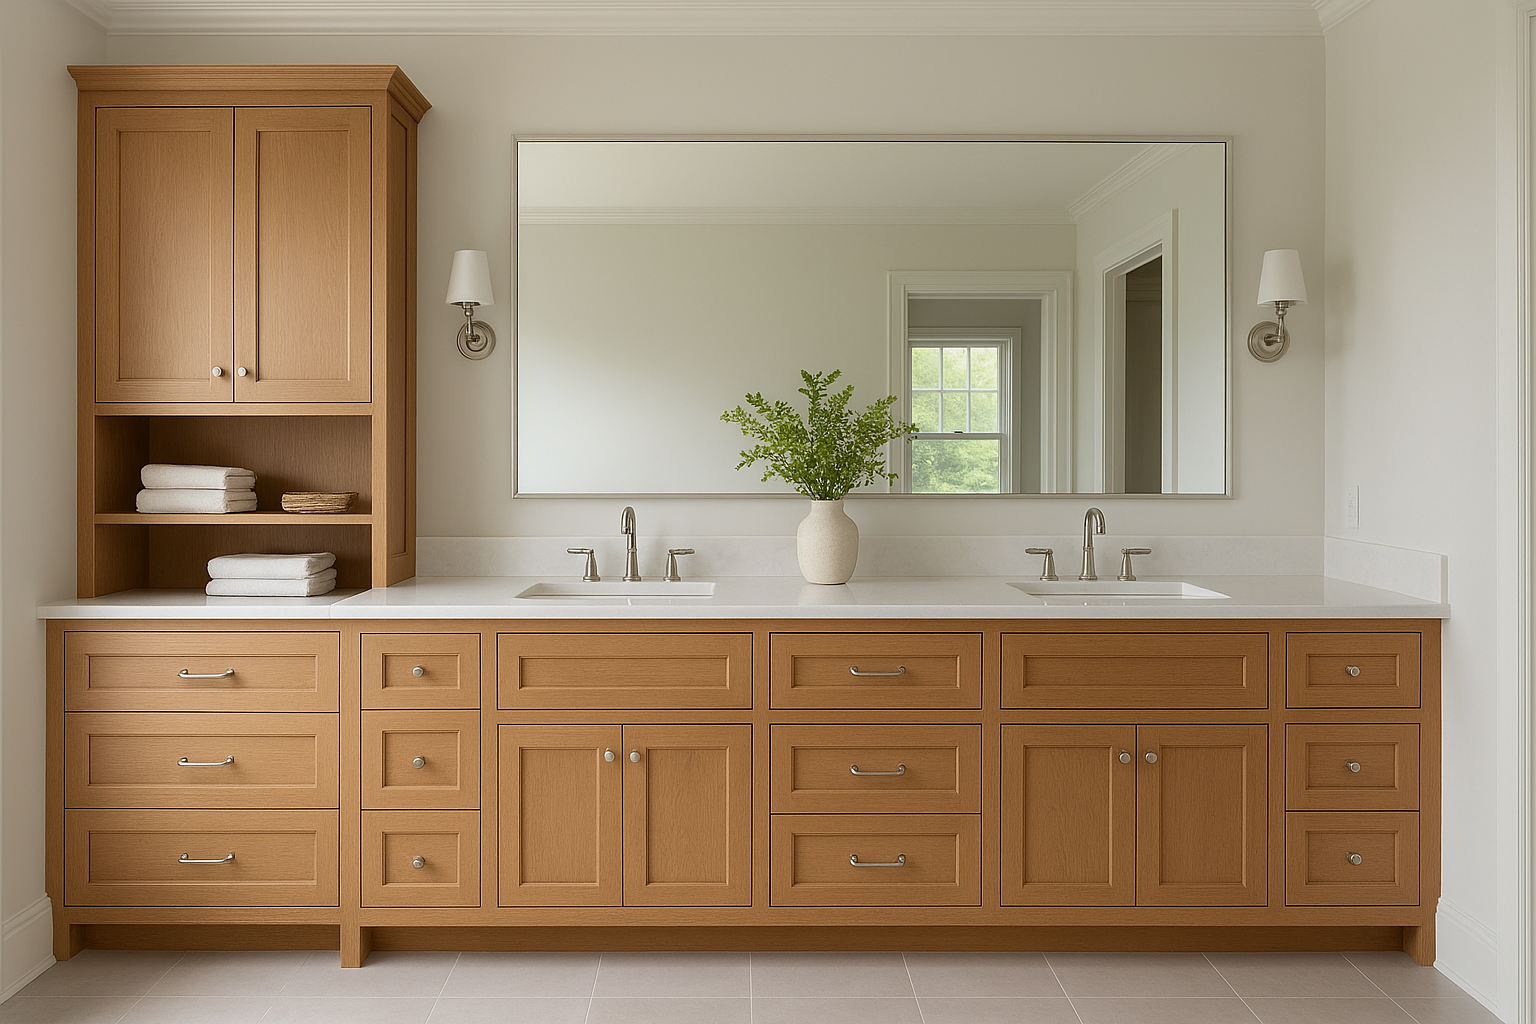
The vanity is the first thing you see every morning and the hardest-working surface in your bathroom. A custom-built vanity gives you exact dimensions, better storage layout, and a finished look that no prefab cabinet can match. If you’re building a shortlist of master bathroom remodel ideas, this one delivers the biggest visual return per dollar spent.
What to build for daily function
Start with how two people actually use the space. Separate sink zones with individual storage columns reduce morning conflicts and keep counters clear. Deep drawers outperform cabinet doors for toiletries, and a dedicated pullout keeps a hair dryer off the counter entirely. A full storage wall alongside or above the vanity handles towels, extra supplies, and anything you’d otherwise pile on a shelf.
- Drawer banks on each side for personal items
- Pullout organizers for appliances and cleaning supplies
- Upper cabinets for backup stock and linens
Design details that read high-end
The gap between a standard vanity and a custom one comes down to inset doors, furniture-style legs, and full-overlay panels that make the unit look built in. Soft-close hardware, consistent grain matching across door fronts, and integrated crown molding at the ceiling line all signal craftsmanship without announcing it. These details are what make a bathroom feel intentional rather than assembled.
A vanity that reads as a built-in furniture piece, not an appliance, is what separates a remodeled bathroom from a basic renovation.
Materials and finishes that hold up on the coast
Cape Cod homes deal with humidity and salt air year-round, which shortens the life of MDF, particleboard, and standard hardware faster than most homeowners expect. Solid wood with a moisture-resistant semi-gloss or satin finish holds up far better over time. Marine-grade or stainless hardware costs more upfront but avoids the corrosion and cabinet failure you’d otherwise face within five years.
Budget range and planning timeline
Expect to invest $8,000 to $18,000 installed for a custom vanity and storage wall, depending on size, material selection, and finish complexity. At Suman Custom Carpentry, the build and installation timeline runs 40 to 60 days from design sign-off, so plan your contractor sequence around that window before locking in a start date.
2. Create a walk-in shower that feels like a spa
A walk-in shower is one of the most impactful master bathroom remodel ideas you can execute without relocating plumbing. When the layout, tile, and storage all work together, the shower stops feeling like a utility and starts feeling like the reason you designed the room.
Layout choices that improve comfort and flow
Give the shower at least 36 by 48 inches of floor space, though 60 inches wide is where comfort really opens up. A curbless entry improves accessibility and keeps the visual line clean across the floor.
Tile, slab, and curb decisions that change the look
Large-format tiles, 24×48 or bigger, reduce grout lines and make the space read larger. Porcelain slabs on the back wall eliminate grout entirely and create a seamless, upscale finish.
The material you choose for the shower walls does more to define the overall feel of the bathroom than almost any other single decision.
Storage upgrades: niches, ledges, and built-in benches
Recessed niches keep bottles off the floor and out of sight. A built-in teak or stone bench adds function and visual weight. Consider these placements:
- Niche at shoulder height on the side wall
- Corner ledge for a second storage zone
- Bench along the back wall for comfort and towel staging
Budget range and waterproofing priorities
Expect $6,000 to $14,000 for a custom walk-in shower, depending on tile selection and size. Never cut the waterproofing membrane budget; a failed membrane means tearing out the entire installation.
3. Make a freestanding tub the focal point
A freestanding tub is one of those master bathroom remodel ideas that changes how the entire room reads. When placed correctly, it becomes the anchor of the space rather than just a fixture you use once a week.
When a tub makes sense and when it doesn’t
Your bathroom needs at least 60 square feet of open floor space and a separate walk-in shower for a freestanding tub to work well. If the tub would replace your only bathing option, reconsider the layout before committing.
Backdrop ideas: feature wall, window, or built-in shelving
Position the tub in front of a large window or a tiled feature wall to give it a natural visual frame. A built-in shelving unit behind the tub adds storage for towels and bath products while creating a designed backdrop without requiring major structural work.
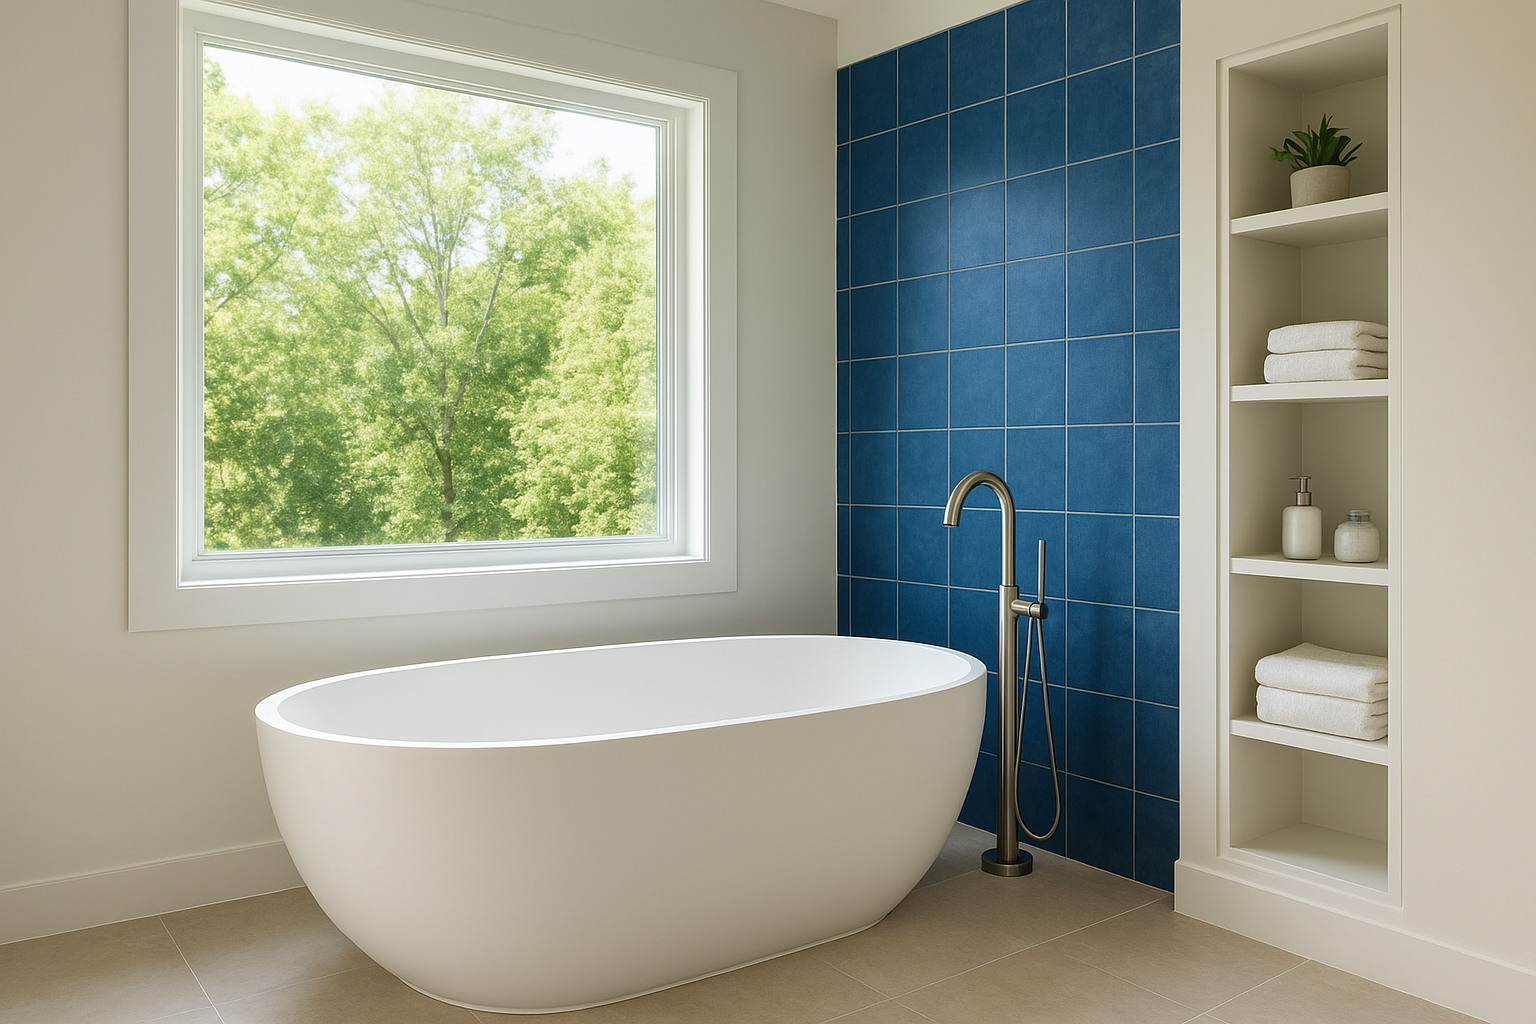
The backdrop you choose for a freestanding tub defines whether it reads as a design statement or an afterthought.
Fixture placement and clearances you need to get right
Plan for at least 12 inches of clearance on each side of the tub and 24 inches at the foot. A floor-mounted filler faucet positioned off-center avoids interfering with how you enter and exit the tub.
Budget range and plumbing considerations
Freestanding tubs range from $1,500 to $6,000 for the fixture alone, with floor-mounted faucets adding $500 to $2,000. If plumbing relocation is required, budget an additional $1,500 to $3,500 depending on how far the supply and drain lines need to move.
4. Layer lighting for a hotel-like glow
Lighting is one of the most underestimated master bathroom remodel ideas on any renovation list. Layered lighting means combining task, ambient, and accent sources so each zone of the bathroom serves a distinct purpose and the overall effect feels deliberate.
Vanity lighting that flatters and reduces shadows
Mount sconces at eye level on each side of the mirror, typically 60 to 65 inches from the floor, to eliminate the shadows a single overhead fixture casts across your face. Side-mounted sconces consistently outperform ceiling-only setups for daily grooming tasks:
- Sconces flanking the mirror at shoulder height
- Horizontal bar above the mirror when wall space is limited
The placement of your vanity lights does more for how the room feels each morning than almost any other single lighting decision.
Shower and ceiling lighting that feels intentional
Place recessed waterproof fixtures rated for wet zones directly inside the shower to avoid dark corners and uneven light. For the main ceiling, two spaced fixtures handle ambient light better than one central unit and prevent the flat, institutional look a single fixture creates.
Controls that add luxury: dimmers and smart switches
Install dimmers on every circuit you can, including both vanity and ceiling lines. Smart switches with preset scenes let you dial down the light in the evening without touching a single bulb or adding any hardware to the fixture itself.
Ventilation upgrades that protect your finishes
A quiet exhaust fan rated at 110 CFM or higher removes humidity before it reaches your cabinet finish and grout lines. Pair it with a humidity-sensing switch so it activates automatically and runs exactly as long as the room needs it.
5. Choose timeless tile and stone that won’t date fast
Tile is one of the master bathroom remodel ideas where the wrong choice ages the room the fastest. Neutral materials and clean geometry hold up better over time and add more resale value than anything bold or highly specific to a passing trend.
Floor tile choices that stay safe and easy to clean
Matte porcelain in warm white, soft gray, or a natural stone finish handles moisture and daily foot traffic without showing wear. Choose a slip-resistance rating of R10 or higher for any wet-area floor tile:
- 12×24 or larger format for fewer grout lines and a cleaner look
- Rectified edges for tighter joints and a more tailored finish
Wall tile patterns that look custom without feeling trendy
Large-format rectified porcelain or natural stone slabs on the main wall eliminate visual noise and give the room a seamless, upscale finish.
Subway tile in a straight-set or stacked pattern works well on secondary walls where you want a clean texture without introducing a pattern that competes with the rest of the space.
Your wall tile sets the tone for the entire room, so pick something that will look right in ten years, not just right now.
Grout color and trim pieces that sharpen the finish
Tone-on-tone or matching grout keeps the tiled surface reading as one continuous plane rather than a visible grid. Use Schluter trim strips or stone pencil liners at all transitions to finish edges cleanly:
- Trim strips at niche borders and shower thresholds
- Matching grout across floor and wall tiles for visual cohesion
Budget range and where to splurge vs save
Expect $4,000 to $10,000 installed for floors and primary wall surfaces. Spend on the feature wall material, whether that’s a large slab or a stone lookalike, and use simpler tile on secondary surfaces to manage the overall budget without pulling the room’s quality level down.
6. Add finishing carpentry that elevates the whole room
Finishing carpentry is one of the master bathroom remodel ideas that most homeowners underestimate until they see the completed space. Trim, built-ins, and millwork details pull every other decision together and give the room a composed, intentional quality that no single fixture can deliver on its own.
Trim, paneling, and ceiling details that add depth
Wainscoting or shiplap paneling on the lower half of the wall adds architectural texture without requiring a full tile installation. Crown molding at the ceiling line, especially when tied into the vanity cabinetry, makes the room feel taller and more refined. Common carpentry upgrades that add depth include:
- Beadboard or shiplap paneling below the chair rail
- Crown molding running continuously across vanity and ceiling
- Coffered or painted ceiling detail above the tub zone
Built-ins that replace cluttered counters
A custom linen tower or recessed storage niche removes the need for freestanding furniture that crowds the floor plan. Built-in shelving above the toilet uses vertical space most bathrooms waste entirely.
Custom built-ins do more to reduce visual clutter than any organizer you can set on a counter.
Mirror and medicine cabinet solutions that look seamless
Frameless recessed medicine cabinets flush-mounted into the wall read far cleaner than surface-mounted units. Pair them with a custom wood surround or backlit mirror above each sink zone for a finished, cohesive result that looks intentional rather than added as an afterthought.
Budget range and sequencing with other trades
Expect $2,500 to $6,000 for trim, built-ins, and mirror work combined. Schedule carpentry after tile and plumbing are complete but before final paint, so your carpenter can scribe and fit cleanly against finished surfaces without rework.
Bring it all together
The best master bathroom remodel ideas work because each element reinforces the others. A custom vanity looks sharper next to well-placed lighting. A walk-in shower reads cleaner when the tile and trim decisions align. A freestanding tub becomes a focal point only when the backdrop and clearances are planned from the start. None of these upgrades operate in isolation, and the rooms that look truly high-end are the ones where every decision was made with the full picture in mind.
Your bathroom can reach that level without requiring a complete gut renovation. Prioritize the elements that give you the most return, sequence your trades correctly, and use custom millwork to tie the finished surfaces together. If you’re ready to start planning, talk to Suman Custom Carpentry about a custom vanity or built-in that anchors your renovation and sets the standard for everything else in the room.