
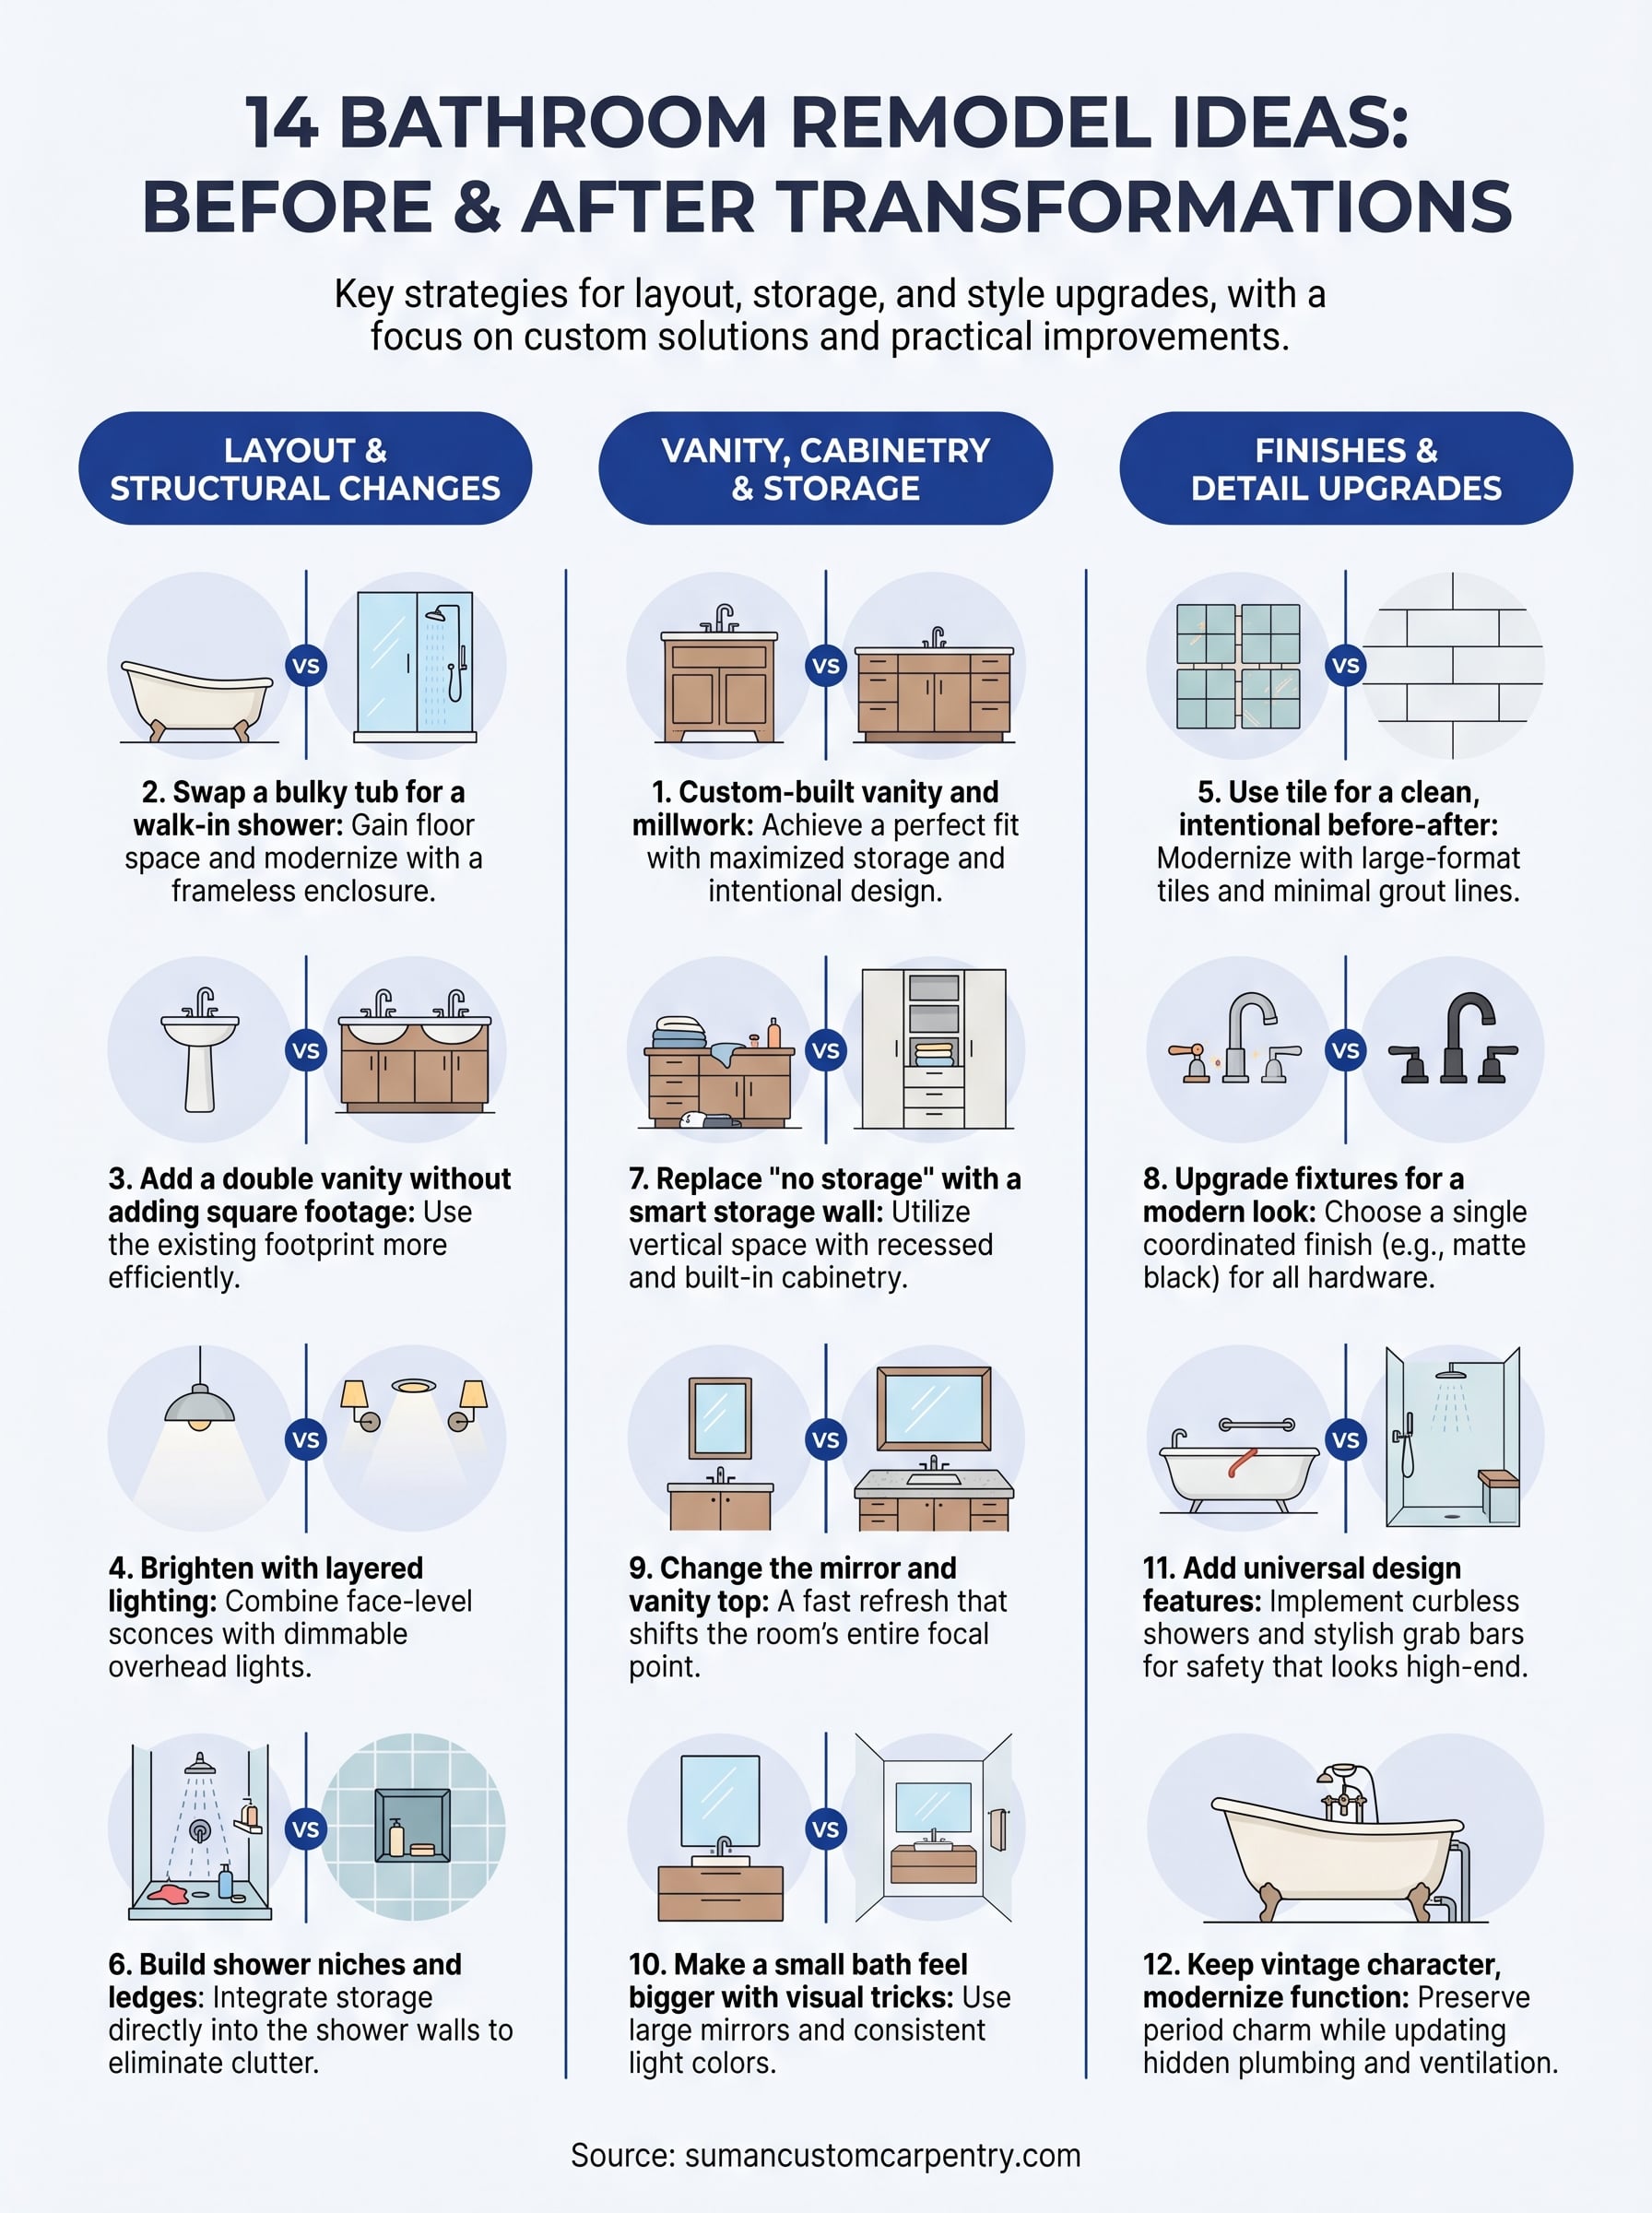
A dated vanity, worn-out tile, or a cramped layout can make your bathroom feel like the least inviting room in the house. But sometimes all it takes is seeing a real transformation to realize what’s actually possible. That’s why bathroom remodel ideas before and after comparisons are so useful, they show you exactly what changed, what worked, and what you could realistically pull off in your own home.
At Suman Custom Carpentry, we build custom vanities, cabinetry, and millwork for homeowners across Cape Cod, so we’ve seen firsthand how a single well-crafted piece can shift an entire bathroom. From our shop in Hyannis, we design and hand-build everything in-house, which gives us a close-up view of what makes a remodel look finished versus thrown together. That perspective shaped this list of 14 before-and-after bathroom remodels worth studying.
Each example below breaks down what was done and why it works, so you can borrow the ideas that fit your space and skip the ones that don’t. Whether you’re planning a full gut renovation or a targeted upgrade like a new custom vanity, these transformations will help you picture the end result before you commit.
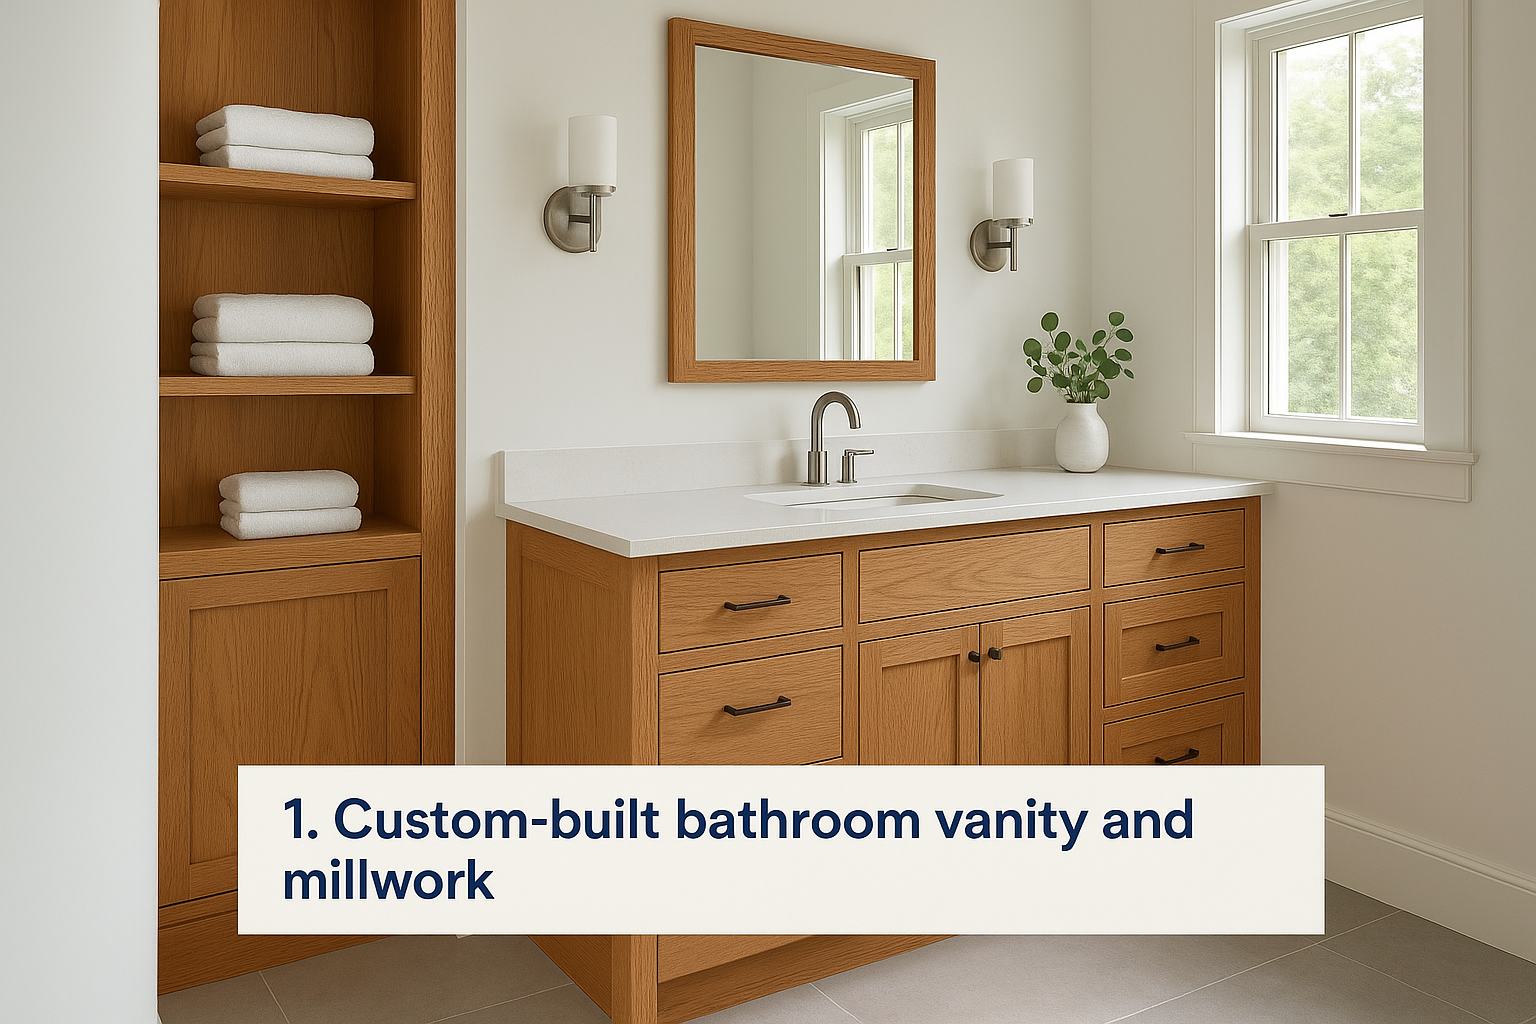
1. Custom-built bathroom vanity and millwork
A custom vanity is one of the highest-impact changes you can make in any bathroom, and before-and-after comparisons make that obvious fast. It’s the piece that sets the tone for the entire room, and a vanity shaped to your exact dimensions does something a box-store cabinet simply can’t: it fills the space completely, without gaps, filler strips, or wasted corners. At Suman Custom Carpentry, the vanity is often the first thing clients point to when showing off their finished bathroom.
Before: What the space usually lacks
Most standard bathrooms ship with builder-grade vanities chosen for cost and speed, not fit. The cabinet is a generic size, which leaves wasted space beside it, above it, or both. The countertop overhangs awkwardly, the drawers are shallow, and the finished look feels accidental rather than designed. Storage is never quite right, so bottles pile up on the counter and towels end up on the floor.
After: What changes when you build the vanity to fit
When you replace that generic cabinet with a custom-built piece, every dimension is designed around your room. The depth can align with your plumbing layout, the height can suit the people using it daily, and the storage zones can reflect how you actually move through your morning routine. A hand-built vanity also holds up better over time because the joinery, materials, and finish are selected for durability rather than hitting a price point. The result looks intentional because it is.
A custom vanity built to fit your exact space will consistently outperform any off-the-shelf alternative on storage capacity, finish quality, and long-term durability.
Key moves to copy in your own remodel
Focus on fit before aesthetics: cabinet dimensions, drawer counts, and storage zones should all be decided before you pick a door style or finish. Working with a carpenter from the design stage gives you a product that solves your specific problems, not a generic template.
- Run the cabinet to the ceiling to gain upper storage without expanding the footprint
- Choose a countertop material suited to your humidity level and cleaning habits
- Plan drawer interiors early, with shallow drawers at the top and deeper ones below for bulkier items
Cost and timeline notes
A custom vanity costs more upfront than a stock cabinet, but you’re paying for fit, material quality, and a piece built to last several decades. At Suman Custom Carpentry, every vanity is hand-built in our Hyannis shop and comes with a lifetime guarantee on cabinet boxes and doors.
Lead time depends on project complexity, but most standalone vanity builds run 3 to 6 weeks from design sign-off to installation day. Building that window into your renovation schedule early keeps the rest of your project moving without delays.
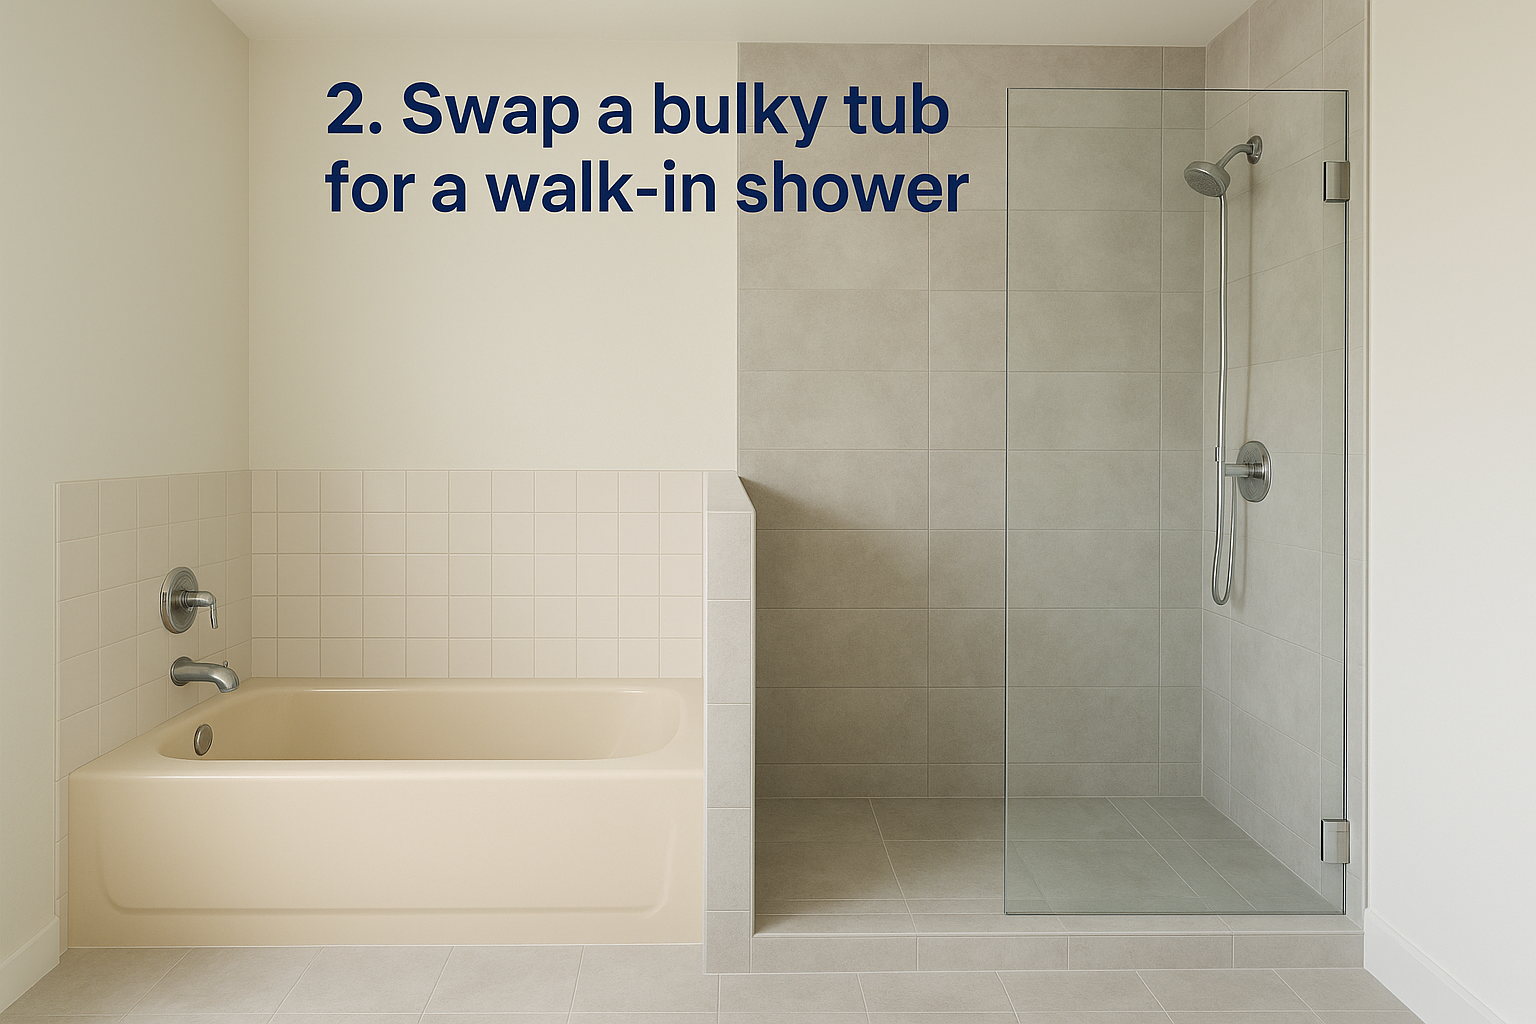
2. Swap a bulky tub for a walk-in shower
Removing a tub you rarely use and replacing it with a walk-in shower is one of the most searched bathroom remodel ideas before and after transformations, and for good reason. A standard alcove tub can eat up 40 to 50 square feet of floor plan, and if no one is bathing in it regularly, that space is simply wasted.
Before: Common layout pain points
Most bathrooms built before 2000 were designed with a tub-shower combo as the default, regardless of how the household actually uses the space. The result is a narrow shower area boxed in by a tub wall, limited head clearance, and a floor that never fully drains. Cleaning the tub surround becomes a recurring chore, and the overall feeling stays cramped rather than comfortable.
After: How a shower opens up the room
Once you remove the tub, the entire floor plan shifts. A well-designed walk-in shower uses the same footprint but feels dramatically more open because the walls come down and sightlines extend across the room. Large-format tiles on the shower floor and walls reduce grout lines, which makes the space look cleaner and bigger. A frameless glass enclosure pushes that effect even further.
A frameless glass shower enclosure is one of the fastest ways to make a bathroom feel larger without changing the room’s actual square footage.
Key moves to copy in your own remodel
Three details consistently separate a finished walk-in shower from one that looks like an afterthought. Each one is worth planning before the tile order goes in.
- Install a linear drain along one wall to simplify the floor slope and reduce visual clutter
- Choose a shower head with adjustable height to suit every person in the household
- Use the same tile inside and outside the shower to keep the eye moving through the space
Cost and timeline notes
Tub-to-shower conversions typically run two to four weeks depending on tile work, waterproofing requirements, and whether any plumbing needs to move. Budget more time if existing drain lines require relocation, as that step adds both labor and local inspection requirements.
3. Add a double vanity without adding square footage
Among the most practical bathroom remodel ideas before and after transformations, switching from a single-sink vanity to a double setup solves a real daily problem without requiring you to knock out a wall. The key is using the existing footprint more efficiently rather than expanding it.
Before: The single-sink bottleneck
A single-sink vanity in a shared bathroom creates a daily traffic jam, especially during morning routines. Counter space fills fast with two people’s products, and one small sink forces everyone to wait. The storage situation is usually just as tight, with a single cabinet that runs out of room long before it runs out of users.
Fitting a double vanity into your existing space is less about adding square footage and more about replacing the wrong cabinet with the right one.
After: How to fit two sinks and keep storage
When you replace a single-sink cabinet with a custom-built double vanity, you gain a second sink without changing the room’s footprint. A carpenter can build the cabinet to the exact width of your wall, which means no wasted space on either side and no filler strips. Drawers and cabinets can be distributed evenly so each person gets dedicated storage, and the counter depth can stay standard while the layout improves.
Key moves to copy in your own remodel
Three details help a double vanity actually work in a tight bathroom rather than just crowding it further.
- Keep the sink basins narrower (around 12 to 15 inches each) to preserve counter space between them
- Use under-mount sinks to simplify cleaning and keep the counter surface clear
- Match the cabinet finish to the wall color to reduce visual weight in a smaller room
Cost and timeline notes
A custom double vanity typically costs more than two standard sinks side by side, but the result is a single unified piece that looks built into the room. Build time at Suman Custom Carpentry generally runs three to five weeks from approved design to installation.
4. Brighten the bathroom with layered lighting
Lighting is one of the most overlooked bathroom remodel ideas before and after comparisons, but the difference in photos is always striking. A bathroom that felt dim and flat with a single overhead fixture can look completely different with three sources of light working together, and you often don’t need to move a single wall to get there.
Before: Why "one ceiling light" never works
Most bathrooms rely on a single ceiling-mounted fixture centered in the room, and that setup creates as many shadows as it eliminates. Light coming from directly above hits the top of your head and leaves your face in shadow, which makes tasks like shaving or applying makeup harder than they need to be. The color rendering in that kind of light also tends to make finishes look flat and dull.
After: A brighter, more flattering setup
Adding lights at face level on either side of the mirror changes the quality of light immediately. Sconces or a lighted mirror bar positioned at eye height eliminate the shadows that overhead lighting creates. Combine that with a dimmable ceiling fixture or recessed cans, and you have a bathroom that works for bright mornings and relaxed evenings.
Layered lighting with a dimmable option gives you one bathroom that serves two completely different moods without any extra square footage.
Key moves to copy in your own remodel
Three changes consistently produce the biggest improvement in bathroom lighting.
- Add vanity sconces at 60 to 65 inches from the floor for even face-level light
- Install a dimmer switch on at least one circuit to control intensity
- Use bulbs rated 2700K to 3000K for warm, accurate color rendering near skin tones
Cost and timeline notes
Lighting upgrades are among the more affordable bathroom changes you can make. Most electricians complete a vanity lighting addition in one to two days, and the fixtures themselves range widely in price depending on finish and style.
5. Use tile to create a clean, intentional before-after
Tile is one of the most powerful tools in any bathroom remodel ideas before and after comparison because the visual shift is immediate and undeniable. The right tile selection pulls a bathroom into a completely different decade, while the wrong one keeps it anchored in whatever year the house was built.
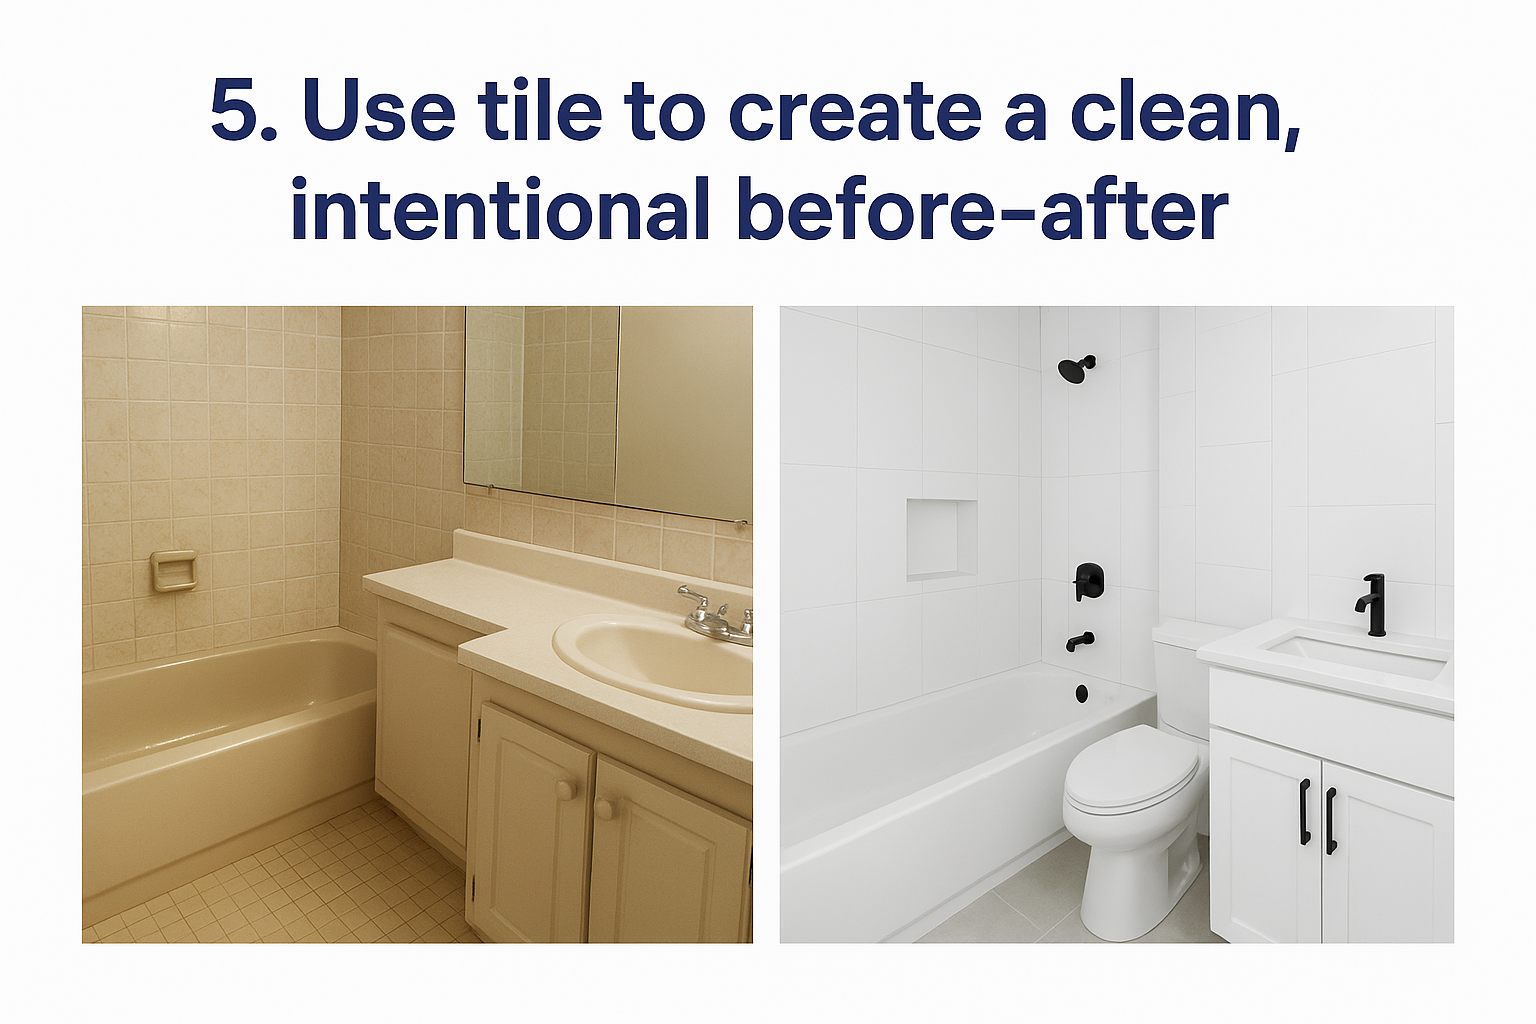
Before: Dated finishes that drag the room down
Most bathrooms that need help share a common tile problem: small, busy patterns and heavy grout lines that make the room feel smaller and harder to clean. Four-inch ceramic tiles from the 1980s and 1990s, often in beige or dusty pink, create a visual texture that reads as dated no matter how updated the fixtures around them are. The grout lines absorb grime over time, and no amount of scrubbing fully restores the original look.
After: Two tile upgrades that transform the look
Replacing dated wall tile with large-format rectangular tiles (think 4×12 or 3×12 subway formats in a vertical stack) immediately modernizes the space. Fewer grout lines mean less visual noise and easier maintenance. The second upgrade is the floor: switching to a matte, larger-format floor tile with minimal grout spacing reduces the busy patchwork effect and makes a small bathroom feel noticeably more open.
Large-format tiles with minimal grout spacing are one of the simplest ways to make a bathroom look more expensive without changing the layout.
Key moves to copy in your own remodel
- Choose rectified tiles for tighter grout joints and cleaner lines
- Keep wall and floor tiles in the same color family to extend the visual space
- Use a contrasting tile only in one intentional zone, like a shower niche or accent wall
Cost and timeline notes
Tile work varies based on square footage and pattern complexity, but a full bathroom tile replacement typically takes one to two weeks for a skilled installer. Budget extra time if your subfloor or existing wall substrate needs repair before new tile goes down.
6. Build shower niches and ledges that stop the clutter
Among the bathroom remodel ideas before and after transformations that get overlooked the most, built-in shower storage consistently delivers one of the clearest visual improvements. When you plan storage into the walls themselves rather than adding it later, the shower looks designed from the start rather than patched together over time.
Before: Bottles on the floor and corners that mildew
Without dedicated storage, the average shower becomes a collection point for bottles, razors, and loofahs stacked on whatever flat surface exists. Corner caddies rust. Plastic organizers leave permanent marks on tile. The floor corners collect moisture and soap residue, and mildew builds in areas that are nearly impossible to scrub once it takes hold.
After: Storage that looks built-in, not added on
When you tile a niche directly into the shower wall, the result reads as a finished architectural detail rather than storage you added as an afterthought. Ledges built at varying heights give you dedicated zones for shampoo, soap, and daily-use items without crowding the floor.
A tiled shower niche at shoulder height keeps products within easy reach and eliminates the floor clutter that makes a clean shower impossible to maintain.
Key moves to copy in your own remodel
Planning these details before tile work starts is the only way to get them right without expensive demolition later.
- Position the main niche between studs to avoid waterproofing complications
- Build a secondary lower ledge for razors or a shave brush to separate categories
- Use the same tile inside the niche as the surrounding wall for a seamless look
Cost and timeline notes
Niches and ledges add minimal cost when planned before tile installation begins. Retrofitting them after the fact requires cutting into finished walls, which typically adds two to four days of additional labor and material cost.
7. Replace "no storage" with a smart storage wall
Among the bathroom remodel ideas before and after comparisons that consistently surprise people, transforming a wall with no storage into a fully functional built-in system ranks high. Most bathrooms have at least one underused wall, and turning it into organized, recessed storage changes how the entire room functions on a daily basis.
Before: The towel pile, the counter clutter, the chaos
Without dedicated storage, every flat surface in a bathroom eventually becomes a dumping ground. Towels stack on the toilet tank, counter space disappears under products, and cabinets beneath the vanity become impossible to navigate. The visual clutter makes the room feel smaller and harder to clean, and the functional problem only gets worse as more people share the space.
After: Recessed and vertical storage that disappears
A built-in storage wall takes all of that surface clutter and moves it into the walls and vertical zones where it becomes part of the architecture. Recessed medicine cabinets, open shelving at eye level, and enclosed lower cabinets for bulk items give each category its own dedicated place. The room looks calmer because everything is contained, and cleaning becomes straightforward with clear counter surfaces.
Recessed storage built into the wall depth keeps your floor plan intact while removing every piece of counter clutter in one move.
Key moves to copy in your own remodel
Three decisions make a storage wall work rather than just look good in photos.
- Use open shelving for items you reach daily and closed cabinets for everything else
- Mix fixed shelves with adjustable ones so the system can adapt as your needs change
- Paint shelving and cabinet interiors the same color as the wall to reduce visual weight
Cost and timeline notes
Custom storage walls built to fit your specific dimensions take three to five weeks from design to installation at Suman Custom Carpentry. The investment pays back quickly in daily time saved and a bathroom that stays tidy without constant effort.
8. Upgrade fixtures for a modern look and easier cleaning
Among the bathroom remodel ideas before and after changes that cost the least per impact delivered, swapping out outdated fixtures ranks near the top. Faucets, towel bars, toilet paper holders, and shower hardware all age visibly, and when they start to look worn, they pull every other element in the room down with them.
Before: Mixed metals, worn finishes, constant water spots
Most bathrooms accumulate a mix of metals over time as fixtures get replaced one at a time without a coordinated plan. Chrome from 2005 sits next to brushed nickel from 2012, and a bronze towel bar rounds out the collection. The result feels scattered and unintentional, and polished chrome in particular shows every water spot and fingerprint the moment it dries.
After: One finish, fewer seams, better performance
Replacing all visible fixtures with a single coordinated finish, such as matte black, brushed gold, or satin nickel, creates immediate visual cohesion. Matte finishes hide water spots far better than polished chrome, which means less daily maintenance without any change to how you use the space.
Choosing one fixture finish throughout the bathroom is the fastest way to make the room look intentionally designed rather than assembled piece by piece over a decade.
Key moves to copy in your own remodel
Three decisions keep this upgrade from becoming an incomplete project that creates new mismatches instead of resolving old ones.
- Replace all visible hardware at once so no mismatched pieces remain
- Choose a matte or brushed finish over polished chrome to reduce water spot visibility
- Upgrade the showerhead and faucet aerators together for consistent water flow
Cost and timeline notes
Fixture replacements are typically a one-to-two-day project for a plumber, and most hardware swaps require no wall work or permit. Budget $300 to $1,000 or more depending on the finish and brand quality you select.
9. Change the mirror and vanity top for a fast refresh
Two elements in every bathroom do more visual work than they get credit for: the mirror and the countertop. As standalone bathroom remodel ideas before and after swaps, replacing them requires no plumbing moves and no major demo, but the result photographs like a full renovation.
Before: A builder-grade focal point that dates everything
Most production homes ship with a frameless plate glass mirror cut to match the vanity width and a laminate or cultured marble top in a color chosen to offend nobody and impress nobody. Over time, the mirror edges silver and chip, and the countertop stains in ways that scrubbing won’t fix. Every other upgrade you make in the room sits next to these two tired pieces, and they drag the finished result down.
After: A new centerpiece without moving plumbing
Swap the plate glass for a framed mirror or a round mirror in a bold finish, and the wall above the vanity immediately reads as a design decision rather than a leftover. Replace the countertop with stone, quartz, or a solid-surface slab, and the vanity looks custom even if the cabinet underneath hasn’t changed. Together, these two swaps shift the entire focal point of the room.
Replacing the mirror and countertop together gives you the visual impact of a full vanity renovation at a fraction of the cost and timeline.
Key moves to copy in your own remodel
- Size the new mirror to the width of the cabinet, not the full wall, to create intentional framing
- Choose a countertop with minimal veining in a small bathroom to avoid overwhelming the space
- Match the mirror frame finish to your new fixture hardware for a coordinated result
Cost and timeline notes
A countertop replacement and mirror swap typically take one to three days combined, and most of that time is countertop templating and fabrication. Budget $400 to $1,500 or more for the countertop depending on material, plus $100 to $600 for a quality framed mirror.
10. Make a small bath feel bigger with visual tricks
The smallest bathroom in your home doesn’t have to feel like a closet. Among the bathroom remodel ideas before and after examples that get the strongest reactions, space-expansion tricks consistently land near the top because the change feels dramatic without moving a single wall.
Before: Tight clearances and heavy-looking pieces
Small bathrooms feel cramped for two reasons: limited square footage and design choices that emphasize every inch of that limitation. A dark paint color absorbs light. A pedestal sink with exposed plumbing draws attention to the floor. A large, ornate vanity mirror fills the wall without reflecting enough light back into the room. Together, these choices make 45 square feet feel noticeably smaller than it actually is.
After: Two changes that create instant "more space"
The two highest-impact moves are a large mirror and a consistent floor-to-ceiling color palette. A mirror that spans the full width of the vanity reflects light from every angle, doubling the perceived depth of the room. Painting the walls and ceiling the same light color removes the visual boundary where the wall stops, which raises the apparent height without any structural work.
A mirror that matches the full width of your vanity effectively doubles the perceived depth of the room without touching the actual layout.
Key moves to copy in your own remodel
Small changes in material placement produce outsized results in a tight bathroom.
- Use large-format floor tiles laid diagonally to push the eye toward the corners
- Choose a wall-mounted vanity to expose floor space and make the room feel taller
- Install a clear glass shower enclosure instead of a frosted or framed panel
Cost and timeline notes
Most of these moves fall into the low-to-mid cost range of a bathroom project. A wall-mounted vanity installation and large mirror swap typically takes two to three days to complete, making this one of the faster upgrades on this list.
11. Add universal design features that look high-end
Universal design used to mean clinical-looking grab bars and oversized fixtures that made a bathroom feel more like a hospital room than a home. That association has completely changed. Among the most underrated bathroom remodel ideas before and after transformations, updating a bathroom with accessible features now produces results that look deliberately luxurious rather than medically necessary.
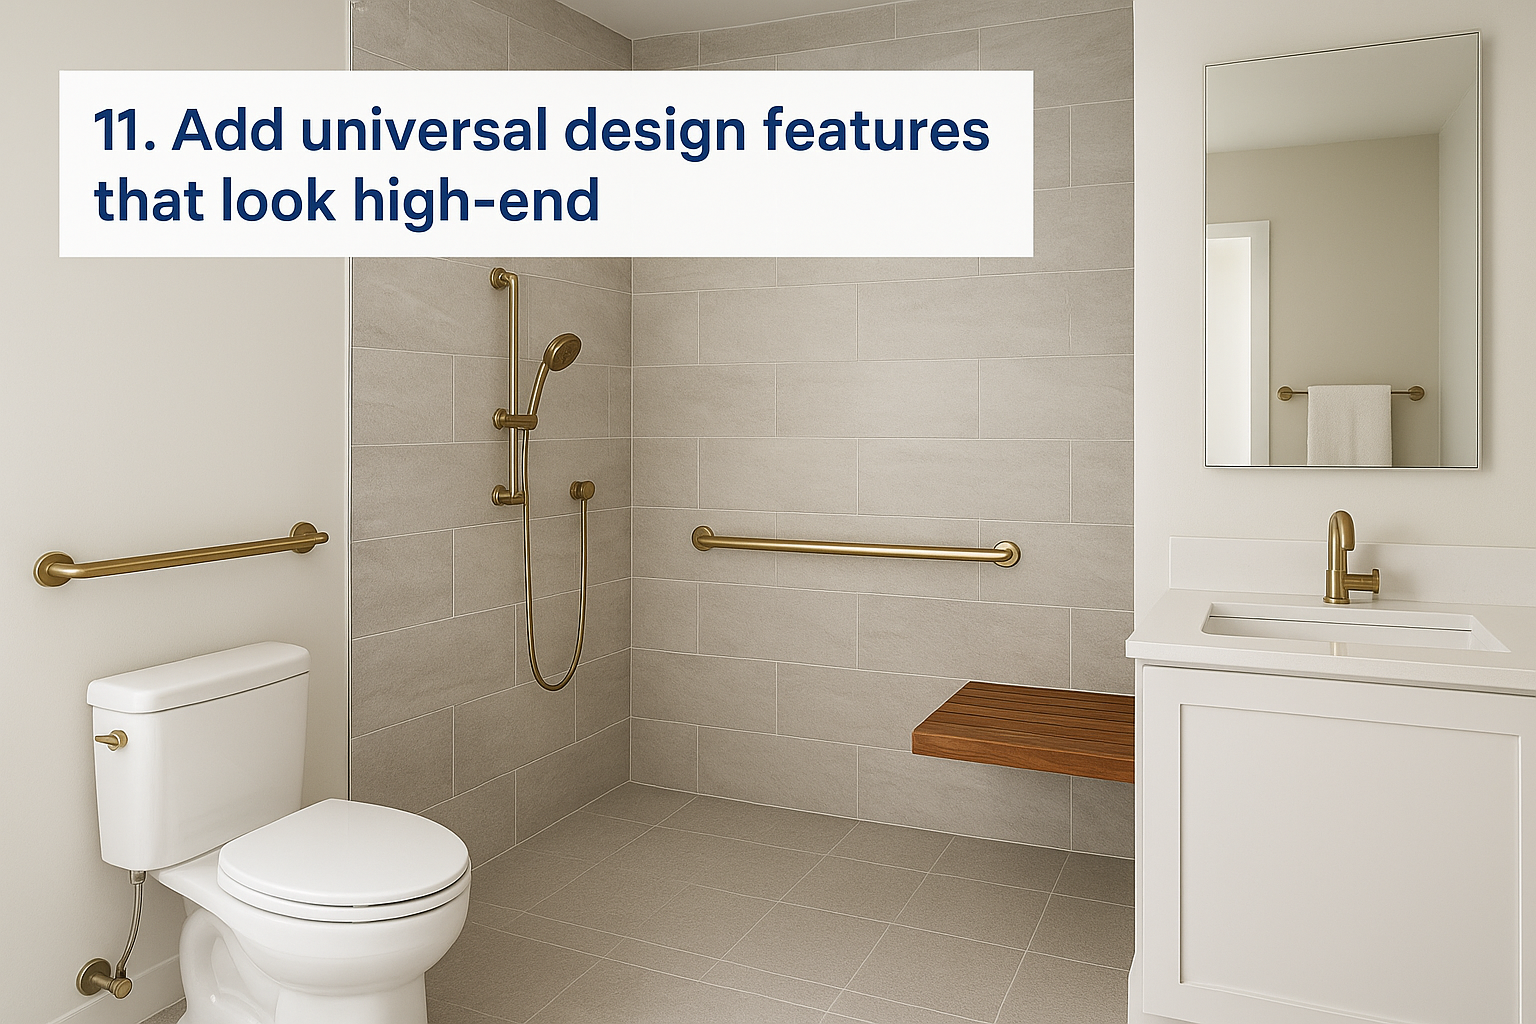
Before: Slippery floors and a step-in tub that feels risky
Many older bathrooms were built with high tub walls, slick tile floors, and narrow doorways that create real safety risks without anyone realizing it until something goes wrong. A step-over tub threshold becomes a daily hazard for anyone with limited mobility, and polished floor tile with small grout lines offers almost no traction when wet. These problems often go unaddressed because the fixes are assumed to look institutional.
After: A safer bathroom that still feels stylish
Replacing a step-in tub with a curbless, barrier-free shower eliminates the threshold entirely while producing one of the cleanest-looking shower designs available. Installing a teak or stone bench inside the shower reads as a spa feature, not a safety aid. Matte, textured floor tile rated for wet areas provides grip without looking utilitarian, and it photographs beautifully in any finish.
A curbless shower with a built-in bench solves a real safety problem while producing one of the most sought-after luxury bathroom looks available today.
Key moves to copy in your own remodel
- Choose grab bars in a brushed gold or matte black finish to match your other hardware
- Install a handheld showerhead on an adjustable rail for flexibility and daily convenience
- Use a wider doorway opening if your layout allows, as it improves both accessibility and resale value
Cost and timeline notes
Universal design upgrades often overlap with other remodel work, making them most cost-effective when planned alongside a broader shower or flooring project. Most additions add one to three days to an existing renovation schedule.
12. Keep vintage character while modernizing function
Older homes on Cape Cod often have bathrooms with real architectural character that newer construction simply can’t replicate. Among the most nuanced bathroom remodel ideas before and after projects, preserving that vintage feel while fixing real functional problems requires careful decisions about what stays, what goes, and what gets upgraded quietly beneath the surface.
Before: Charm you love, problems you can’t live with
Many period bathrooms carry details worth saving: hex tile floors, clawfoot tubs, subway tile, and hardware with weight and detail that modern fixtures rarely match. The problem is that the same room often has corroded plumbing, poor ventilation, and surfaces that have passed the point of restoration. Owners get stuck between tearing everything out and losing the character, or leaving it alone and living with the dysfunction.
Preserving vintage character and modernizing function are not competing goals as long as you decide early which details are non-negotiable and which ones only look original.
After: Period style with modern comfort
A well-executed vintage remodel keeps the visual anchors like the hex tile floor, the clawfoot tub, or the subway wall tile, and replaces everything that sits behind the walls or under the floor. New waterproofing, updated plumbing supply lines, and a properly exhausted ventilation fan disappear completely once the room is finished. The result looks untouched by time while functioning like a bathroom built this year.
Key moves to copy in your own remodel
- Source reproduction fixtures in period-appropriate styles rather than substituting modern shapes that clash
- Regrout or replace original tile in matching sizes before committing to a full tile demo
- Install a quiet, high-CFM exhaust fan above the shower to protect original finishes from moisture damage
Cost and timeline notes
Vintage-preservation remodels take longer than standard renovations because sourcing period-accurate materials adds lead time. Budget four to six weeks for a bathroom that requires both reproduction fixtures and any hidden infrastructure work behind the walls.
A simple way to pick your next move
The best bathroom remodel ideas before and after comparisons all point to the same starting principle: fix the biggest daily frustration first. If your morning routine stalls at one sink, start with a double vanity. If clutter defeats every cleaning effort, tackle storage before anything else. Picking the right first move keeps your project focused and your budget working where it matters most.
From there, build outward. Once your storage works and your layout functions, cosmetic upgrades like tile, mirrors, and fixtures land harder because the foundation supports them. A custom-built vanity or built-in storage wall gives every other detail something solid to lean against. Plan your sequence before you start spending, and each phase builds naturally on the last.
Ready to move from inspiration to a real plan? Talk to the team at Suman Custom Carpentry about a custom vanity or millwork project built specifically for your Cape Cod home.