
Both wainscoting and board and batten add character to a room, but they’re not the same thing, and picking the wrong one can mean spending money on a look that doesn’t fit your space. When you’re comparing wainscoting vs board and batten, the differences come down to construction, style, cost, and where each one actually works best. Understanding those details before you commit saves you time, materials, and frustration.
At Suman Custom Carpentry, we design and hand-build custom millwork at our shop in Hyannis, Cape Cod, including wall treatments like these. We’ve installed both styles in homes across the region, so we know firsthand how each one performs in real living spaces, not just on a mood board. That hands-on experience shapes everything in this guide.
Below, we’ll break down the structural and visual differences between wainscoting and board and batten, compare costs, walk through style considerations, and help you figure out which option makes sense for your project, whether you’re hiring a professional or planning to tackle it yourself.
What wainscoting and board and batten mean
Both terms describe decorative wall treatments, but they come from different traditions and produce different results. Wainscoting is the older style, with roots in European interior design going back centuries. Board and batten is more of a functional, structural pattern that became popular on barn exteriors before moving inside homes. Knowing exactly what each one is gives you a clearer picture when you’re weighing wainscoting vs board and batten for your own project.
What wainscoting is
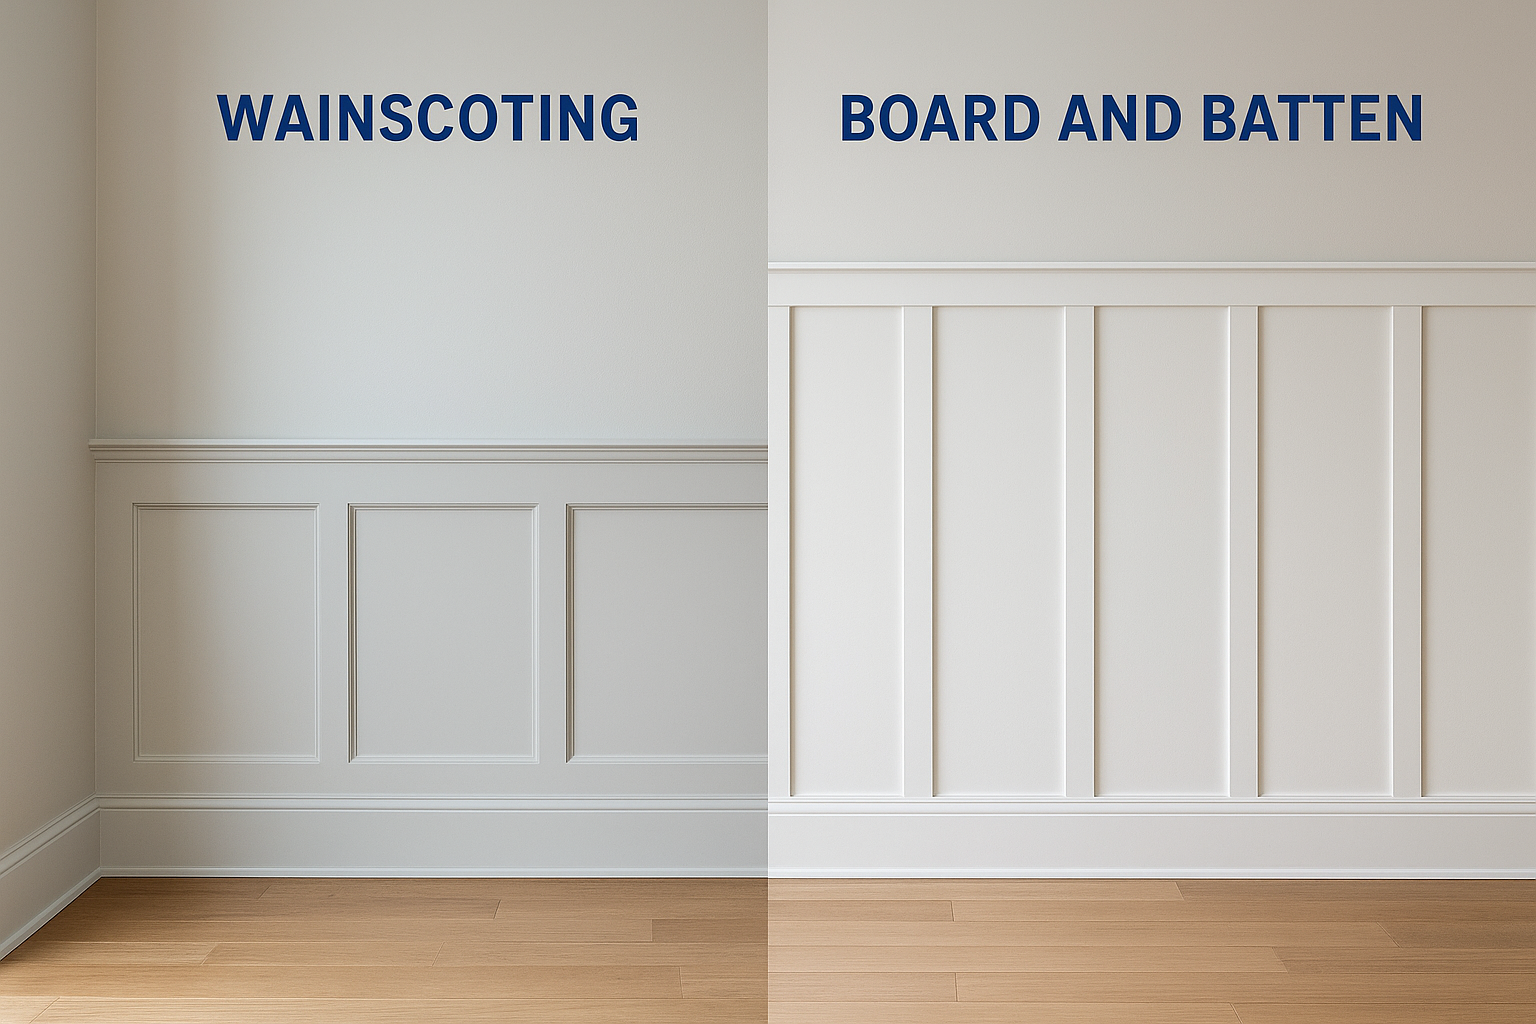
Wainscoting refers to decorative paneling applied to the lower portion of a wall, typically running from the baseboard up to about one-third to halfway up the wall height. The traditional version uses raised or recessed rectangular panels set inside a frame of rails and stiles, which gives the wall a layered, formal look. The top edge is typically finished with a chair rail or cap molding, creating a clean horizontal line that visually divides the wall into two zones.
The term actually covers several panel styles, not just one. Flat panel wainscoting uses simple inset rectangles, which reads as more contemporary. Raised panel wainscoting, where the panel itself sits above the surrounding frame, carries a more formal, traditional character that works well in dining rooms, entryways, and hallways. Beadboard wainscoting uses narrow vertical boards with a routed groove between them, giving it a cottage or coastal feel that you’ll see often in Cape Cod homes.
What board and batten is
Board and batten is a vertical pattern made from wide flat boards with narrow strips, called battens, placed over the seams. It originally served a weatherproofing function on exterior siding, where the battens covered gaps between boards to keep moisture out. When builders brought this pattern inside, the focus shifted entirely to aesthetics, though the vertical lines still carry that clean, structured quality associated with the original exterior application.
Board and batten tends to run floor to ceiling, which makes it visually distinct from wainscoting before you even consider materials or cost.
Unlike wainscoting, board and batten doesn’t rely on a frame, rail, or inset panel. The pattern is simply about alternating wide boards and narrow battens applied directly to the wall surface. You can space the boards close together for a dense, detailed look or spread them out for something more open and modern. That flexibility makes it one of the easier wall treatments to scale up or down depending on your room size and design goals.
Key differences in look, layout, and purpose
When you put wainscoting vs board and batten side by side, the most immediate difference is height and coverage. Wainscoting typically covers the lower third to half of a wall, leaving the upper portion exposed. Board and batten usually runs the full height of the wall, giving a room a more commanding, unified presence.
Visual character
The two styles send different design signals. Wainscoting, especially raised panel or beadboard versions, reads as formal and traditional, making it a natural fit for dining rooms, entryways, and hallways. Board and batten carries a cleaner, more geometric quality that works equally well in farmhouse and modern interiors.
The style you choose changes the entire personality of a room, so match the treatment to your existing architecture before committing.
Layout and structure
Wainscoting uses a system of rails, stiles, and panels that requires careful planning and precise cuts. The horizontal cap molding at the top creates a clear design boundary. Board and batten is structurally simpler, built from vertical boards with narrow battens overlaid at regular intervals.
Spacing the battens wider gives a more open, modern feel, while tighter spacing creates a denser, more detailed look. That flexibility lets you scale the pattern to your room size without major design adjustments.
Purpose and function
Both treatments protect lower walls from scuffs, furniture contact, and daily wear, but they achieve this differently. Wainscoting adds depth through its layered panel construction, which creates shadow and dimension that a flat wall simply can’t match.
Board and batten adds visual height and rhythm through its vertical lines, which can make a low-ceilinged room feel taller. If your goal is to make a smaller space feel bigger, board and batten typically delivers that effect more reliably.
Cost and material options
Cost is one of the most practical factors when comparing wainscoting vs board and batten, and the gap between the two can be significant depending on your material choices. Board and batten is generally the more budget-friendly option because it uses fewer components and requires less labor to install. Wainscoting, especially raised panel versions, involves more materials, more precise cuts, and more assembly time, which drives up both material and labor costs.
What wainscoting typically costs
Material costs for wainscoting range from around $1 to $3 per square foot for basic MDF flat panel kits, up to $10 or more per square foot for solid wood raised panel systems. If you hire a carpenter, expect labor costs to add $40 to $80 per hour on top of materials, depending on your region and the complexity of the profile. Beadboard wainscoting sits in the middle of that range and is one of the more approachable options if you’re working with a tighter budget.
The more ornate the panel profile, the more it costs to mill, install, and paint, so keep that in mind when reviewing quotes.
What board and batten typically costs
Board and batten uses standard dimensional lumber or MDF boards, both of which are widely available and affordable. Pine boards run roughly $1 to $2 per linear foot, and MDF is often even cheaper. A full wall of board and batten in a standard-sized room can cost as little as $150 to $300 in materials if you’re doing the work yourself. Hiring a professional to install it adds labor, but the simpler construction means the job typically takes less time than a comparable wainscoting installation, keeping the total cost lower overall.
How to choose the right one for each room
Choosing between wainscoting vs board and batten starts with the room’s existing character and how you use the space. A formal dining room or a traditional entry hall calls for wainscoting’s layered panels, while a casual mudroom or a child’s bedroom fits board and batten’s straightforward vertical pattern better. Look at your trim profiles, ceiling height, and furniture style before deciding.
Rooms that suit wainscoting
Wainscoting works best in rooms where you want a refined, structured look without covering the entire wall. Dining rooms, entryways, and home offices benefit from the horizontal cap molding because it frames the space and adds visual weight at a height that draws attention without overwhelming the room.
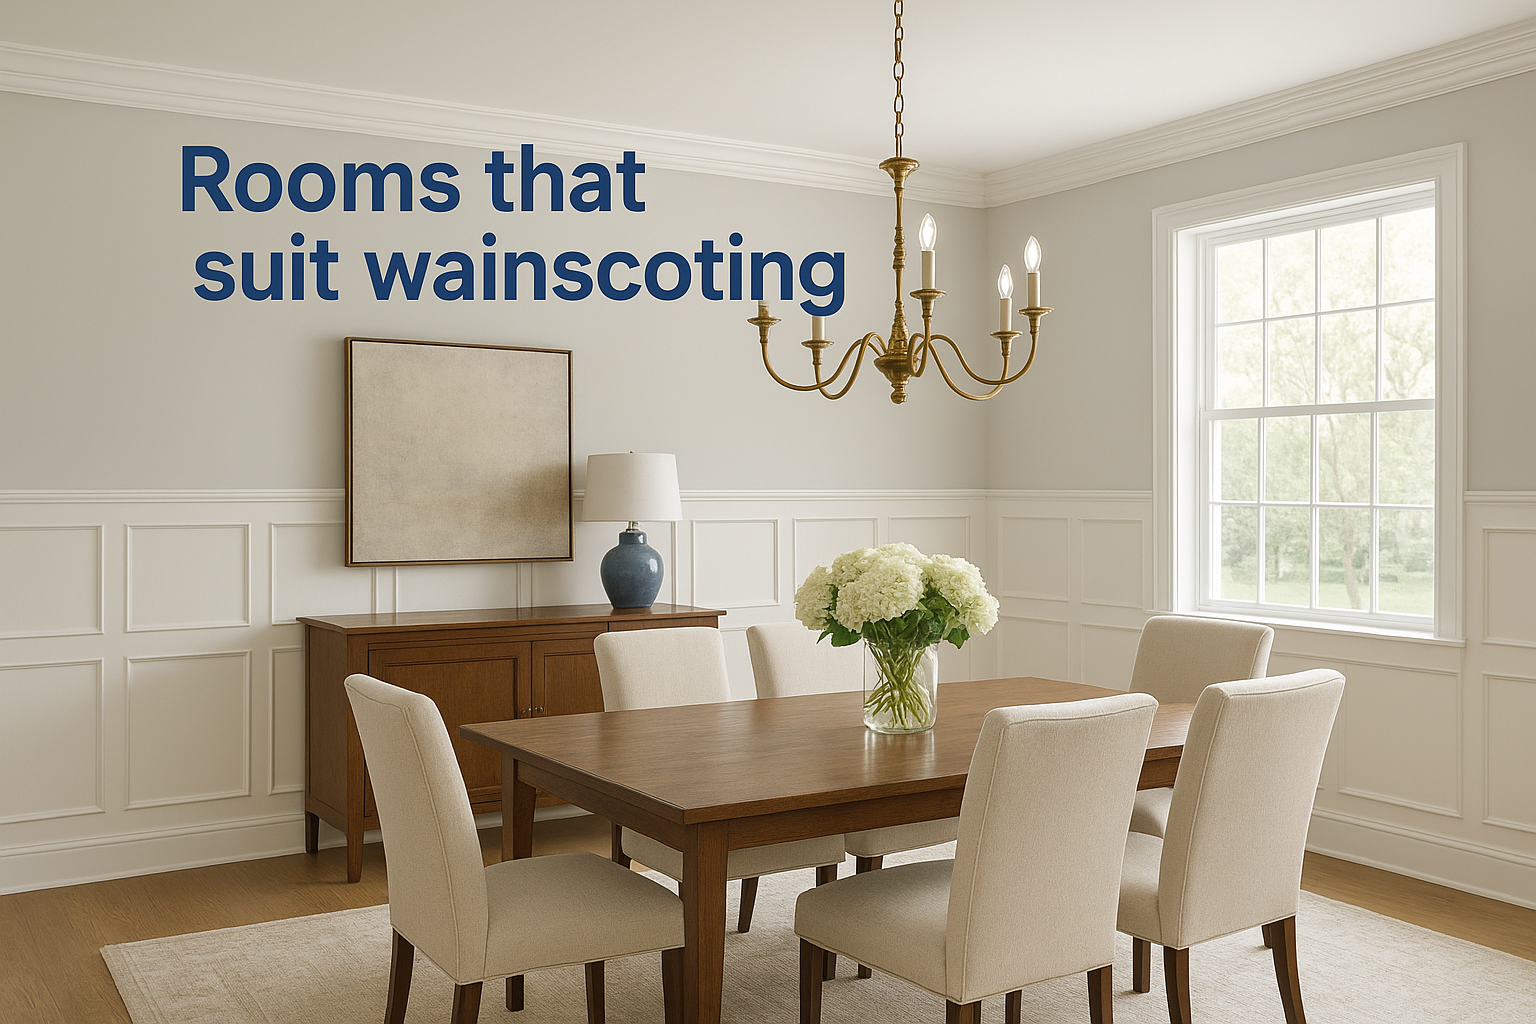
If your room already has detailed trim and crown molding, wainscoting will blend into that vocabulary naturally.
Bathrooms are another strong candidate, especially with beadboard panels, which handle moisture well when sealed properly and painted with a quality interior paint. This style suits any room where your existing trim details already lean traditional or classic.
Rooms that suit board and batten
Board and batten suits rooms where you want height and movement across the full wall surface. Living rooms, bedrooms, and stairwells benefit from the floor-to-ceiling coverage because the vertical lines pull the eye upward, making the space feel larger and more open. It also works well in modern or farmhouse-style kitchens, where the clean geometry fits an already minimal design.
Practical spaces like mudrooms and laundry rooms are also strong fits. The simple construction holds up to daily wear, and the flat surfaces are easy to clean and repaint over the years without the detailed panel profiles that wainscoting requires.
How to plan and install each style
Before you pick up a saw or order materials, measure your walls carefully and decide on your panel or board dimensions. Whether you’re working with wainscoting vs board and batten, the planning phase determines how clean the finished result looks. Sketch your wall layout on paper, marking stud locations, electrical outlets, and any architectural features like doors and windows that might interrupt the pattern.
Installing wainscoting
Wainscoting requires the most upfront planning because the panel sizes need to divide evenly across each wall section. Start by calculating how many panels fit between each corner, door, and window, then adjust the panel width slightly to keep them uniform. Once you cut your rails, stiles, and panels, attach the bottom rail at baseboard height, build the frame in sections, and finish with the cap molding across the top edge.
Here are the key steps in order:
- Measure the wall and determine your panel count
- Cut rails, stiles, and panels to size
- Nail the bottom rail at baseboard height into studs
- Assemble panel frames and attach them to the wall
- Add cap molding along the top edge and caulk all seams
Nail into studs wherever possible and back the installation with construction adhesive, especially in high-humidity rooms like bathrooms.
Installing board and batten
Board and batten starts with establishing a consistent spacing plan across the full wall. Mark your stud locations first, then decide how far apart the battens will sit, typically between 12 and 24 inches depending on the look you want. Attach the wide flat boards floor to ceiling with fasteners driven into studs, then overlay the narrow battens centered over the seams.
Once everything is fastened, fill all nail holes with wood filler, sand the surfaces smooth, and apply a quality primer before your finish coat to get a result that holds up for years without peeling or cracking.

Next steps for your walls
Once you understand the difference between wainscoting vs board and batten, the next move is picking the style that fits your specific room and budget. Both treatments add real value to a home when installed correctly, but the details matter: panel proportions, material quality, and finish work all determine whether the result looks polished or rushed. Take your room dimensions and existing trim style into account before you order a single board.
Working with a skilled carpenter saves you time and eliminates costly mistakes that are hard to reverse once you’ve nailed boards to the wall. Suman Custom Carpentry designs and hand-builds custom millwork at our Hyannis shop and installs it across Cape Cod homes with a lifetime guarantee on cabinet boxes and doors. Reach out to start a conversation about your project, and we’ll help you plan the right wall treatment from the first consultation through final installation.