
Living on Cape Cod means the ocean is already part of your daily life, so it makes sense to bring that feeling indoors. If you’re searching for coastal bathroom remodel ideas, you’re probably ready to move past the generic seashell-and-anchor décor and toward something that actually feels like the coast. Think natural textures, soft blues, weathered wood tones, and materials that hold up to salt air and humidity.
At Suman Custom Carpentry, we build custom vanities, cabinetry, and millwork right here in our Hyannis shop, so we see firsthand what works (and what doesn’t) in Cape Cod bathrooms. Moisture, shifting temperatures, and coastal conditions all factor into the materials and finishes we recommend to our clients every day.
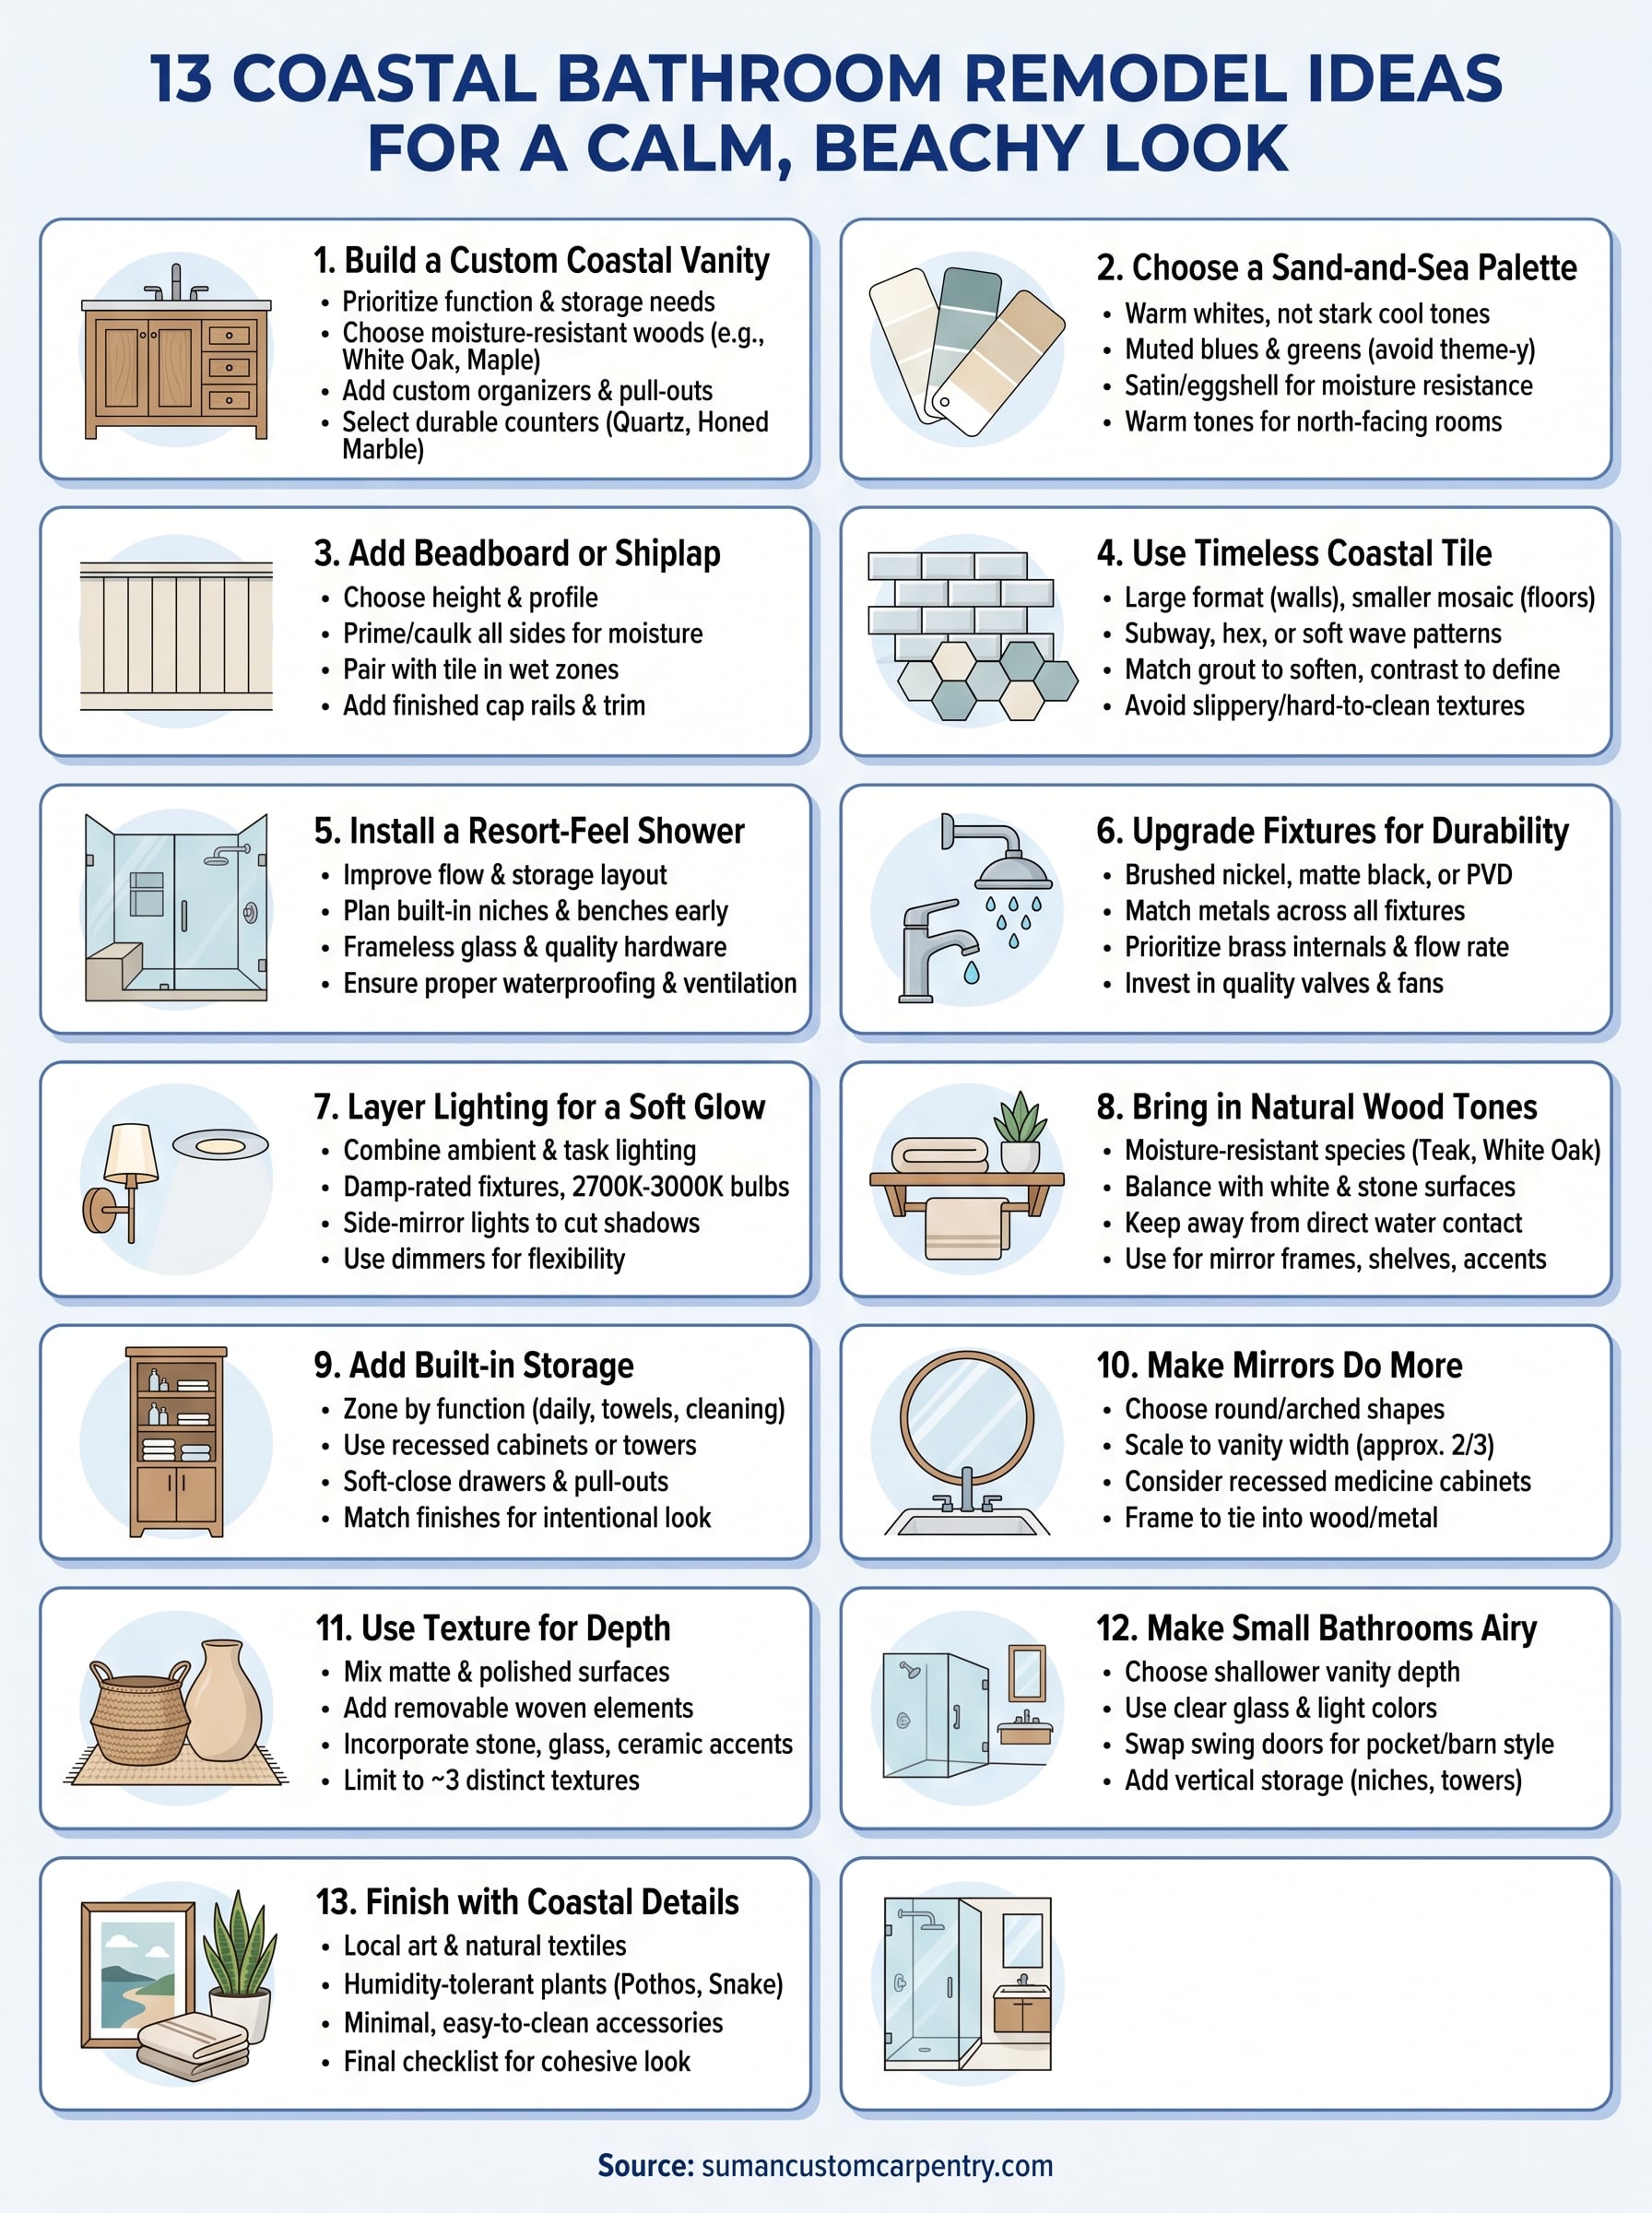
Below, you’ll find 13 specific ideas to help you plan a bathroom remodel that looks calm, coastal, and intentional. From tile choices and paint colors to custom-built vanity styles, each one is grounded in what actually works for homes near the water.
1. Build a custom coastal vanity
The vanity sets the tone for the entire bathroom. In any coastal bathroom remodel, it’s the largest piece of furniture in the room, and a custom build lets you control every dimension, finish, and storage feature to match exactly how you live in that space.
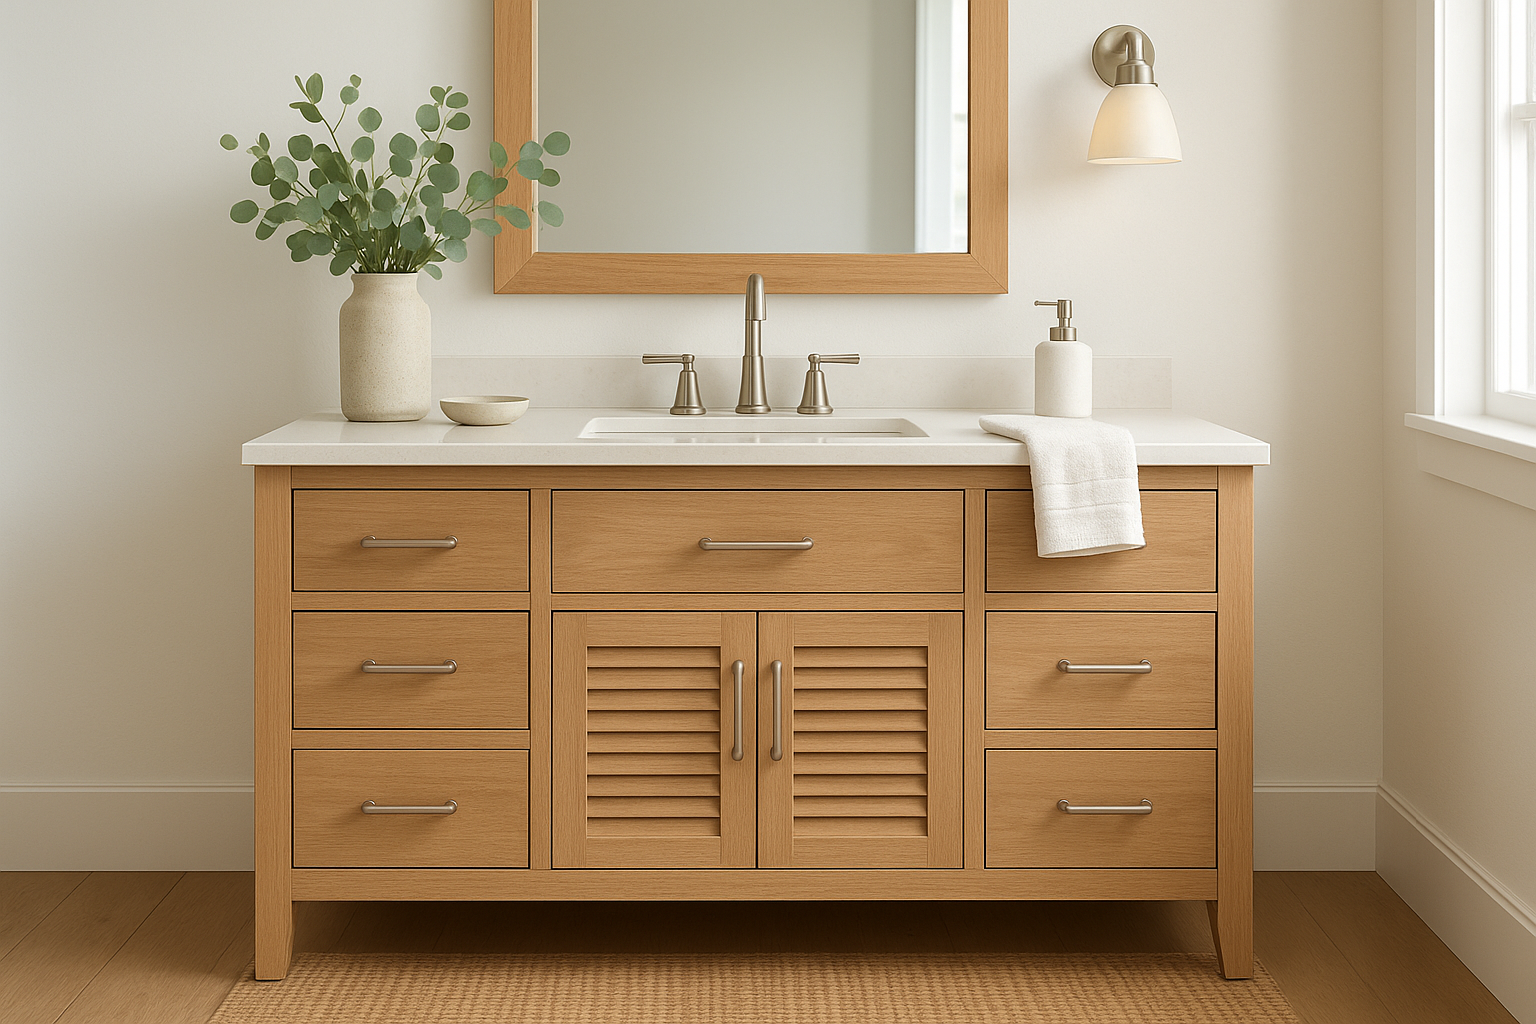
Decide what you need the vanity to solve
Before you think about style, think about function. How many people share the bathroom and what do they need to store every day? A single-sink vanity with deep drawers works differently than a double vanity with separate zones. Map out your daily routine before you commit to a layout.
Consider these functional questions upfront:
- Do you need a seated vanity area or just sink access?
- How much under-sink plumbing limits your storage footprint?
- Does counter space or drawer space matter more?
Choose woods and finishes that handle Cape Cod humidity
Coastal bathrooms deal with real moisture stress. Solid wood species like hard maple, white oak, and poplar hold up well when properly sealed and finished. At Suman Custom Carpentry, we build cabinet boxes with moisture-resistant materials and apply finish coats that protect against humidity without looking industrial.
A properly sealed custom wood vanity will outlast a stock cabinet in a coastal bathroom by years, sometimes decades.
Add storage features that keep counters clear
Pull-out trays, deep base drawers, and built-in organizers solve the specific clutter problems that off-the-shelf vanities always leave behind. Think about where you put your hair dryer, cleaning supplies, and toiletries every single morning. Custom storage layouts let you assign a place to everything, which keeps the countertop clear and the room feeling calm.
Select countertop and sink options that fit the look
Quartz and honed marble both read naturally coastal without requiring constant maintenance. An undermount sink keeps the counter clean and easy to wipe. If you want a more relaxed feel, a vessel sink in matte white or stone pairs well with a wood-toned vanity base and simple brushed hardware.
Cost range and scope
A custom-built vanity runs higher than a stock option upfront, but the gap narrows fast when you factor in fit, longevity, and finish quality. For a single vanity with custom storage, expect to invest between $3,000 and $7,000 depending on size, wood species, and finish details. Double vanities and specialty countertops sit toward the higher end of that range.
2. Choose a sand-and-sea color palette
The color palette you choose sets the emotional tone for the entire room. In any coastal bathroom remodel, the right colors do the heavy lifting without a single seashell in sight. Stick to tones pulled from actual coastal landscapes: sand, driftwood, seafoam, and sky give you a full range to work with.
Pick a white that stays warm, not stark
Not all whites read the same on a bathroom wall. Cool, blue-toned whites can feel clinical and harsh under bathroom lighting. Instead, look for whites with warm undertones like Benjamin Moore White Dove or Sherwin-Williams Alabaster, which both hold a soft, creamy tone that pairs naturally with wood vanities and natural stone.
The right white makes every other color in the room look more intentional.
Add blue and green accents without going theme-y
You can bring in coastal color through accent tiles, towels, or cabinet paint without overwhelming the space. Muted sage greens and soft blue-grays work better than saturated primary blues, which read more nautical than natural. One well-placed color on a vanity or an accent wall goes further than multiple competing hues.
Use paint sheen to control moisture and glare
Satin or eggshell finishes hold up better than flat paint in high-moisture spaces and wipe clean without streaking. Avoid high-gloss on large wall surfaces because it amplifies light and can make the room feel harsh, especially in smaller bathrooms with direct natural light.
Color pairings that work in north-facing bathrooms
North-facing bathrooms get cooler, indirect light all day. Warm whites paired with soft greige or sandy tones counteract that cool cast and keep the room feeling bright. Avoid cool grays in these spaces because they tend to look flat and dull when natural light is limited.
3. Add beadboard or shiplap wainscoting
Beadboard and shiplap are two of the most reliable ways to bring a coastal, craftsman feel into a bathroom without overloading it with accessories. Both work well in Cape Cod-style homes, and both respond well to paint, which means you can update the color without replacing the millwork.
Choose the right height and profile for your room
Standard wainscoting runs 32 to 36 inches tall, which suits most bathrooms. If your ceilings are 9 feet or higher, consider running the paneling to 48 inches for better visual proportion. Beadboard offers a finer, more traditional groove pattern, while shiplap reads slightly more relaxed and modern. Pick the profile that matches the trim work already in your home.
Paint and caulk details that prevent swelling and gaps
Moisture is the biggest risk with wall paneling in a bathroom. Prime all four sides of each board before installation, not just the face. Use a flexible, paintable caulk at every seam and at the top and bottom rail to allow for minor movement without cracking. Skipping this step is the most common reason paneling fails near the coast.
A few extra minutes on prep work during installation will save you from repainting and recaulking within two years.
Pair paneling with tile to control splash zones
In wet areas near the tub or shower, tile should handle the first line of defense. Run wainscoting on dry walls and transition to subway tile or large-format ceramic in the splash zone. This combination gives you the warm, layered look of coastal bathroom remodel ideas without putting wood paneling at direct water risk.
Where trim carpentry adds the most value
Cap rails and base trim are the details that separate a clean installation from a finished, intentional look. A well-built cap rail ties the paneling to the rest of the room’s millwork and gives you a natural ledge for small accessories. Investing in tight joinery and proper trim profiles is where a skilled carpenter earns every dollar.
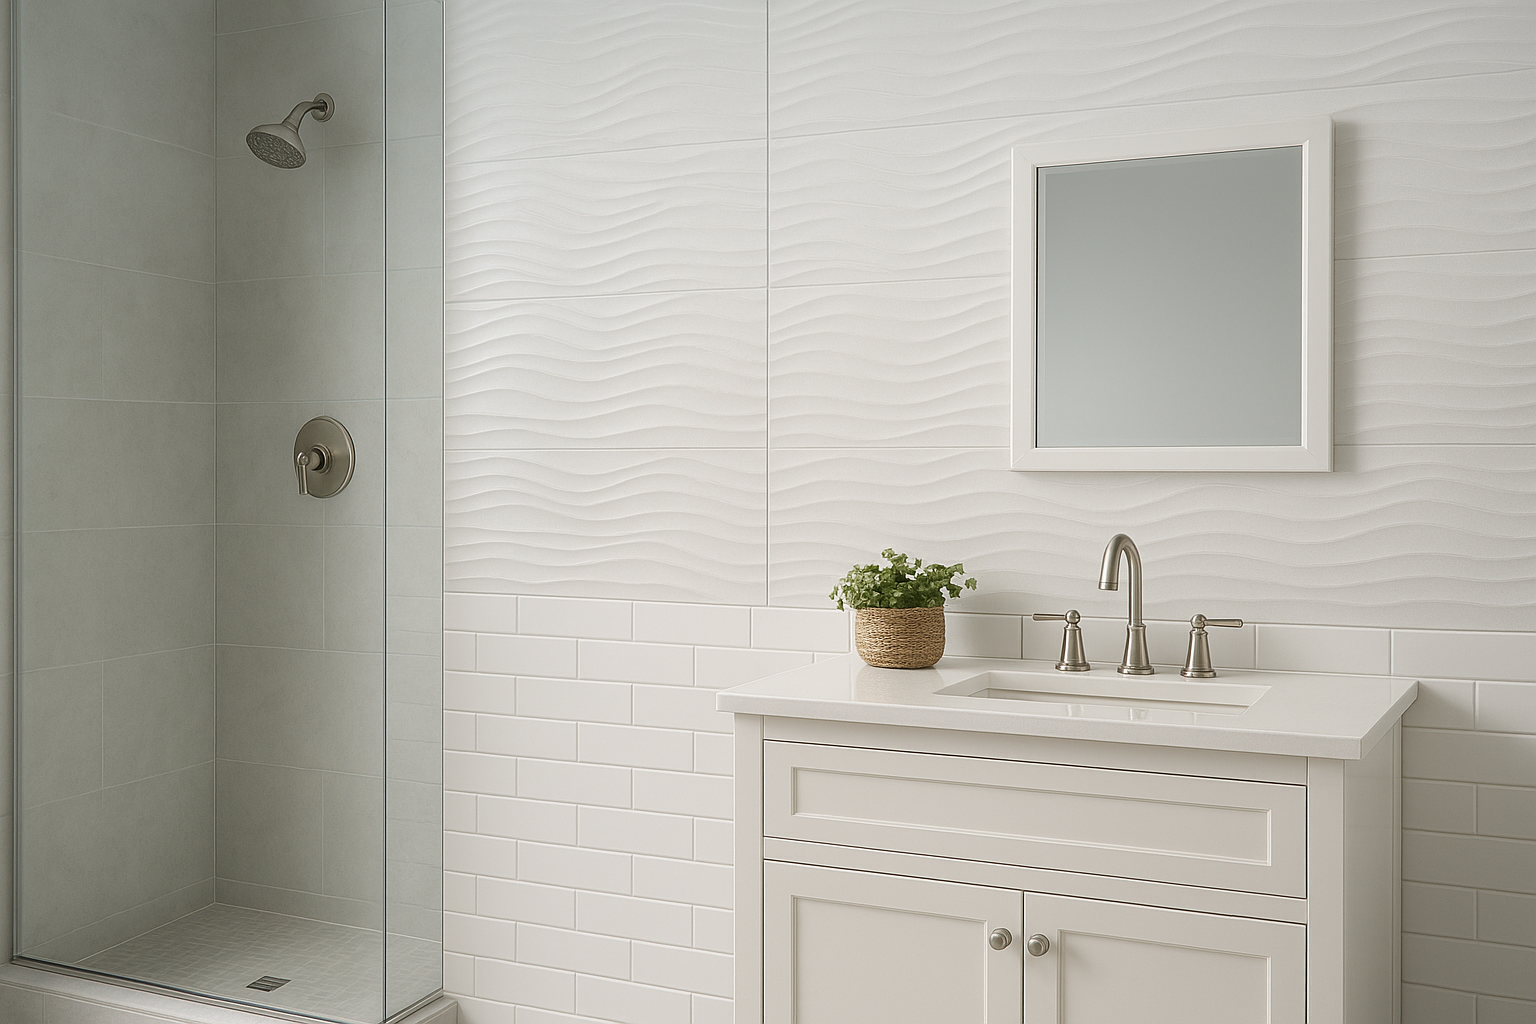
4. Use coastal tile patterns that feel timeless
Tile is one of the most permanent decisions in any coastal bathroom remodel, so getting it right matters. Choosing classic formats and neutral tones keeps your bathroom from feeling frozen in a particular era while still reading intentional and polished.
Pick the right tile for floors, walls, and showers
Not every tile suits every surface. Large-format tiles (12×24 or bigger) work well on shower walls because fewer grout lines mean less scrubbing and a cleaner visual field.
For floors, smaller mosaic or 12×12 porcelain provides better traction and cuts more easily around drains and edges without leaving awkward slivers at the perimeter.
Try patterns that read coastal without seashells
Subway tile, hex tile, and soft wave patterns all carry a coastal character without leaning into literal beach themes. A simple stacked or offset subway tile in warm white or pale blue-gray delivers texture and movement without committing to anything that will look dated in a few years.
A well-laid subway tile in a soft neutral will still look current twenty years from now.
Use grout color to soften or sharpen the look
Matching grout color to your tile softens the grid and makes the room feel larger and quieter. If you want more definition, a warm mid-tone gray grout against white tile adds subtle contrast without competing with your hardware or vanity finishes. The choice comes down to how graphic you want the pattern to read from across the room.
Avoid slippery floors and hard-to-clean textures
Choose matte or lightly textured tile finishes for floor surfaces rather than polished stone or high-gloss ceramic, which get slick when wet. Deeply textured wall tiles trap soap residue, so save those for dry accent walls and stick to smooth or honed finishes inside the shower.
5. Install a shower that feels like a resort
The shower is often the most used part of the bathroom, yet it gets the least planning attention in most coastal bathroom remodel ideas. A well-designed shower improves your daily routine, stays easier to clean, and adds real value to your home.
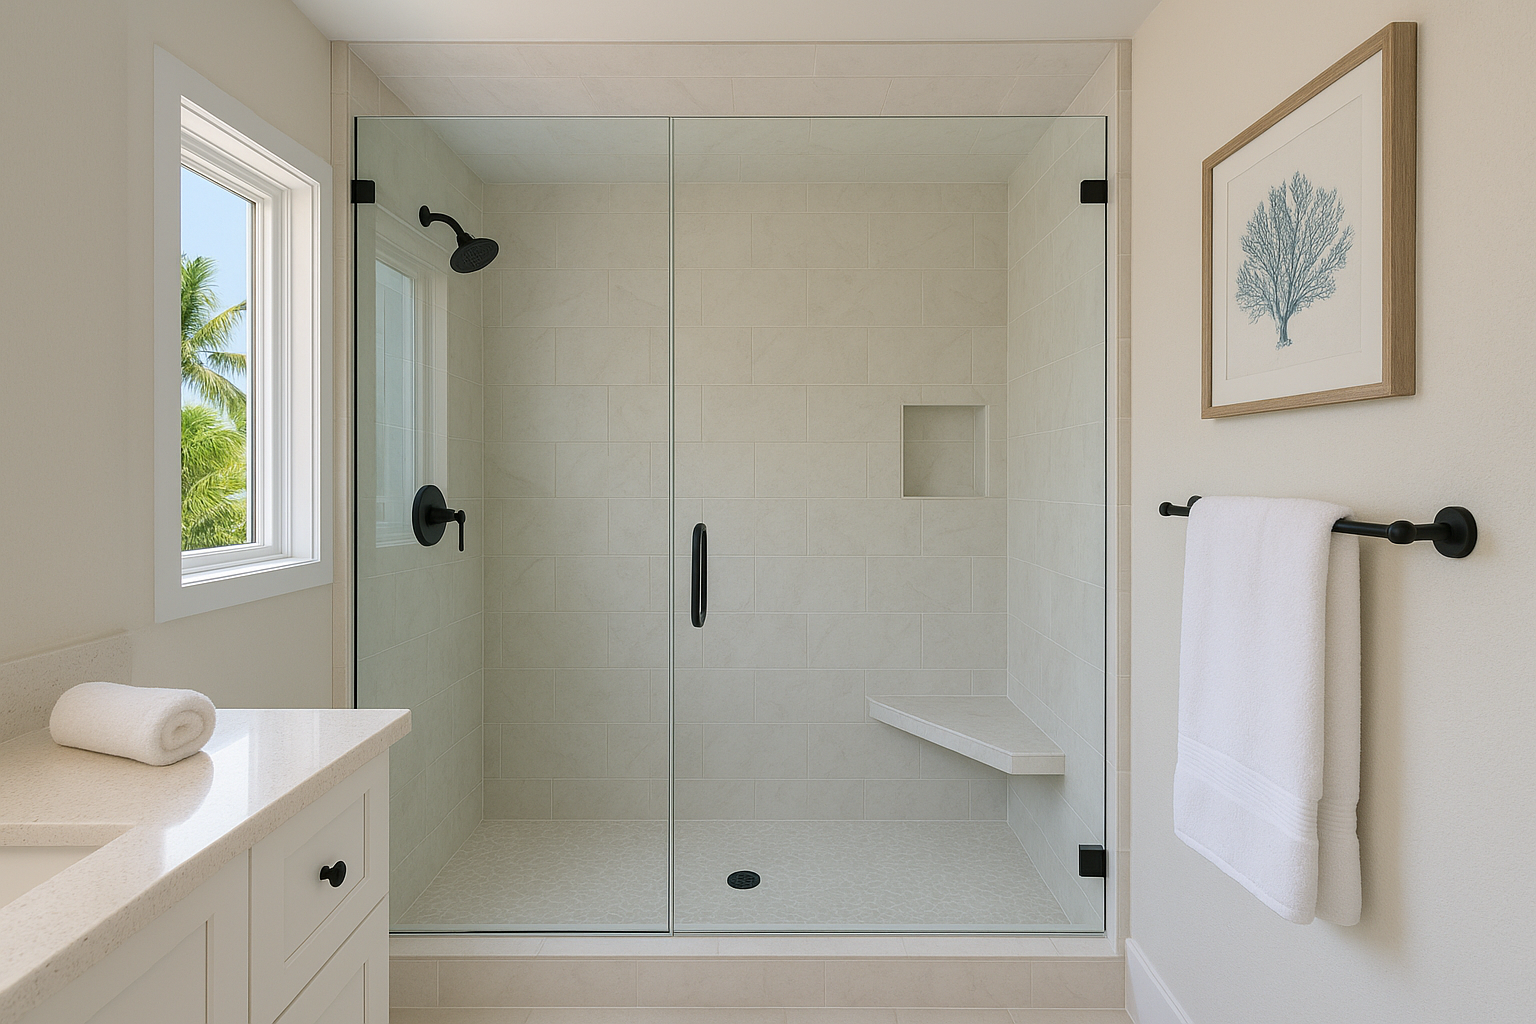
Choose a layout that improves flow and storage
Start with how many people use the shower and how often. A single 36×36 stall works for a guest bath, but a primary shower benefits from at least 36×48 inches to give you room to move without bumping into walls. Position the showerhead on the wall opposite the entry so water sprays away from the door and toward the drain.
Add a bench, niches, and ledges the right way
Built-in niches and benches need to be planned before tile goes up, not added as an afterthought. Niches should be framed between studs, waterproofed carefully, and tiled with the same grout lines as the surrounding wall so they look intentional. A corner bench at 17 to 18 inches high gives you a functional seat without cutting into floor space.
Plan your niche placement at eye level when standing, not at countertop height, so it stays accessible and practical.
Select glass, door swing, and hardware for daily use
Frameless glass enclosures keep the room feeling open and are easier to clean than framed alternatives. Choose a door swing that clears the toilet and vanity fully when open. Matte black or brushed nickel hardware both work in coastal spaces and resist water spotting better than polished chrome.
Plan ventilation and waterproofing before finishes
Proper waterproofing membranes behind tile are non-negotiable in any shower, especially in coastal climates where humidity stays high year-round. Pair that with an exhaust fan rated for your bathroom’s square footage to pull moisture out before it settles into walls, grout, and trim.
6. Upgrade fixtures for salt-air durability
Salt air and humidity accelerate wear on fixtures faster than most homeowners expect. Choosing the right finishes and specs upfront saves you from replacing corroded faucets and spotty hardware within a few years of your remodel.
Choose finishes that resist corrosion and spotting
Brushed nickel and matte black both hold up well in coastal conditions. Polished chrome looks sharp initially but shows water spots immediately and corrodes faster in salt-air environments. PVD (Physical Vapor Deposition) coated fixtures offer the strongest resistance to corrosion and typically carry longer manufacturer warranties than standard plated options.
Match metals across lighting, plumbing, and hardware
Mixing metals creates visual noise that undercuts even a well-planned coastal bathroom remodel ideas execution. Pick one primary metal finish and apply it consistently across your faucet, towel bars, toilet paper holder, and cabinet pulls. Brushed brass paired with matte white cabinetry reads warm and coastal without feeling cluttered or busy.
Consistent hardware finishes throughout the room make every other design choice look more deliberate.
Keep function first with shower and faucet specs
Flow rate and pressure balance matter more than appearance when you’re choosing shower valves and faucets. Look for pressure-balancing valves that maintain consistent water temperature when other fixtures are running simultaneously. WaterSense-certified faucets reduce water use without sacrificing performance, which matters in water-conscious coastal communities.
Where to spend more for long-term reliability
Not every fixture needs to be top of the line, but shower valves, faucets, and exhaust fan motors are worth the upgrade investment. These components handle daily use and moisture stress constantly. Prioritizing solid brass internal components over zinc or plastic saves you from premature failures in the most humidity-exposed areas of your bathroom.
7. Layer lighting for a bright, soft glow
Lighting is one of the most overlooked decisions in coastal bathroom remodel ideas, yet it shapes how every other finish looks in the room. A single overhead fixture leaves harsh shadows and makes even a well-designed space feel flat. Layering your light sources gives you control over mood, function, and how the room reads at different times of day.
Build a simple lighting plan for task and ambient
Start with two types: ambient light for overall room illumination and task light positioned where you need to see clearly. Recessed fixtures on a dimmer handle ambient duty well, while dedicated vanity or mirror lighting handles task needs without overlap.
Pick damp-rated fixtures and bulbs that flatter skin
Bathrooms require damp-rated or wet-rated fixtures depending on their proximity to the shower or tub. For bulbs, stay in the 2700K to 3000K color temperature range, which produces a warm tone that flatters skin rather than washing it out the way cooler daylight bulbs do.
Choosing the wrong color temperature makes even an expensive vanity and tile combination look cheap.
Add mirror lighting that cuts shadows at the sink
Vertical sconces mounted on either side of the mirror eliminate the under-eye shadows that overhead lighting creates. Side-mounted lighting distributes illumination evenly across your face, which makes daily tasks like shaving or applying makeup noticeably easier.
Use dimmers and controls that make mornings easier
Install dimmer switches on every circuit you can, including vanity lighting. Low light in the early morning is easier on your eyes, and the ability to dial up full brightness when needed gives your bathroom more flexibility throughout the day.
8. Bring in natural wood tones the right way
Wood adds warmth that tile and paint alone can’t deliver, but moisture mismanagement turns a beautiful wood accent into a warped, stained problem within a season. In any coastal bathroom remodel ideas planning process, wood belongs in your material mix, but placement and preparation determine whether it lasts.
Choose species and stains that read coastal
White oak and teak are two of the strongest performers in humid bathroom environments. Both species have tight grain structures that resist moisture absorption better than softer woods. For stain color, driftwood grays, warm natural tones, and light honey finishes all carry a coastal character that feels pulled from the landscape rather than assembled from a catalog.
Balance wood with crisp whites and stone
Wood looks best when it shares the room with bright whites and cool stone surfaces rather than competing with other warm tones. A white oak vanity base next to a honed marble countertop and white wall tile creates contrast that makes each material look more intentional. Keep the wood as an accent rather than the dominant surface and the room stays calm instead of heavy.
One strong wood element in a bathroom reads sophisticated; several competing wood surfaces read cluttered.
Use wood for warmth without inviting water damage
Keep wood away from direct water contact, meaning outside the shower enclosure and off the floor. Sealed wood works well on vanity faces, mirror frames, and floating shelves positioned away from the sink splash zone.
Great spots for wood accents beyond the vanity
Mirror frames, open shelving, and ceiling details are all low-risk areas where wood adds texture without absorbing daily water exposure. A wood-framed mirror above a painted vanity ties the room together with minimal maintenance risk.
9. Add built-in storage that hides the clutter
A bathroom with visible clutter undermines every design decision you’ve made. Built-in storage is one of the most practical investments in any coastal bathroom remodel ideas planning process because it assigns a place to everything without adding visual weight to the room.
Plan storage zones for towels, cleaning, and daily items
Dividing your storage into three zones (towels, cleaning supplies, and daily-use items) keeps the room functional without constant reorganization. Your daily items should live closest to the sink and mirror, while cleaning supplies belong behind a closed door at floor level where they’re accessible but out of sight.
Choose built-ins, towers, or recessed cabinets by layout
Recessed medicine cabinets and niche shelving work in smaller bathrooms because they use wall depth rather than floor space. If you have room, a freestanding tower or custom linen cabinet next to the vanity handles towel and overflow storage without requiring demolition.
The right storage solution depends entirely on your floor plan, not on what looks good in a showroom.
Use doors, drawers, and pullouts that stay organized
Soft-close drawers and pull-out trays keep contents accessible without creating a jumbled pile every time you open a cabinet. Use shallow drawers for daily items and deeper base drawers for bulkier supplies so you’re not digging through everything to find what you need.
Keep storage looking intentional, not bulky
Matching your storage finishes to the vanity ties the room together visually so built-ins look designed rather than added as an afterthought. Keep door profiles simple and consistent with the rest of your millwork to maintain the calm, uncluttered feel that coastal bathrooms are built around.
10. Make mirrors do more than reflect
A mirror in a coastal bathroom does real work beyond reflection. The right choice anchors the vanity visually, connects your finishes, and can even add storage you didn’t know you were missing in your coastal bathroom remodel ideas planning.
Choose a mirror shape that fits coastal style
Round and arched mirrors carry a soft, organic quality that fits naturally in coastal spaces. Rectangular mirrors work too, but they read more formal. If your vanity is long, consider two smaller round mirrors side by side instead of one wide rectangle for a relaxed, layered effect.
Scale the mirror to the vanity and ceiling height
A mirror that’s too small above a wide vanity looks like an afterthought. Size your mirror to about two-thirds the width of the vanity and leave 6 to 8 inches of clearance between the top of the mirror and the ceiling so the wall doesn’t feel crowded.
Getting the scale right makes the vanity and mirror feel like a single intentional unit rather than two separate pieces placed near each other.
Add practical features like medicine storage
Recessed medicine cabinets provide storage without adding depth to the room. Modern options include adjustable interior shelving and integrated electrical outlets, which keep countertops clear and your daily routine organized without sacrificing style.
Frame choices that tie into woodwork and hardware
Your mirror frame should connect to at least one other finish already in the room. A wood-framed mirror links back to the vanity, while a metal frame in your chosen hardware finish reinforces the consistency you’ve built across fixtures and cabinet pulls.
11. Use texture to keep the room from feeling flat
A bathroom built entirely from smooth, reflective surfaces reads cold and sterile no matter how carefully you choose your colors. Texture is what gives a well-planned coastal bathroom remodel ideas execution its sense of depth and warmth, making the room feel layered rather than assembled from a catalog.
Mix smooth and tactile finishes for depth
Pairing matte and polished surfaces side by side creates contrast that reads naturally coastal. A honed stone countertop next to a glossy subway tile wall, or a brushed wood vanity against a smooth painted wall, gives your eye something to move across without overwhelming the room.
Add woven elements without trapping moisture
Woven textures like natural fiber bath mats, cotton rope baskets, and linen hand towels bring a tactile softness to a bathroom without requiring any construction work. Keep woven items off the floor near wet zones where they stay damp and choose tightly woven materials that dry quickly rather than loosely braided options that hold moisture and mildew.
Woven accents work best as finishing touches, not primary surfaces, so they stay removable and easy to replace when needed.
Bring in stone, glass, and ceramic for subtle shine
Pebble tile shower floors, frosted glass shelving, and glazed ceramic vessels each catch light differently and add visual interest without competing with each other. Use these materials sparingly as accent points rather than large-field applications so they read as intentional details.
Keep the look calm by limiting competing textures
Introduce no more than three distinct textures in a single bathroom to prevent the room from feeling chaotic. Choose one dominant texture, one secondary, and one accent, and let each one do its job without overlap.
12. Make a small bathroom feel airy
Small bathrooms present a real challenge in coastal bathroom remodel ideas planning because the instinct to add storage and style can quickly eat up the floor space that makes a room feel open. With smart material choices and layout decisions, you can make even a compact bathroom feel larger without knocking down walls.
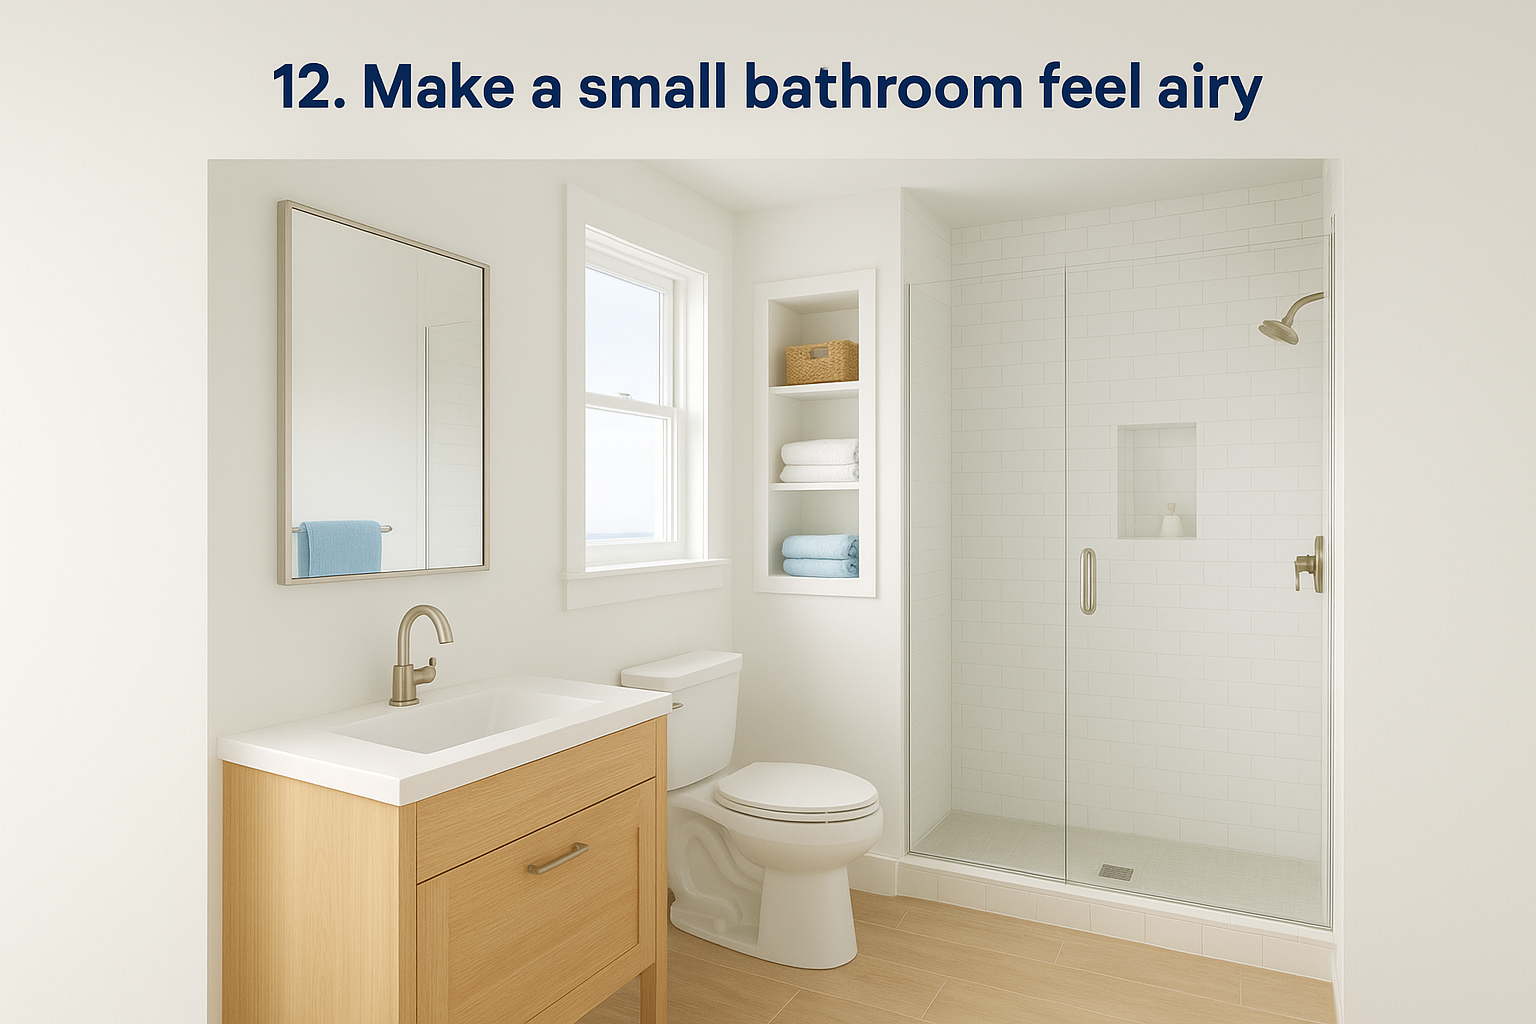
Choose a vanity depth that frees up floor space
Standard vanities run 21 to 24 inches deep, but a shallow vanity at 18 inches deep gives you several extra inches of clearance that make a narrow bathroom significantly easier to move through. Pair a shallower base cabinet with tall drawers rather than wide ones so you recover the storage you lose in depth without sacrificing the open feel.
Gaining even four inches of floor clearance in a small bathroom changes how the room feels to walk into.
Use glass, light colors, and smart sightlines
Clear glass shower enclosures let the eye travel through the room rather than stopping at a solid wall or opaque curtain. Keep wall colors light and warm so natural and artificial light bounces around the room rather than getting absorbed by dark surfaces.
Swap swing doors for pocket or barn-style solutions
A standard hinged door uses 9 to 12 square feet of swing clearance that a small bathroom can rarely afford. Pocket doors or sliding barn-style doors eliminate that dead zone entirely and let you reclaim floor space for a wider vanity or a small linen storage tower.
Add storage without shrinking the room
Recessed niches, wall-mounted shelving, and tall narrow towers add storage capacity without pushing into your floor footprint. Mount shelves above the toilet or door frame to keep floor space open while still giving everyday items a dedicated place.
13. Finish with coastal details that stay classy
The final layer of any coastal bathroom remodel ideas plan is the one most people rush through, and it shows. Accessories, art, and small details either tie the room together or expose every inconsistency in the decisions that came before them.
Choose art, towels, and decor that feels local
Skip the generic beach prints and look for artwork that references your actual surroundings, whether that’s a Cape Cod map, a local watercolor, or a photograph from a place you recognize. Linen and cotton towels in soft whites, warm grays, or muted blues reinforce your palette without requiring constant rotation.
Add plants and greenery that tolerate bathroom conditions
Not every plant survives in a high-humidity, low-light bathroom environment, but several do well without much effort. The following options all thrive with minimal care and add a living texture that no tile or paint can replicate:
- Pothos grows in low light and tolerates inconsistent watering
- Snake plants handle humidity and need almost no attention
- Air plants mounted on small driftwood pieces dry quickly between mistings
A single healthy plant adds more life to a bathroom than a shelf full of decorative objects.
Keep accessories minimal and easy to clean
Every item you place on a counter or shelf collects dust, water spots, and soap residue. Limit your countertop to only what you use daily, and choose smooth materials like ceramic, glass, or sealed stone that wipe clean in seconds rather than requiring detailed scrubbing.
Create a cohesive final checklist before you call it done
Walk the room with fresh eyes before you call it finished. Check that your metals match, your textures don’t compete, and nothing on the counter lacks a purpose. One final pass catches the small details that separate a polished room from a finished one.
Next steps for your coastal bath
You now have a complete set of coastal bathroom remodel ideas to work from, covering everything from custom vanities and tile selection to lighting, texture, and final accessories. The difference between a room that looks pulled together and one that falls short almost always comes down to planning the details before construction starts, not after.
Start by identifying the two or three changes that will have the biggest impact on your specific space. If your vanity is outdated or undersized, that is your highest-leverage starting point. Built-in storage, custom millwork, and quality wood finishes are areas where working with a skilled local carpenter pays off most visibly.
If you are ready to talk through your project with someone who builds every piece by hand in a Hyannis shop, reach out to Suman Custom Carpentry to start the conversation.