
A kitchen island can transform the way you cook, gather, and use your space, but only if it’s built with the right proportions and placement. Get those wrong, and you end up with a bulky obstruction that kills your kitchen’s workflow. Knowing how to design a kitchen island starts with understanding a few non-negotiable rules about sizing, clearance, and function before you pick a single material or finish.
At Suman Custom Carpentry, we design and hand-build kitchen islands at our shop in Hyannis, Cape Cod. Over seven-plus years of custom kitchen work, we’ve seen what makes an island genuinely useful, and what turns it into an expensive regret. The difference almost always comes down to layout decisions made early in the process, not the countertop stone or the hardware you choose after the fact.
This guide breaks down six practical rules for kitchen island design, covering dimensions, spacing, seating, storage, and layout configurations. Whether you’re planning a full kitchen renovation or adding an island to your current space, these are the guidelines we follow in our own builds, and the ones that’ll help you avoid costly mistakes.
1. Partner with a local custom carpenter
The single best step you can take before figuring out how to design a kitchen island is work with someone who builds them professionally. A local custom carpenter brings hands-on knowledge of what fits, what fails, and what your specific space can actually handle, knowledge you won’t find in a showroom or a box store.
When custom work makes sense for an island
Custom work makes sense when your kitchen has irregular dimensions, specific functional needs, or a style that stock cabinets simply can’t match. If you want a built-in trash pull-out, a prep sink, a precise seating overhang, or cabinetry that integrates with your existing trim profile, a custom builder gives you full control. Off-the-shelf islands come in fixed sizes, which often means compromising on layout or leaving gaps that standard filler pieces won’t fully solve.
What to bring to a design consult
Walk into a design consult with accurate room measurements, including ceiling height, window and door positions, and the location of existing plumbing, electrical, and gas lines. Reference photos of islands you like also help a carpenter understand your priorities quickly. Bring the following to keep the conversation productive:
- Rough dimensions of the space
- Photos of your current kitchen from multiple angles
- Appliance specs if you already own them
- A clear sense of your top priorities (seating, storage, or appliance integration)
How the design, build, and install process typically runs
At Suman Custom Carpentry, the process moves from design consultation to shop drawings, then to fabrication at our Hyannis shop, and finally to on-site installation. Custom kitchens run 40 to 60 days from finalized design to installation because every cabinet box and door is hand-built in-house rather than ordered prefabricated, which means every dimension is exact to your space.
Locking your design decisions early is what keeps that timeline on track and prevents costly changes mid-build.
Decisions you must lock before cabinets get built
You need to confirm countertop material, sink placement, appliance specs, and seating configuration before fabrication begins. Appliance dimensions matter most here since cooktops, hood vents, and dishwashers carry specific rough-in requirements that directly affect cabinet sizing and structural blocking.
2. Set the island location and clearances first
Before you pick dimensions or finishes, you need to pin the island’s position in your floor plan. Location drives everything else in the design. When you’re figuring out how to design a kitchen island, clearances are the first constraint to solve, not the last.
The minimum walkway clearances to plan around
Every side of your island that faces a wall or appliance needs at least 42 inches of clearance for a single-cook kitchen. If two people regularly cook together, push that to 48 inches minimum on working sides. Tighter than that, and doors, drawers, and bodies start colliding constantly.
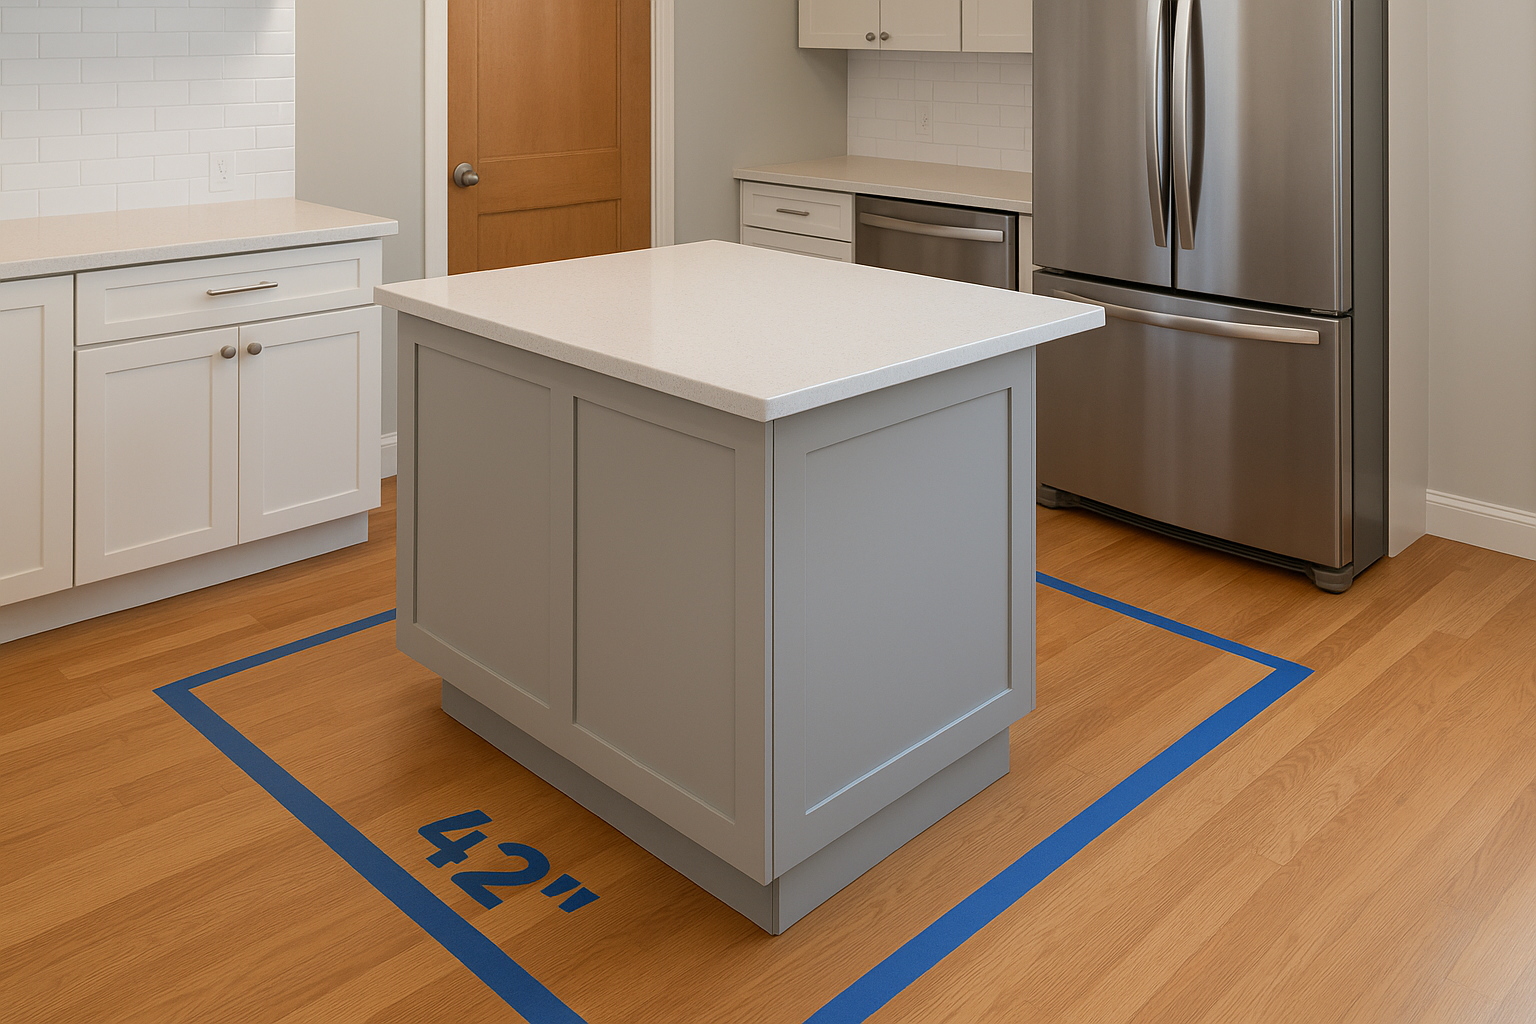
NKBA guidelines recommend 42 inches for one cook and 48 inches for two cooks as the industry standard for kitchen walkways.
How to handle busy zones like the fridge and dishwasher
The refrigerator door swing and the dishwasher door drop both consume floor space when open. Keep at least 48 inches between your island and these appliances so you can load, unload, and reach inside without stepping around the island to do it.
How to keep traffic off your prep side
Your primary prep zone should face away from the main traffic path through the kitchen. If people walk through to reach a dining room or back door, route that path along the seating side of the island instead, so foot traffic never cuts across your workspace.
Quick layout tests to confirm it will feel right
Tape the island’s footprint on the floor using painter’s tape before committing to a build. Walk through it carrying grocery bags and open nearby cabinet doors to catch clearance problems before anything gets built.
3. Size the island for prep, traffic, and appliances
Once you’ve locked the island’s location, you need to size it precisely. Part of learning how to design a kitchen island is understanding that dimensions follow the constraints of your room, your workflow, and any appliances you plan to integrate.
Practical island dimensions that work in real kitchens
Most functional islands land between 4 feet and 10 feet long, with roughly 2 feet of usable depth on each working side. A 4-by-4-foot island works well in a mid-size kitchen, while larger kitchens can handle 4-by-8 or beyond. Keep in mind that every foot of length you add also increases cabinet cost and clearance demand, so bigger is not automatically better.
How to choose the right island height
Standard kitchen islands sit at 36 inches tall, matching base cabinet height. This works well for most prep tasks. If you want seating, a dedicated overhang drops to 30 or 42 inches depending on whether you’re using standard chairs or bar stools.
Mixing two heights on one island is possible but requires careful structural planning to avoid weak joints at the transition point.
When a sink or cooktop belongs in the island
A sink makes sense when your perimeter run is already crowded or when you want a dedicated prep zone separate from cleanup. A cooktop works best when the island is at least 48 inches wide, leaving enough counter space on both sides for safe, practical workflow.
How to avoid seams and awkward proportions
Long countertops often require seams in stone or solid surface slabs, so size your island to minimize joints where possible. Keep the length-to-width ratio roughly 2:1 or less to avoid a shape that reads more like a corridor than a real workspace.
4. Plan seating that feels comfortable, not cramped
Seating turns your island from a pure prep surface into a daily gathering spot, but only if the numbers work from the start. When thinking through how to design a kitchen island with seating, dimensions affect long-term comfort more than cushion choice or stool style ever will.
How many seats you can realistically fit
Every seat needs at least 24 inches of linear counter space, though 28 to 30 inches per person feels noticeably less cramped during longer meals. A 6-foot overhang section realistically fits two to three people without crowding.
Plan your seat count before finalizing island length. Adding one extra seat often requires stretching the island by two feet, which may push you past your clearance limits on the opposite side.
Overhang, knee clearance, and stool spacing basics
Your overhang needs at least 12 inches of depth to give knees somewhere to go, and 15 inches works better for extended sitting. Keep 9 to 12 inches of vertical clearance between the underside of the countertop and the stool seat so legs fit without discomfort.
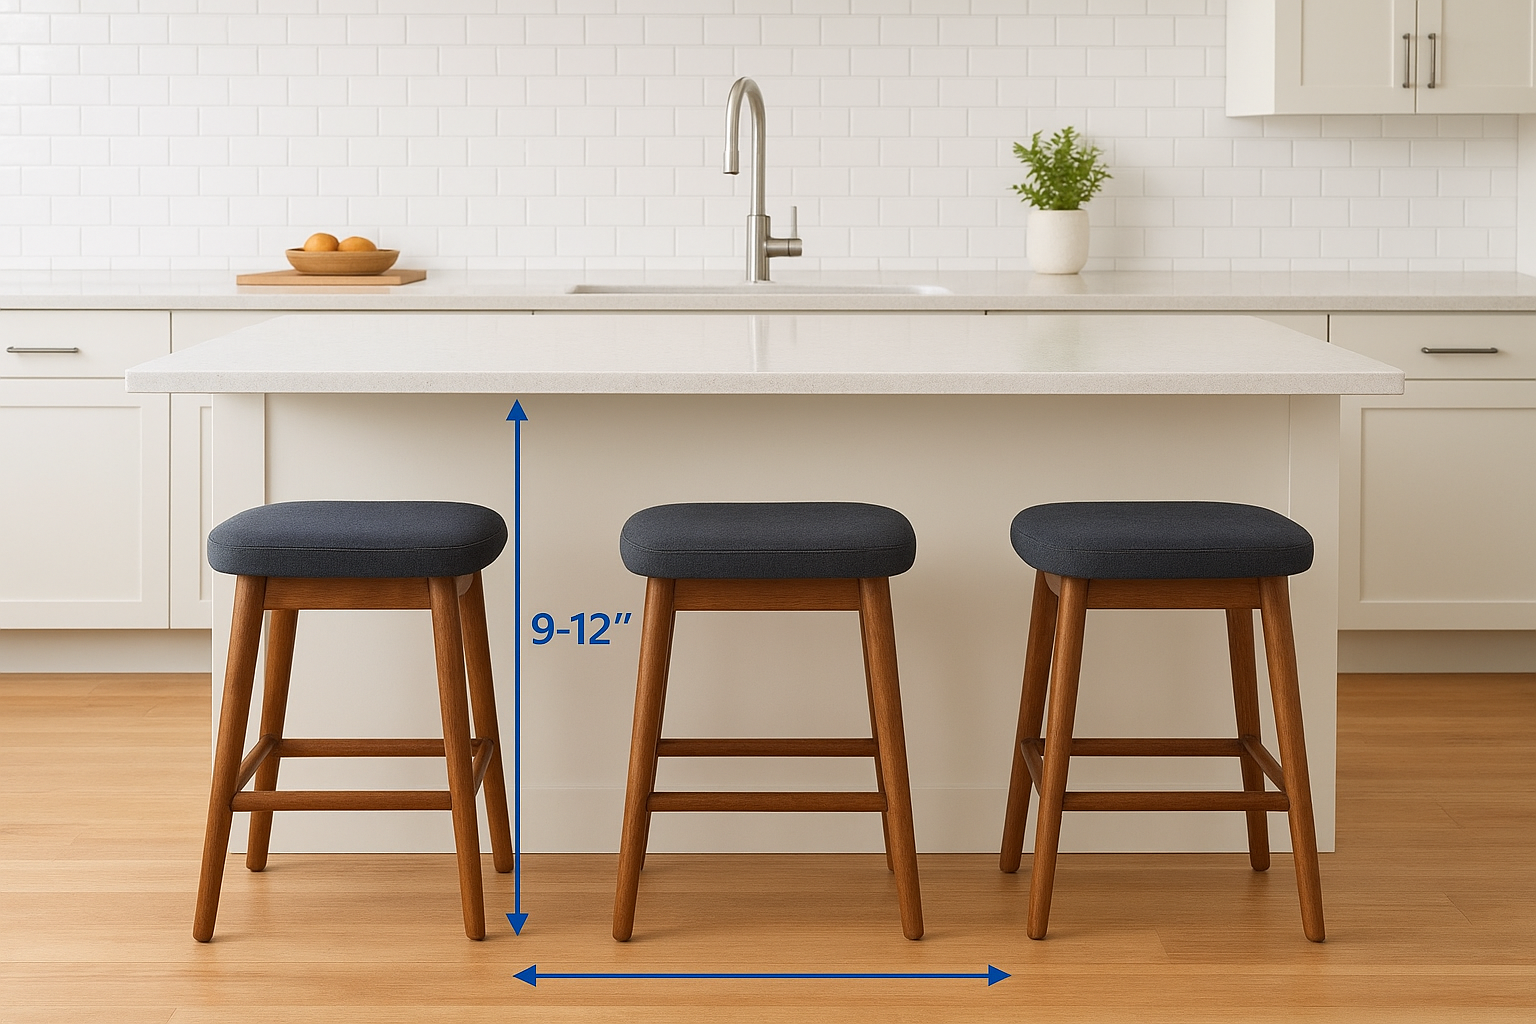
Overhang depth and knee clearance affect daily comfort far more than almost any other seating decision you will make.
Bar height vs counter height seating
Counter height islands at 34 to 36 inches pair with stools around 24 to 26 inches tall. Bar height at 40 to 42 inches requires stools near 28 to 30 inches. Match your stool height to your island height before you purchase anything.
Kid-friendly and aging-in-place seating choices
Dropping the seating section to 34 inches works better for children and for anyone who finds high stools difficult to climb. Choose stools with backs and footrests to reduce fatigue for both kids and older adults during longer sit-down meals.
5. Build in storage, trash, and outlets from day one
When thinking about how to design a kitchen island, storage and utility planning must happen in the early design phase, not after cabinet boxes are framed. Retrofitting outlets or trash pull-outs into finished cabinetry is expensive and disruptive.
Storage priorities that make an island work harder
Your island should address a specific storage gap your perimeter cabinets already have. Lock down your top priorities before the layout gets drawn, since those choices drive how the interior framing gets built.
Common island storage priorities:
- Deep pot and pan drawers
- Built-in trash and recycling pull-outs
- Dedicated prep or baking supply storage
Drawer and pull-out choices that earn their footprint
Deep drawers outperform door-and-shelf cabinets for pots, pans, and bulk items. A full-extension, soft-close drawer stays far more accessible during daily use than a fixed shelf behind a door.
Position trash and recycling pull-outs on an end panel or near the sink so cleanup stays in one zone. Keeping waste storage close to the sink reduces cross-kitchen trips during meal prep and cleanup.
Drawer stacks on both sides of the island nearly double your accessible storage without adding a single inch to the footprint.
Where to place outlets so they stay useful and discreet
Plan at least two outlets on the island and mount them on side panels rather than the countertop surface.
Your electrician needs rough-in positions confirmed before framing closes, so finalize outlet locations during the design phase.
The must-avoid mistakes that cause rework later
Never skip blocking for future outlets during the build. Adding electrical afterward means cutting into finished cabinetry.
Confirm your trash pull-out width matches the cabinet opening before ordering hardware, since mismatched dimensions are among the most common fit errors on island builds.
6. Choose materials, finishes, and lighting that last
The final piece of how to design a kitchen island involves selecting materials and finishes that hold up under real daily use, not just ones that photograph well on opening day.
Countertop material tradeoffs for daily wear
Quartz handles daily prep and cleaning better than marble in most kitchens because it resists staining without requiring sealing. Butcher block adds warmth but needs regular oiling and scratches visibly near the sink over time. Match your material to how your household actually cooks, not to how you imagine you might cook.
Cabinet construction details that signal quality
Solid wood face frames and dovetail or dowel drawer boxes outlast stapled particleboard construction by decades. Ask your carpenter directly whether they use full-extension soft-close hardware throughout, since that detail separates durable cabinetry from furniture that wears out in a few years.
Box construction and joinery method matter far more to long-term durability than the finish color you choose on day one.
Coastal considerations for Cape Cod homes
Cape Cod’s salt air and humidity accelerate wear on finishes and hardware faster than inland climates. Choose marine-grade or stainless hardware and a topcoat that resists moisture penetration, especially on islands positioned near exterior walls or windows where condensation builds.
Lighting and ventilation details that make the island usable
Pendant lights need 15 to 30 inches of clearance between the bulb and your countertop surface to avoid glare during prep. If your island includes a cooktop, size your hood vent to at least 1.5 times the BTU output of your range so smoke and grease don’t settle into nearby cabinetry over time.

A simple island checklist
Knowing how to design a kitchen island comes down to making the right calls in the right order. Lock location and clearances first, then size the island to your room, your seating needs, and any appliances you plan to integrate. Settle storage layout, outlet positions, and trash pull-out placement before fabrication starts, since those decisions affect framing directly.
Run through this list before your design gets finalized:
- Clearances confirmed at 42 to 48 inches on all working sides
- Island dimensions sized to your actual floor plan
- Seating overhang at 12 to 15 inches with correct stool heights
- Outlets roughed in on side panels
- Trash and recycling pull-outs positioned near the sink
- Countertop material chosen for your actual cooking habits
- Hardware and finish selected for coastal humidity if applicable
If you want a professional to handle every step from design through installation, contact Suman Custom Carpentry to start your project.