
Figuring out how to design kitchen cabinets isn’t just about picking door styles and finishes. It starts with understanding how you actually use your kitchen, where you prep, where you cook, where everything needs to land when you walk in with groceries. Get the layout wrong, and even the most beautiful cabinets will frustrate you every single day.
That’s something we see firsthand at Suman Custom Carpentry. From our shop in Hyannis, we’ve spent over seven years designing and hand-building custom kitchen cabinetry for homeowners across Cape Cod. Every project starts the same way: sitting down with the client and working through layout, storage needs, and workflow before a single board gets cut. The design phase is where a kitchen either comes together or falls apart, and it deserves more attention than most people give it. We’ve learned that the clients who engage deeply in the design process end up with kitchens they genuinely love using, not just looking at.
This guide walks you through the full process of designing kitchen cabinets, from mapping your layout and optimizing storage zones to planning for the kind of flow that makes cooking feel effortless. Whether you’re working with a designer, using a 3D planning tool, or sketching ideas on graph paper, you’ll find practical steps and professional insight to help you make confident decisions before your build begins.
Before you start: measure, list needs, set constraints
Most kitchen cabinet design mistakes happen before anyone opens a design tool. Homeowners jump straight to door styles and drawer counts without capturing the raw data that every layout decision depends on. If you start designing without accurate room measurements, a clear list of what you need to store, and a firm understanding of your budget and building constraints, you’ll spend hours redesigning from scratch once reality catches up with you.
Take accurate measurements first
You need three things before you touch any design tool: room dimensions, ceiling height, and the exact position of every window, door, and utility connection. Measure wall lengths to the nearest quarter-inch and note where outlets, switches, and plumbing rough-ins sit. Most kitchens are not perfectly square, so measure each wall independently rather than assuming opposite walls match.
Use this checklist as your starting template:
- Room dimensions: measure each wall at counter height and again near the floor
- Ceiling height: floor to ceiling at multiple points (older Cape Cod homes often have variance)
- Window locations: distance from corners, rough opening width, sill height, and header height
- Door locations: opening width, swing direction, and clearance needed
- Plumbing rough-ins: center of drain, hot and cold supply locations
- Electrical: position of existing outlets, switches, and any dedicated circuits for appliances
- Gas line location (if applicable): position and shutoff point
- Appliance cutouts: existing dimensions if you’re keeping current appliances
If your measurements are off by even half an inch in the wrong place, a cabinet run won’t close out cleanly at a wall, or a drawer will collide with a door swing every time you open it.
Sketch the room on graph paper first, even if you plan to use a 3D software tool later. A hand sketch forces you to examine every corner and transition, which is where most layout problems hide.
List what you own and how you cook
Before you work out how to design kitchen cabinets, you need to know what you’re actually designing storage for. Pull everything out of your current kitchen and group it: everyday dishes, glassware, pots and pans, baking equipment, small appliances, dry pantry items, cleaning supplies. This audit tells you exactly how many linear feet of shelving, drawer space, and cabinet depth you actually need, rather than guessing at the end.
Think through your cooking habits with the same specificity. Do you bake regularly? You’ll want a dedicated drawer for sheet pans and a countertop spot for your stand mixer near an outlet. Do you cook with large, heavy pots? A deep drawer base outperforms a door cabinet for that use case every time. The more specific your list, the fewer surprises show up once fabrication begins.
Set your constraints before you design
Every project runs into three categories of constraints: budget, structural limits, and code requirements. Getting clear on all three before you commit to a layout saves you from making decisions you’ll have to undo.
For budget, know your number going in so you can make real trade-offs during the design phase rather than after fabrication starts. Custom cabinetry built to your exact dimensions and specifications costs more than stock options, but the fit, durability, and long-term value are not in the same category.
Structural constraints include load-bearing walls you cannot move, ductwork you need to route around, and ceiling soffits that affect upper cabinet height. Code requirements cover minimum clearances between an island and perimeter cabinets, typically 42 inches for a single-cook kitchen and 48 inches for a multi-cook layout, along with ventilation requirements for range hoods. Locking these constraints down now means your design survives contact with a contractor or building inspector without requiring a full restart.
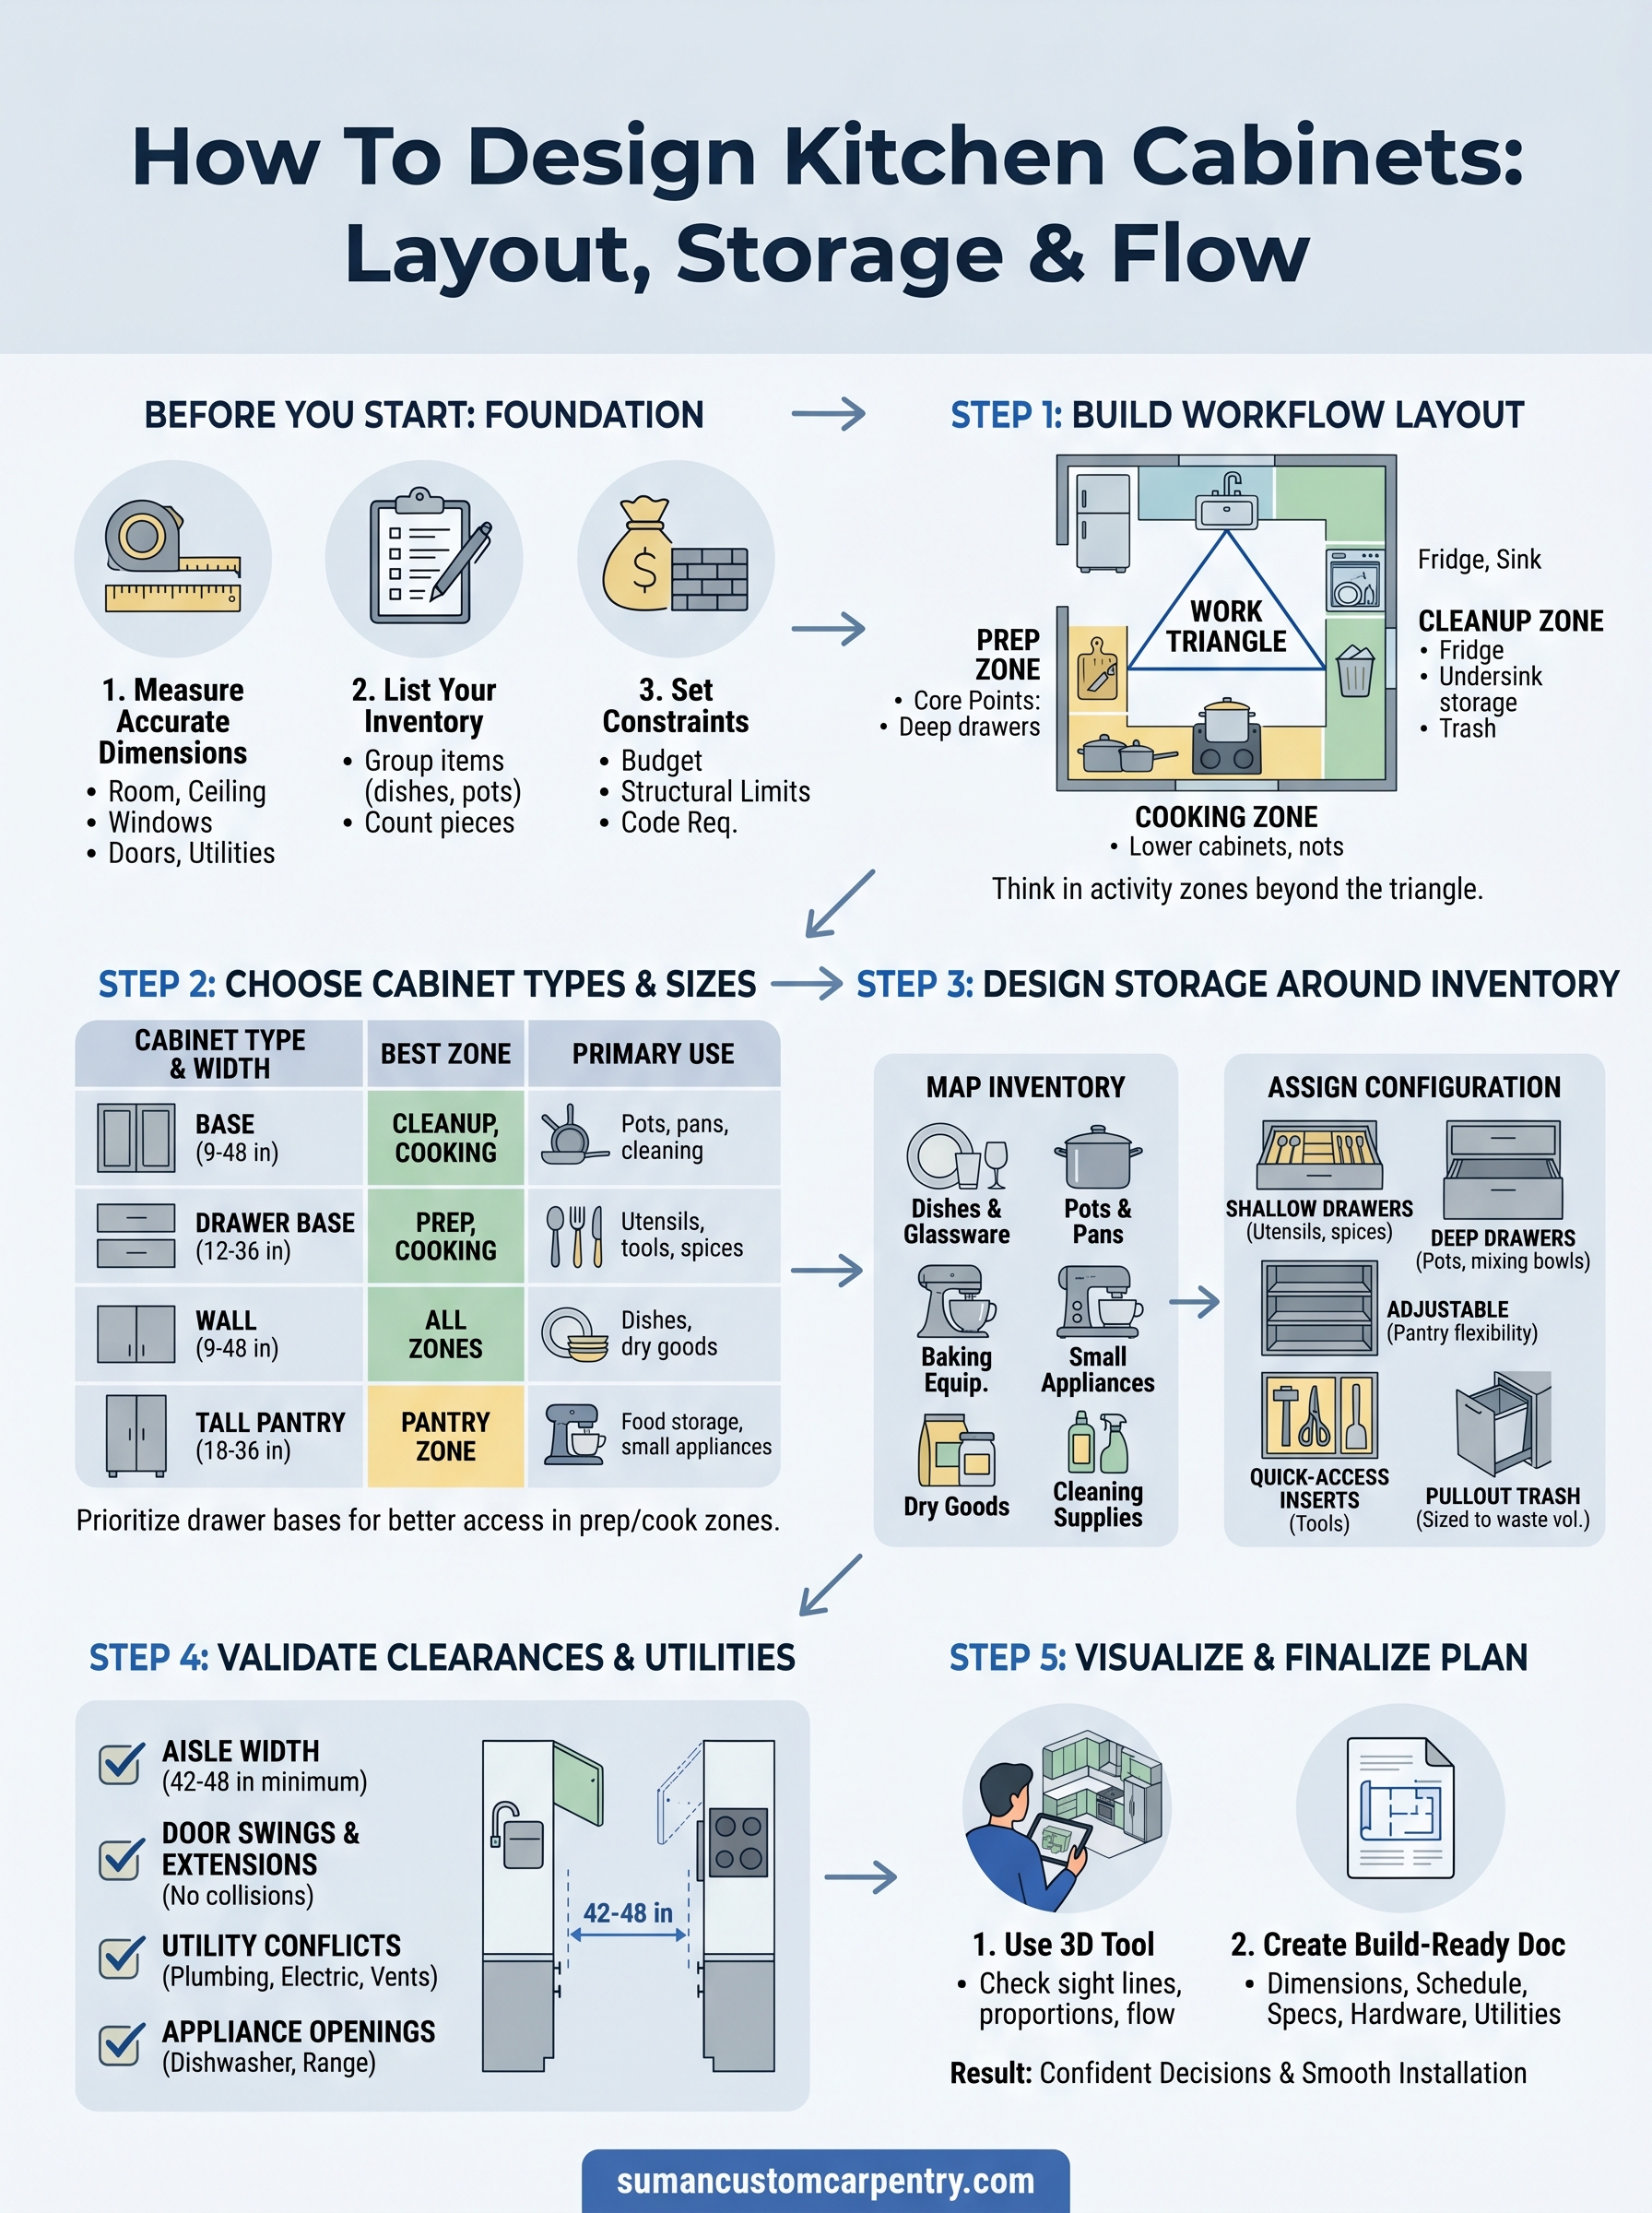
Step 1. Build a layout that supports your workflow
Your kitchen layout determines how much work your cabinets can actually do for you. Before you commit to any cabinet placement, map the three core activity points where you spend most of your time: the refrigerator, the sink, and the range or cooktop. This is the classic work triangle, and it still holds up as a planning foundation because it reflects how people actually move through a kitchen during meal prep and cooking. Everything you place around those three points should reduce steps, not add them.
Start with the work triangle, then build zones
The work triangle gives you a starting framework, but most modern kitchens benefit from thinking in dedicated activity zones beyond that. A prep zone, a cooking zone, and a cleanup zone each have distinct cabinet requirements. Your prep zone needs deep drawer bases for tools and a nearby landing surface. Your cooking zone needs lower cabinets that keep heavy pots accessible without lifting. Your cleanup zone needs undersink storage and a home for trash and recycling, positioned so you’re not carrying food waste across the room.
When you think about how to design kitchen cabinets through this lens, you stop placing cabinets randomly and start placing them in response to real tasks. A spice drawer that sits 18 inches from the cooktop gets used every day. That same drawer positioned at the far end of the kitchen gets ignored.
The single most common layout mistake is treating all cabinet space as interchangeable. Where a cabinet sits matters just as much as what goes inside it.
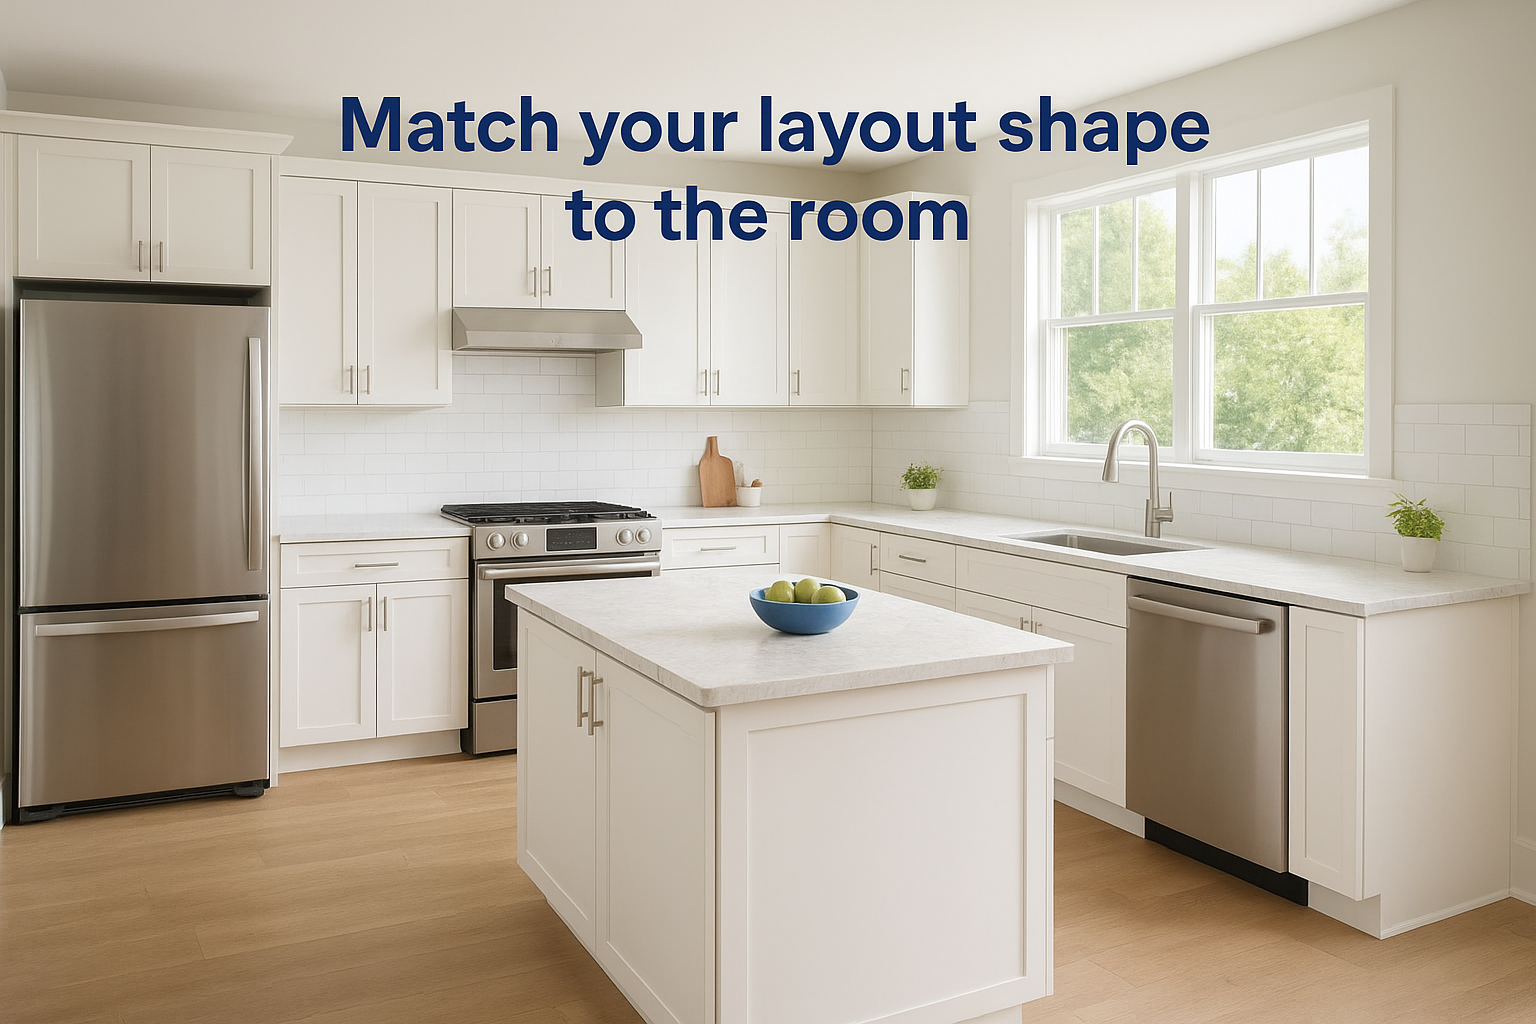
Match your layout shape to the room
Each kitchen footprint has a natural layout shape, and forcing the wrong shape into a room creates daily friction you’ll feel for years. Use this table to match your layout to your actual footprint:
| Layout Shape | Best For | Key Constraint |
|---|---|---|
| Single wall | Narrow spaces, open plans | Limited counter run |
| Galley | High-efficiency cooking | 48-inch aisle minimum |
| L-shape | Corner rooms, open-concept kitchens | Corner cabinet access matters |
| U-shape | Large kitchens, serious cooks | 60-inch interior width minimum |
| Island addition | Any layout with enough floor space | 42-48 inch clearance on all sides |
Choose the shape that fits your actual square footage first, then design cabinet runs that fill that shape without blocking doors, windows, or natural traffic paths. A layout that respects how you move through the room makes cooking feel effortless instead of like a problem you solve every time you start a meal.
Step 2. Choose cabinet types and sizes that fit the room
Once you’ve locked in your layout shape, you need to fill it with the right cabinet types in the right sizes. This is where many homeowners make a costly mistake: they choose cabinets based on what looks good in a showroom rather than what actually fits the room and serves each zone. Understanding standard cabinet dimensions and the full range of cabinet types gives you the information you need to build a plan that works in practice, not just on paper.
Know the standard cabinet dimensions
Standard cabinet dimensions exist because they’re designed to work with standard countertop heights, appliance sizes, and human reach ranges. Base cabinets run 34.5 inches tall and 24 inches deep, landing at 36 inches with a countertop. Wall cabinets are typically 12 inches deep and come in heights of 30, 36, or 42 inches depending on your ceiling height and how much upper storage you want. Tall cabinets, used for pantries and built-in appliances, run full height at 84 or 96 inches.
Width is where you have the most flexibility. Cabinets come in widths from 9 inches to 48 inches in 3-inch increments. When you think about how to design kitchen cabinets around a specific wall run, you’ll often need to mix widths deliberately to close out the run cleanly without leaving an awkward gap at the wall.
Filler strips can hide small gaps, but a well-planned layout minimizes their use by calculating the total wall length against a deliberate cabinet width sequence.
Match cabinet types to each zone
Different cabinet types serve different functions, and placing the right type in each zone is what separates a functional kitchen from one that just looks organized. Use this reference to match cabinet types to your activity zones:
| Cabinet Type | Standard Width | Best Zone | Primary Use |
|---|---|---|---|
| Base with doors | 9-48 in | Cleanup, cooking | Pots, pans, cleaning supplies |
| Drawer base | 12-36 in | Prep, cooking | Utensils, tools, spices |
| Blind corner base | 24-48 in | L or U corners | Maximizing corner storage |
| Wall cabinet | 9-48 in | All zones | Dishes, dry goods, glasses |
| Tall pantry cabinet | 18-36 in | Pantry zone | Food storage, small appliances |
| Sink base | 30-36 in | Cleanup | Undersink storage, trash |
Choosing drawer bases over door bases wherever possible in your prep and cooking zones gives you faster access to what you use most. Drawers outperform doors on accessibility and daily usability, especially for heavy items like cast iron and large pots that you’d otherwise be crouching down to retrieve from the back of a cabinet.
Step 3. Design storage around what you actually own
Most storage problems in a kitchen come from designing for an imaginary version of what you own rather than the actual items sitting in your cabinets right now. When you think about how to design kitchen cabinets that genuinely work, the key is building the interior storage configuration around your specific collection of cookware, dishes, and pantry goods, not around a generic list pulled from a showroom catalog.
Map your inventory before you assign cabinet space
Pull everything out of your current kitchen and sort it into distinct categories: everyday dishes and glassware, pots and pans, baking equipment, small appliances, dry goods, and cleaning supplies. Count the pieces in each category and measure the largest items in each group. A Dutch oven that’s 7 inches tall needs a different drawer depth than a sheet pan that’s 1 inch thick but 18 inches long. This inventory gives you concrete dimensions to design around rather than rough guesses that lead to cabinets that are either too shallow or too deep for what you actually put inside them.
Use this template to record your inventory before you finalize any cabinet configuration:
| Category | Item Count | Largest Item Dimensions | Preferred Access |
|---|---|---|---|
| Everyday dishes | Wall cabinet, eye level | ||
| Pots and pans | Deep drawer base | ||
| Baking equipment | Tall drawer or lower base | ||
| Small appliances | Counter or pantry cabinet | ||
| Dry goods | Pantry cabinet or wall cabinet | ||
| Cleaning supplies | Sink base |
Filling out this table before you finalize your layout forces you to confront real storage needs, which is the only way to avoid building cabinets that look great but can’t hold what you actually use.
Assign storage depth and configuration to each zone
Shallow drawers between 4 and 6 inches deep handle utensils, spices, and flatware without wasting vertical space. Deep drawers at 10 to 12 inches handle pots, pans, and mixing bowls far better than a door cabinet with a single fixed shelf. Tall pantry cabinets with adjustable shelving give you flexibility for dry goods and small appliances that vary in height as your household’s needs change over time.
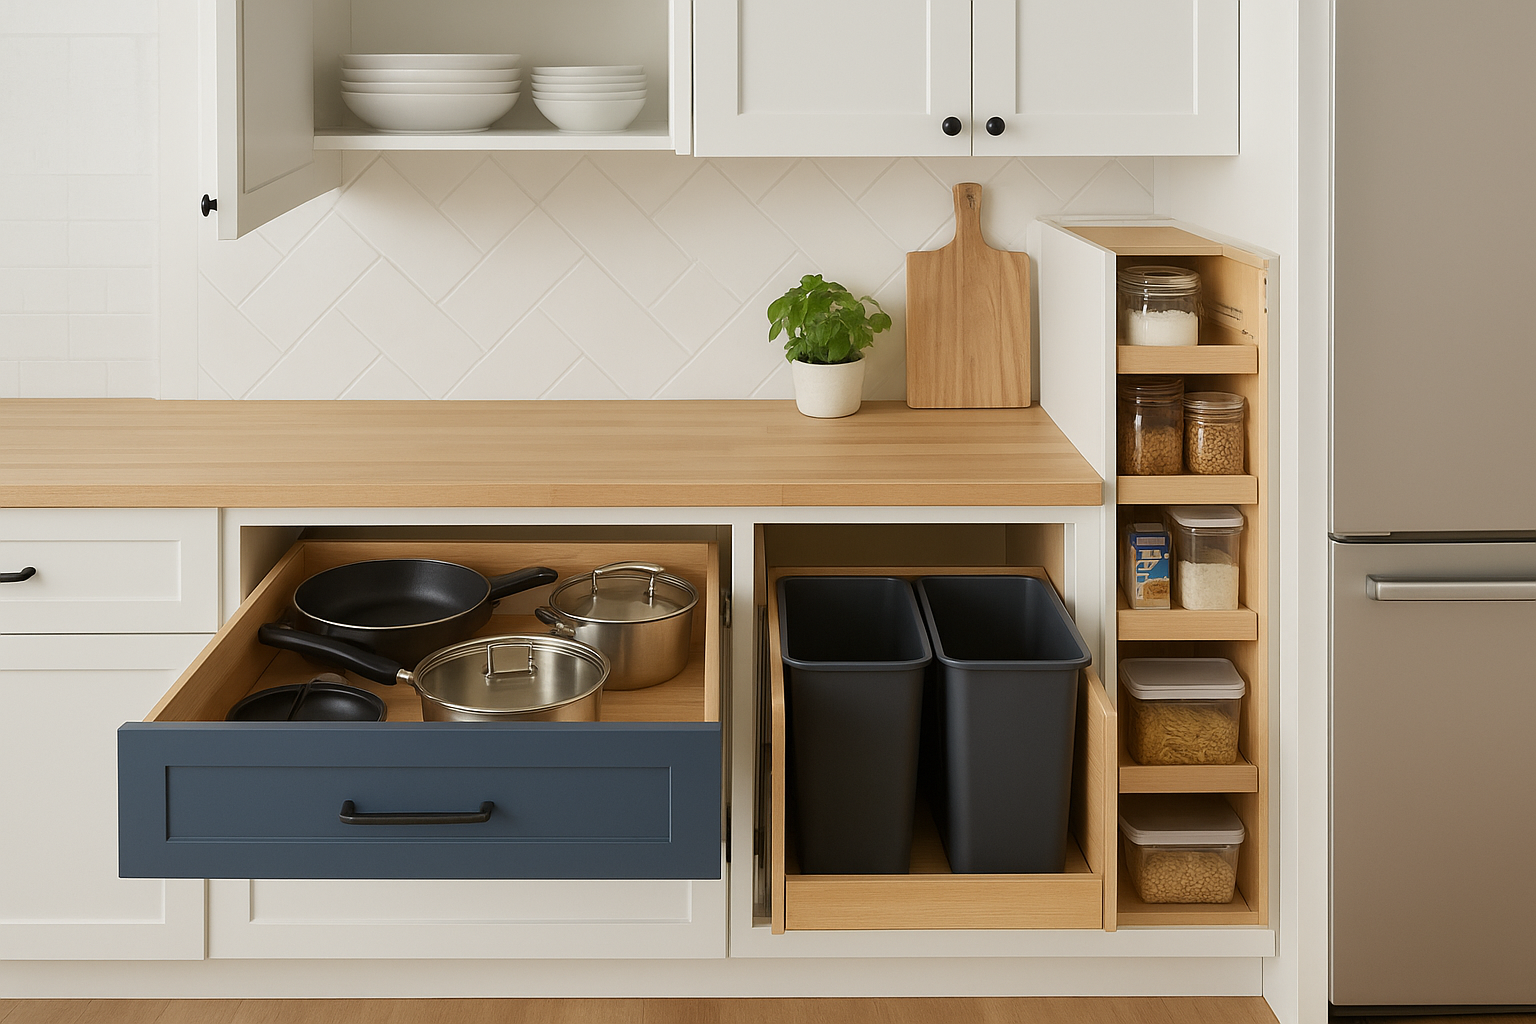
Match each cabinet’s internal configuration to the zone it serves. Your prep zone needs quick-access drawer inserts for tools you reach for constantly. Your cleanup zone needs pullout trash and recycling bins sized to your actual waste volume, not a generic insert that barely holds a day’s worth of scraps. Building storage around what you own means every drawer and cabinet has a clear job, and nothing ends up empty or chronically overstuffed.
Step 4. Validate clearances, utilities, and install details
A finished design that ignores physical clearances and utility positions will fail during installation. This is the step most homeowners skip when working out how to design kitchen cabinets, and it’s where projects run into costly change orders and delayed timelines. Run through every clearance check and utility conflict before you hand off a plan to a builder or order a single cabinet.
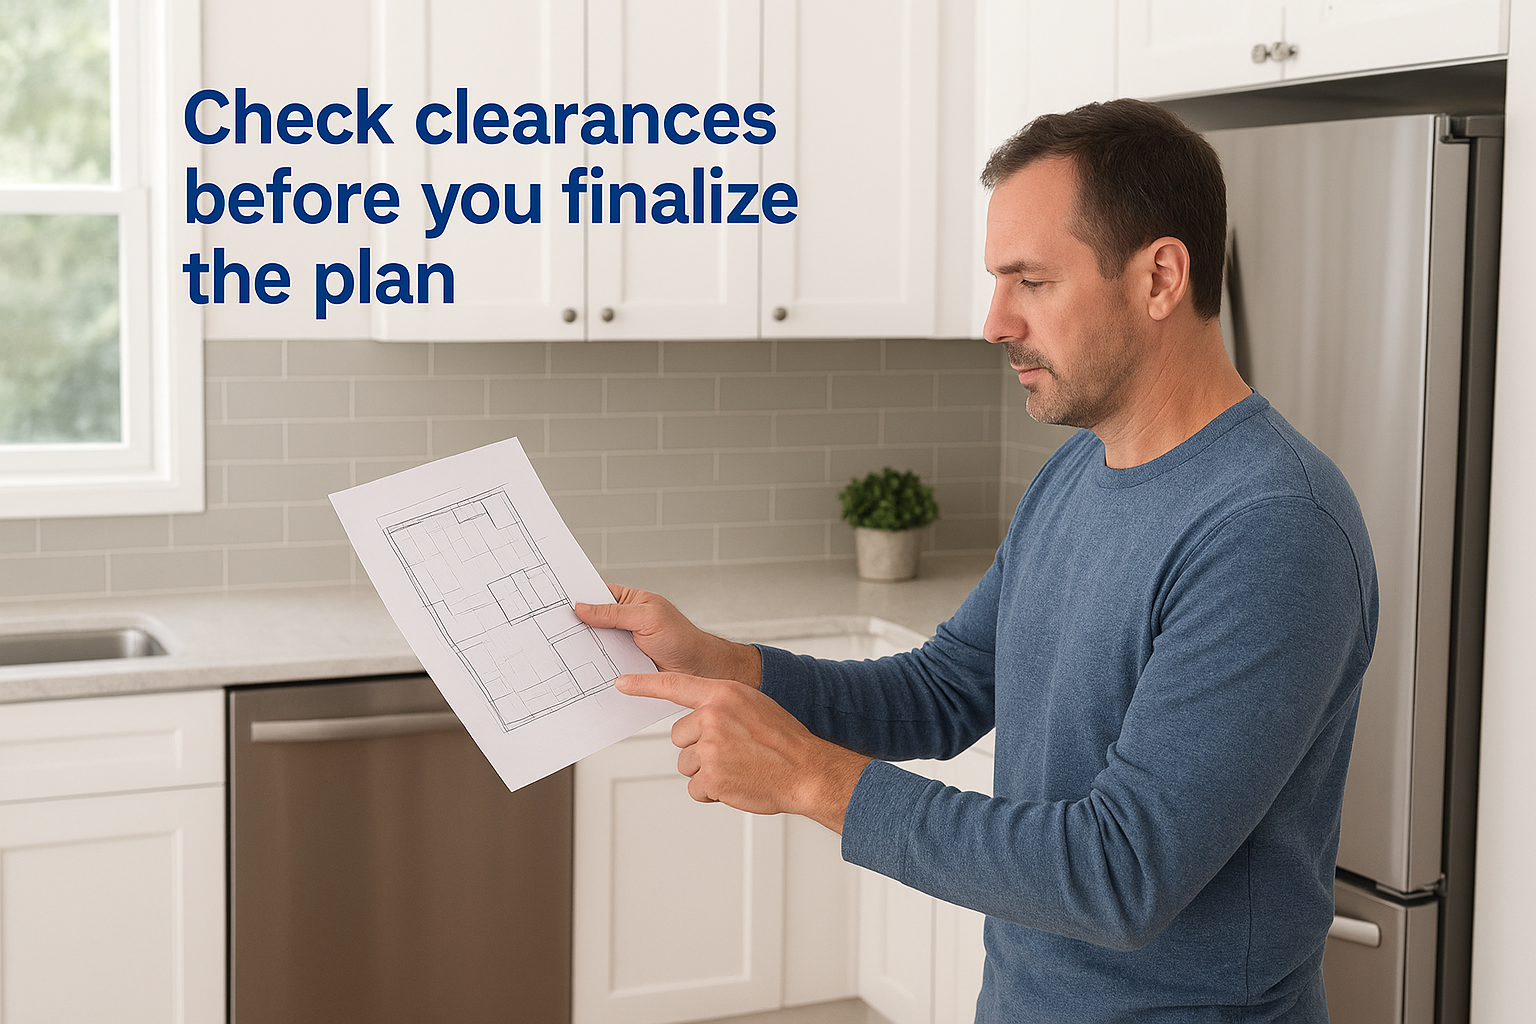
Check clearances before you finalize the plan
Door swings, drawer extensions, and appliance openings all need room to operate without colliding with adjacent cabinets or walls. Validate each of these clearances individually against your floor plan before you lock in cabinet positions. A quick check at this stage takes 30 minutes; fixing a collision after installation can take days.
Use this checklist as your final clearance validation pass:
- Aisle width: 42 inches minimum for a single-cook kitchen; 48 inches when two people cook simultaneously
- Refrigerator clearance: 1 inch on each side and above for ventilation; confirm the door swing clears any adjacent cabinet
- Dishwasher door: needs 24 inches of open floor space directly in front when fully extended
- Drawer extension: deep drawers travel 20 to 22 inches; confirm no island or opposite cabinet blocks full travel
- Upper cabinet doors: check that open doors don’t collide with a range hood, pendant light, or ceiling fixture
- Toe kick: standard 3.5 inches deep and 3.5 inches tall; verify this works with your finished flooring thickness
Skipping this checklist is the fastest way to end up with a drawer that hits your island every time you open it, and no amount of good design elsewhere fixes that once it’s built.
Confirm utility locations against your cabinet plan
Plumbing, electrical, and ventilation rough-ins occupy fixed positions that your cabinets must work around. Lay your cabinet plan directly on top of your utility map and flag every point where a base cabinet, back panel, or wall cabinet landing conflicts with an existing rough-in before you finalize dimensions.
Check these specific utility details in sequence:
- Sink drain and supply lines: confirm the sink base cabinet leaves enough interior clearance for the P-trap and shutoff valves to operate without obstruction
- Dedicated circuits: mark outlet positions inside cabinet runs for dishwashers, microwaves, and refrigerators so each connection lands inside the correct wall or base cavity
- Range hood duct: trace the duct path up through the wall or ceiling and confirm no cabinet back panel blocks the run
- Gas line: verify the shutoff valve stays accessible after cabinet installation, not buried behind a fixed panel
Catching a utility conflict at the design stage costs you nothing but a revision. Catching the same conflict after installation means cutting into finished cabinetry or pulling appliances to reach a line that a 10-minute check would have flagged from the start.
Step 5. Visualize in 3D and finalize a build-ready plan
A 2D floor plan tells you where cabinets land, but it won’t show you that your upper cabinets feel oppressively low over the peninsula, or that the range hood visually dominates the room in a way you didn’t expect. Rendering your design in 3D is the step that closes the gap between a plan that looks correct on paper and a finished kitchen you’ll actually want to walk into every morning. This is also the stage where you catch proportion problems and visual imbalances before a single piece of wood gets cut.
Use a 3D tool to walk through your design
Many homeowners working out how to design kitchen cabinets stop at a sketch or a basic 2D layout. Moving into a 3D view forces you to evaluate the design from the perspective of someone standing in the room. Look at sight lines, door swing arcs, and how upper cabinet height relates to ceiling height at each point in the kitchen. Walk the virtual camera through the cooking zone, the prep zone, and the cleanup zone separately to check that each area feels open and functional, not cramped or visually cluttered.
A 3D walkthrough is the closest you can get to standing inside your kitchen before it exists, and the decisions you make at this stage cost you nothing to change.
Run through this checklist inside your 3D view before you move on:
- Upper cabinet height: confirm the gap between countertop and wall cabinet bottom is between 18 and 20 inches
- Island proportions: check that the island width and overhang work visually against the perimeter cabinet run
- Hardware placement: verify drawer pulls and door handles are consistent in height across each run
- Lighting clearance: confirm pendant lights over the island don’t conflict with upper cabinet doors when open
- Color and finish contrast: assess whether the cabinet finish reads clearly against the wall color and countertop material
Compile a build-ready document before you hand off the plan
Once your 3D review is complete, pull everything into a single build-ready document that your carpenter or fabricator can act on without asking follow-up questions. A disorganized or incomplete handoff adds time to your project and creates room for errors that are expensive to fix after fabrication starts. Your final plan document should include every dimension, material specification, hardware selection, and utility note in one place.
Use this template as your build-ready plan structure:
| Section | What to Include |
|---|---|
| Room dimensions | All wall lengths, ceiling height, window and door positions |
| Cabinet schedule | Cabinet type, width, height, depth, and quantity for each position |
| Interior configurations | Drawer inserts, pullouts, shelf counts, and trash bin sizes |
| Material specs | Box material, door style, finish, and edge detail |
| Hardware | Pull or knob style, size, and placement height |
| Utility notes | Sink drain location, dedicated circuit positions, duct path, gas shutoff |
| Appliance cutouts | Width, height, and depth for each built-in appliance |
Hand this document to your builder with accurate measurements attached and you eliminate the most common source of back-and-forth that delays a kitchen project from design approval to installation start.
Ready to move from plan to cabinets
You now have a complete framework for how to design kitchen cabinets that actually work: accurate measurements, a workflow-driven layout, the right cabinet types in the right zones, storage built around what you own, clearances confirmed, and a build-ready document your fabricator can act on without guessing. Every step in this process exists to prevent the expensive problems that surface when a kitchen gets designed quickly and built without enough attention to the details that matter.
The difference between a kitchen you tolerate and one you genuinely enjoy using comes down to how seriously you treated the design phase before fabrication began. If you’re ready to stop planning and start building, Suman Custom Carpentry hand-builds every cabinet in our Hyannis shop and works with you through every decision from the first site measurement to final installation. Reach out and put your plan into production.