
A small kitchen doesn’t mean you’re stuck with a cramped, frustrating workspace. Some of the most functional, beautiful kitchens we’ve built at our Hyannis shop have been under 100 square feet. The trick isn’t adding more room, it’s making smarter use of every inch you already have. That’s exactly what good small kitchen renovation ideas come down to: clever design choices that make a compact layout feel open, organized, and genuinely enjoyable to cook in.
Here on Cape Cod, small kitchens are the norm rather than the exception. Many of the homes we work on, cottages, capes, and older colonials, were built with kitchens sized for a different era. Our team at Suman Custom Carpentry designs and hand-builds custom cabinetry and millwork specifically to solve the storage and layout problems that come with these tighter spaces. We see what works (and what doesn’t) every single week.
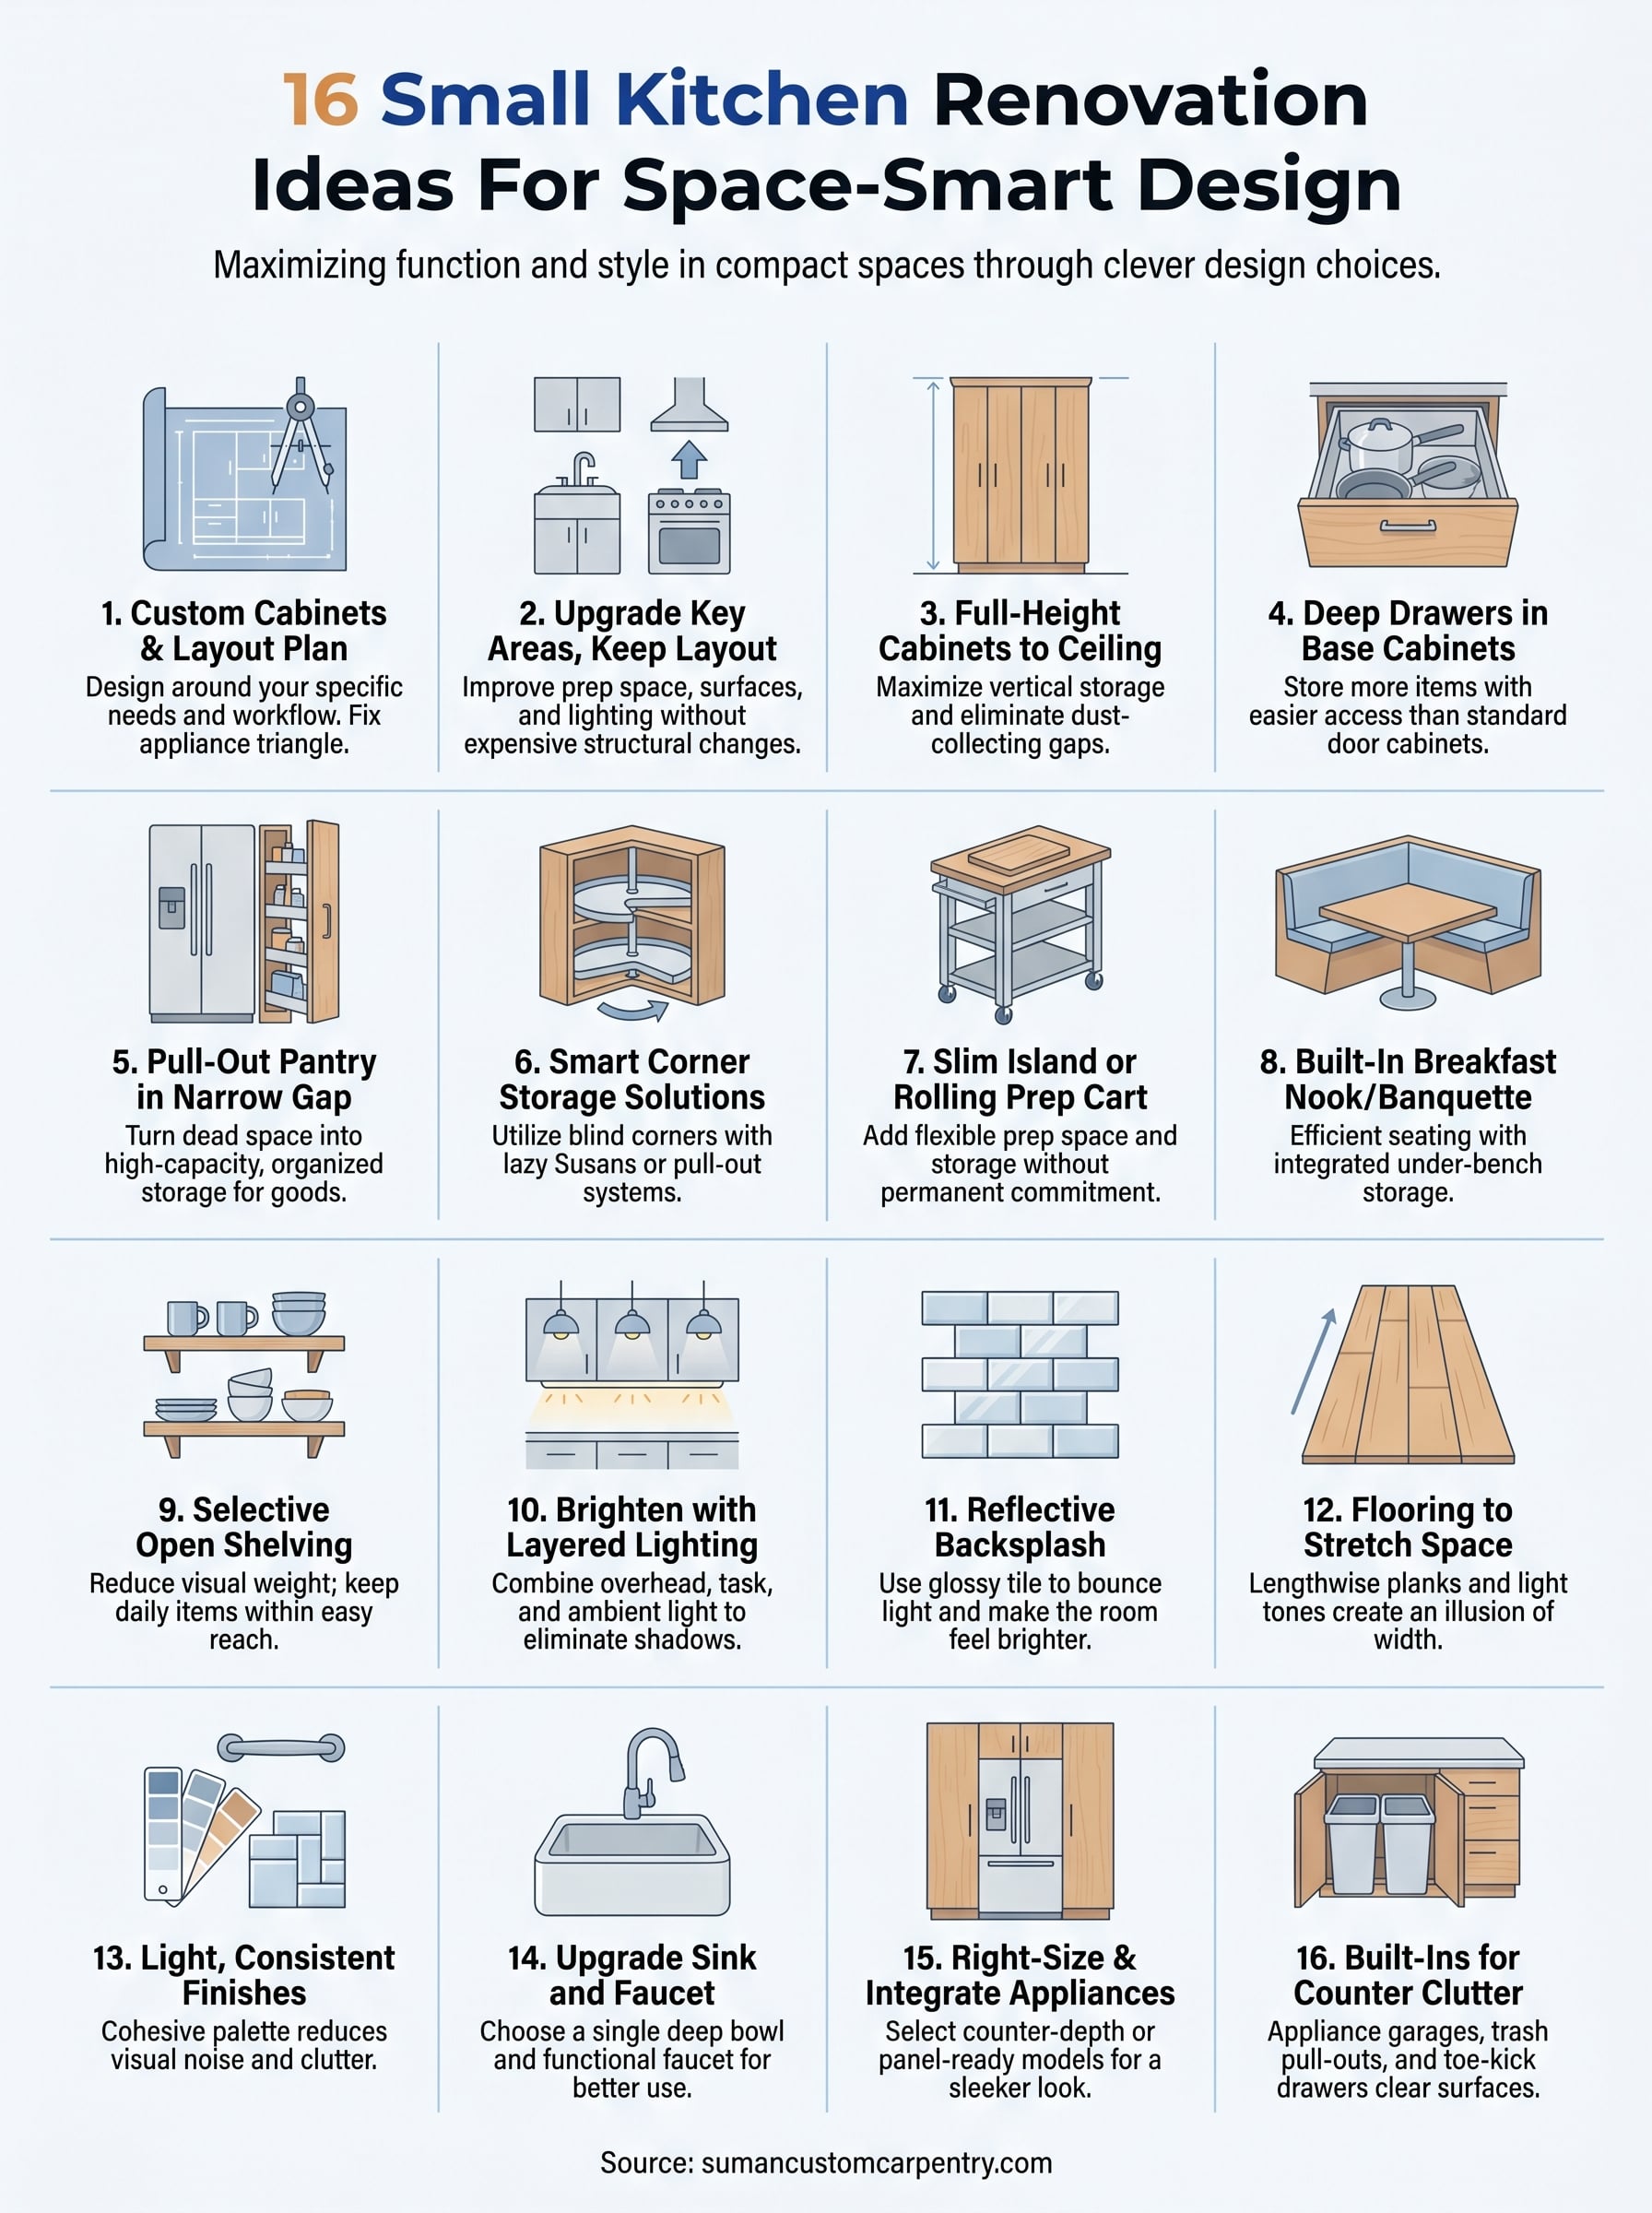
This guide covers 16 practical renovation ideas that prioritize both function and style. You’ll find layout strategies, storage solutions, material picks, and design details that can transform a small kitchen without blowing your budget. Whether you’re planning a full gut renovation or looking for targeted upgrades, each idea here is something you can actually act on, backed by real-world experience from thousands of hours spent building kitchens just like yours.
1. Start with custom cabinets and a layout plan
Before any small kitchen renovation ideas become real choices, you need a solid plan built around how the space actually functions. Custom cabinets give you the flexibility to design around your specific needs rather than forcing your kitchen to fit a stock solution. Getting layout decisions right before anything is ordered or built saves you from expensive changes once work is underway.
Define how you cook and what you store
Your cooking habits shape every cabinet decision. If you bake regularly, you need deep drawers for sheet pans and counter space near the oven. If you cook for two and rarely entertain, your storage priorities shift entirely. Write down what you actually use every week before you sit down with a carpenter, because that list drives the entire design.
Fix the workflow with the sink, stove, and fridge
The relationship between your sink, stove, and refrigerator determines how comfortable your kitchen feels during daily use. In a small kitchen, keeping those three points close to each other reduces wasted steps and makes cooking less frustrating. Avoid layouts where the fridge door swings into the path between the stove and the sink.
A well-planned work triangle is the single most impactful layout decision you can make in a compact kitchen.
Build storage around real item sizes
Most cabinet designs fall short because they rely on generic dimensions rather than your actual cookware and appliances. Measure your sheet pans, stand mixer, tallest stockpot, and pantry staples before you finalize cabinet heights and depths. A pull-out drawer built around your specific items works far better than a standard cabinet that wastes two inches on every side.
Decide what to keep, move, or remove
A renovation gives you the right opportunity to audit every item in your kitchen and decide what actually earns cabinet space. Appliances you rarely use, duplicate tools, and oversized serving pieces belong somewhere else or out of your home entirely. Clearing out before you design means your new layout reflects what you genuinely need, not what you’ve accumulated.
Set expectations for timeline and cost
Custom kitchen cabinets typically run 40 to 60 days from design approval to installation, and that timeline holds whether your kitchen is 80 square feet or 200. Material choices, hardware selections, and finish options all affect final cost. Setting a realistic budget early keeps decisions on track and prevents delays when your carpenter needs answers quickly.
2. Keep the layout but upgrade what matters most
Not every small kitchen renovation needs a complete overhaul. If your sink, stove, and fridge sit in positions that already work reasonably well, preserving that layout while upgrading surfaces and storage can deliver a dramatically better kitchen at a fraction of the cost.
Identify the biggest pain points in your current setup
Start by listing what actually frustrates you each day. Is it the lack of counter space, cabinets that don’t close properly, or poor lighting over the prep area? Naming the specific problems first keeps you from spending money on changes that won’t improve your experience.
Improve prep space without moving plumbing
Moving a sink requires a plumber and often means opening walls and floors. Instead, reclaim counter space by moving small appliances off the surface, adding a pull-out cutting board, or extending the counter into an underused corner. You gain meaningful prep room without touching a single pipe.
The most effective small kitchen renovation ideas often involve targeted upgrades rather than full relocations.
Update surfaces and fixtures for a new feel
New cabinet doors, fresh hardware, a different backsplash, and updated lighting can transform how your kitchen looks and feels without changing a single structural element. These upgrades carry high visual impact relative to their cost.
Save money by avoiding structural changes
Plumbing, electrical, and gas line moves are the most expensive line items in any kitchen renovation. Keeping those in place lets you redirect that budget toward better materials, custom cabinetry, or higher-quality fixtures where you’ll notice the difference every day.
Know when a layout change pays off
Sometimes the current layout blocks a door or forces you to cross the room between the stove and the sink. In those cases, the cost of relocating a key element is worth evaluating against the daily frustration it removes, not just against the upfront price.
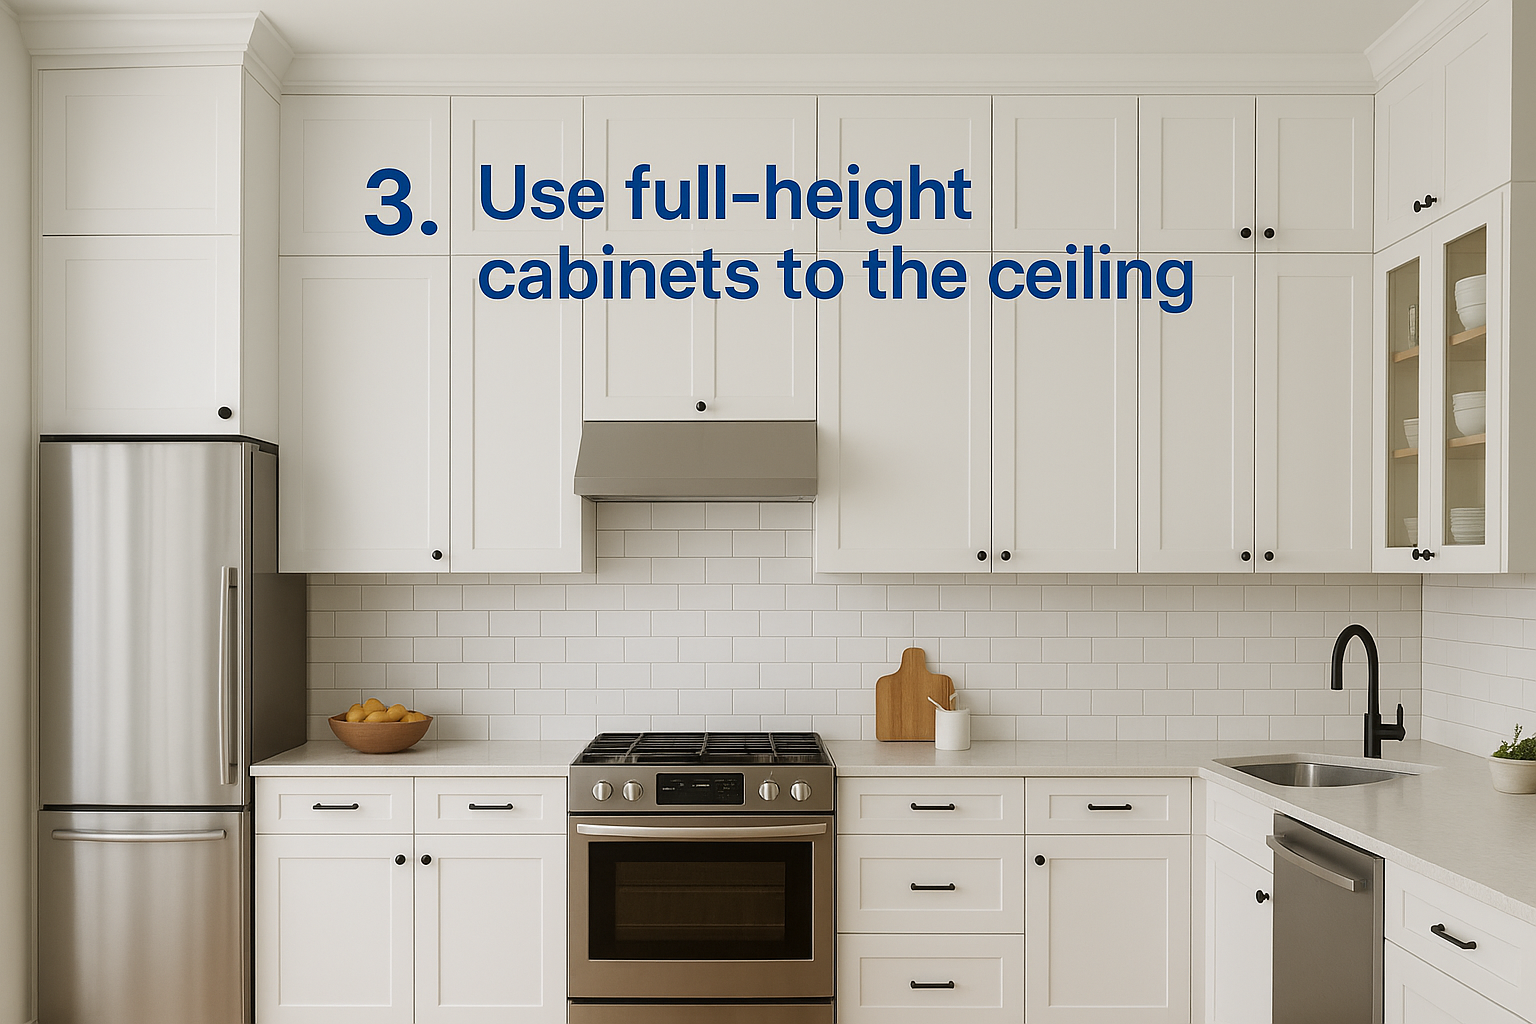
3. Use full-height cabinets to the ceiling
One of the most effective small kitchen renovation ideas you can act on is running cabinets all the way to the ceiling. In a compact kitchen, vertical space is the one direction you haven’t used yet, and full-height cabinets let you capture every inch of it without expanding your footprint.
Add usable storage without taking floor space
Tall cabinets give you significantly more storage capacity without touching your kitchen’s square footage. Upper shelves work well for seasonal items, seldom-used appliances, and backup pantry stock you don’t reach for every day. You gain real storage volume simply by using height the room already has.
Reduce dust shelves and wasted cabinet tops
Standard-height cabinets leave a gap above them that collects grease, dust, and random clutter. Closing that gap with full-height doors eliminates that maintenance problem entirely. You also remove the visual break that gap creates, which makes the room feel taller and more finished.
Removing the soffit gap is one of the fastest ways to make a small kitchen feel larger without touching the floor plan.
Choose door styles that fit a smaller room
In a tight kitchen, flat-panel or shaker-style doors keep the visual weight manageable when cabinets run floor to ceiling. Highly detailed profiles can feel heavy across a small wall and draw attention to the size of the room rather than away from it.
Plan for soffits, crown, and ceiling issues
Before committing to full-height cabinets, check whether soffits or hidden ductwork sit above your current uppers. Removing or rerouting them adds cost, but it eliminates the biggest obstacle to a clean, continuous run of cabinetry.
Balance tall cabinets with open space
Running full-height cabinets on every wall can feel visually heavy. Use one run of open shelves or a glass-panel door insert to break up the cabinetry and let the room breathe without sacrificing storage.
4. Swap doors for deep drawers in base cabinets
Replacing lower cabinet doors with deep drawers is one of the most impactful small kitchen renovation ideas you can make in a compact kitchen. Standard base cabinets with hinged doors force you to crouch, reach around a door, and dig blindly into the back. Drawers eliminate that entirely.
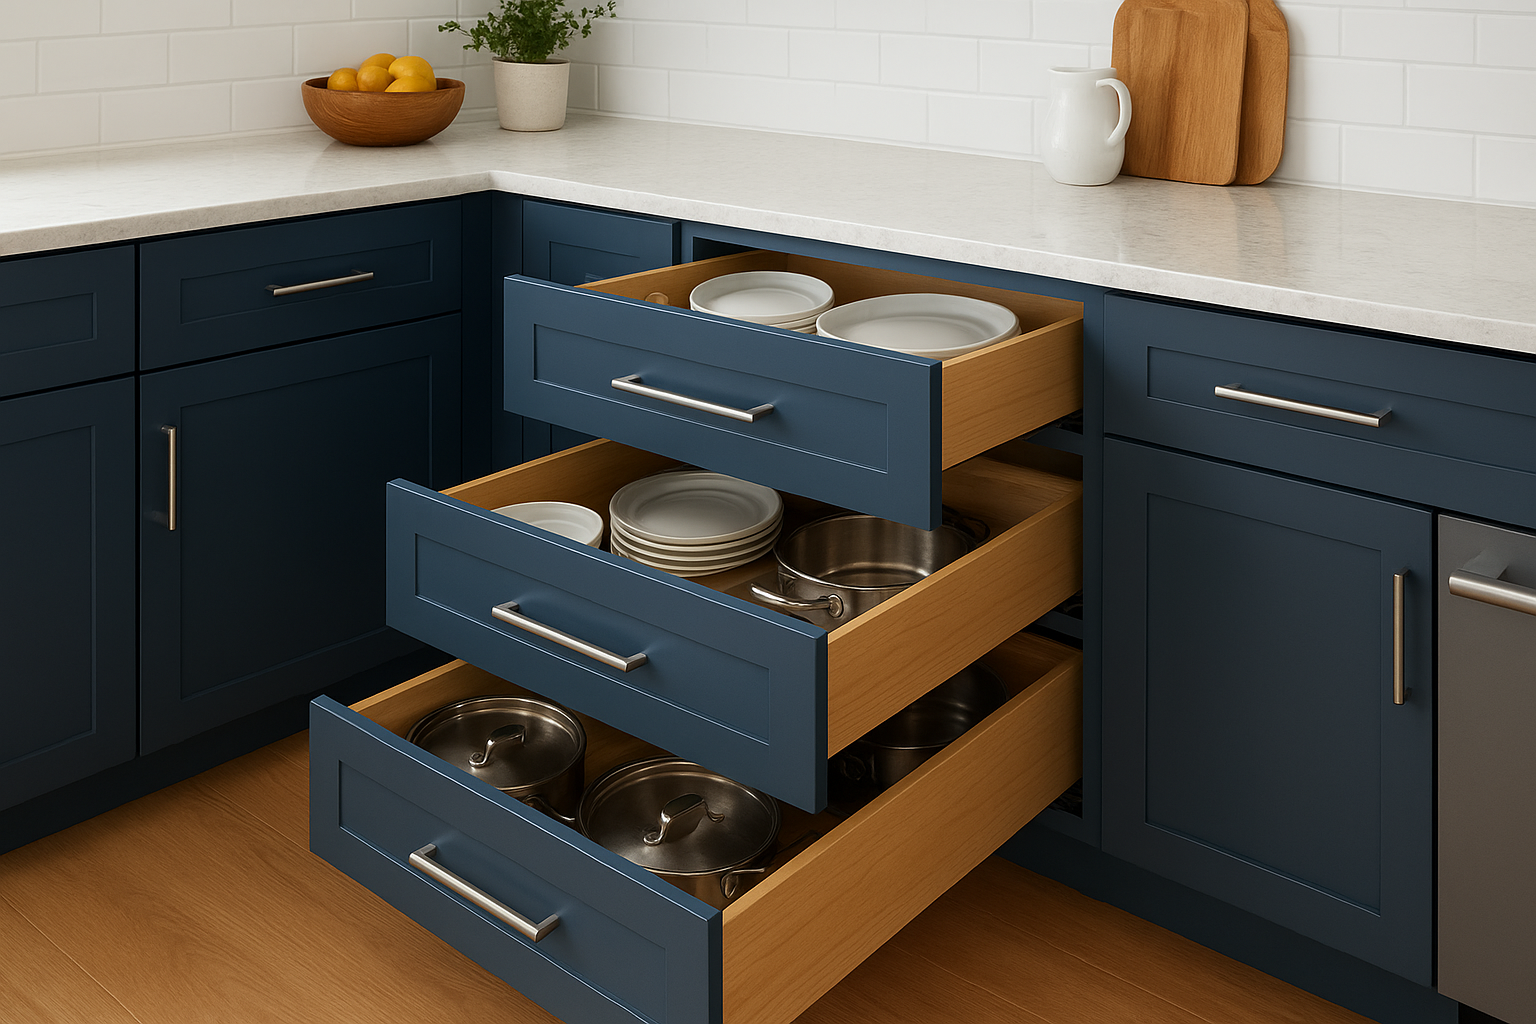
Store more in the same footprint
Deep drawers let you stack and organize items vertically rather than piling them behind a door you can barely see around. A single 24-inch drawer stack can hold more usable, accessible storage than the equivalent base cabinet with a swinging door, all within the exact same cabinet footprint.
Make pots, pans, and dishes easier to access
Heavy cookware belongs in lower drawers you can pull straight out rather than in cabinets where you move three items to reach one. Dishes stacked in a deep drawer with a soft-close mechanism stay organized and come out without lifting above your head.
Deep drawers for pots and pans are the single most requested upgrade from homeowners who have renovated a kitchen before.
Choose drawer organizers that prevent clutter
Dividers and custom inserts keep drawers functional long after installation. Peg systems work well for plates and bowls. Knife blocks built into the drawer face keep counters clear.
Plan drawer sizes around your cookware
Before your carpenter finalizes drawer heights, measure your tallest pot and widest pan. A drawer that’s one inch too shallow forces you back to the cabinet below for overflow.
Avoid common drawer layout mistakes
Don’t convert every base cabinet to drawers without thinking through door swing clearance near the dishwasher or corner cabinets. Some base positions still work better with doors, particularly where pull-out trash or cleaning supplies live.
5. Add a pull-out pantry in a narrow gap
Narrow gaps between appliances and wall cabinets are some of the most overlooked opportunities in any small kitchen renovation. A pull-out pantry unit fits into openings as slim as six inches and converts what was dead wall space into organized, fully accessible storage without adding a single square foot to your kitchen’s footprint.
Turn dead space into high-capacity storage
That 9-inch gap beside your refrigerator or between the stove and an adjacent cabinet is not wasted space. A floor-to-ceiling pull-out unit built into that gap holds dozens of items on tiered shelves that slide completely forward so you can see everything at once.
Pull-out pantries consistently rank among the most appreciated additions homeowners discover after completing a kitchen renovation.
Use pull-outs for spices, cans, and snacks
Shallow shelves work best for single-row storage of spices, canned goods, and packaged snacks. Because the unit extends fully outward, you eliminate the blind reaching and digging that plagues deep base cabinets.
Choose between full-height and base pull-outs
Full-height pull-out units maximize total capacity and suit spaces beside tall appliances. Base-height pull-outs tuck under a continuous counter run and are simpler to install without disrupting existing upper cabinetry.
Plan ventilation and clearance near the fridge
Refrigerators need airflow along their sides to operate efficiently. Keep at least one inch of clearance between the pull-out unit and the refrigerator casing, and confirm your appliance’s specific ventilation requirements before finalizing placement.
Prevent tipping and binding with solid hardware
A pull-out pantry loaded with canned goods carries serious weight. Full-extension drawer slides rated for the actual loaded weight keep the unit from binding mid-pull or tipping forward when fully extended.
6. Make corners work with smart corner storage
Corner cabinets are where usable storage disappears in most small kitchens. The standard two-door corner base wastes a significant portion of its depth behind the cabinet face, making it one of the most frustrating spots in any layout. Treating corners as a real storage opportunity is one of the most overlooked small kitchen renovation ideas for homeowners working with a compact space.
Choose between lazy Susans and pull-out systems
Lazy Susan turntables work well where corner access is straightforward and the opening is large enough to rotate items comfortably. Pull-out systems offer better visibility and let you retrieve items from the back without spinning through everything else. Your cooking habits and the items you store most often should drive that decision.
Use blind corner pull-outs when doors limit access
A blind corner exists where one cabinet door partially blocks access to an adjacent cabinet. Blind corner pull-out systems solve this by linking the hidden shelf to the door itself, so opening the door pulls the storage forward automatically.
A well-designed blind corner pull-out recovers nearly 70% of the interior space a standard blind corner cabinet leaves inaccessible.
Prioritize easy access over maximum capacity
The best measure of any corner solution is whether you actually use it. Pick a system that lets you reach items in one or two movements rather than one that holds more but frustrates daily use.
Plan door swings and handle clearance
Cabinet doors near corners need clearance to open fully without hitting adjacent doors, appliances, or walls. Check handle placement and swing clearance before installation to avoid creating a new problem where you solved an old one.
Avoid corner solutions that waste space
Diagonal corner cabinets and angled fillers look clean on paper but often sacrifice more usable area than they create. Stick with purpose-built pull-out or rotating systems designed specifically for corner geometry.
7. Build a slim island or a rolling prep cart
A slim island or a rolling prep cart adds meaningful counter space and storage to a small kitchen without committing to a permanent structural change. Among practical small kitchen renovation ideas, this one offers one of the best returns on both budget and daily usability.
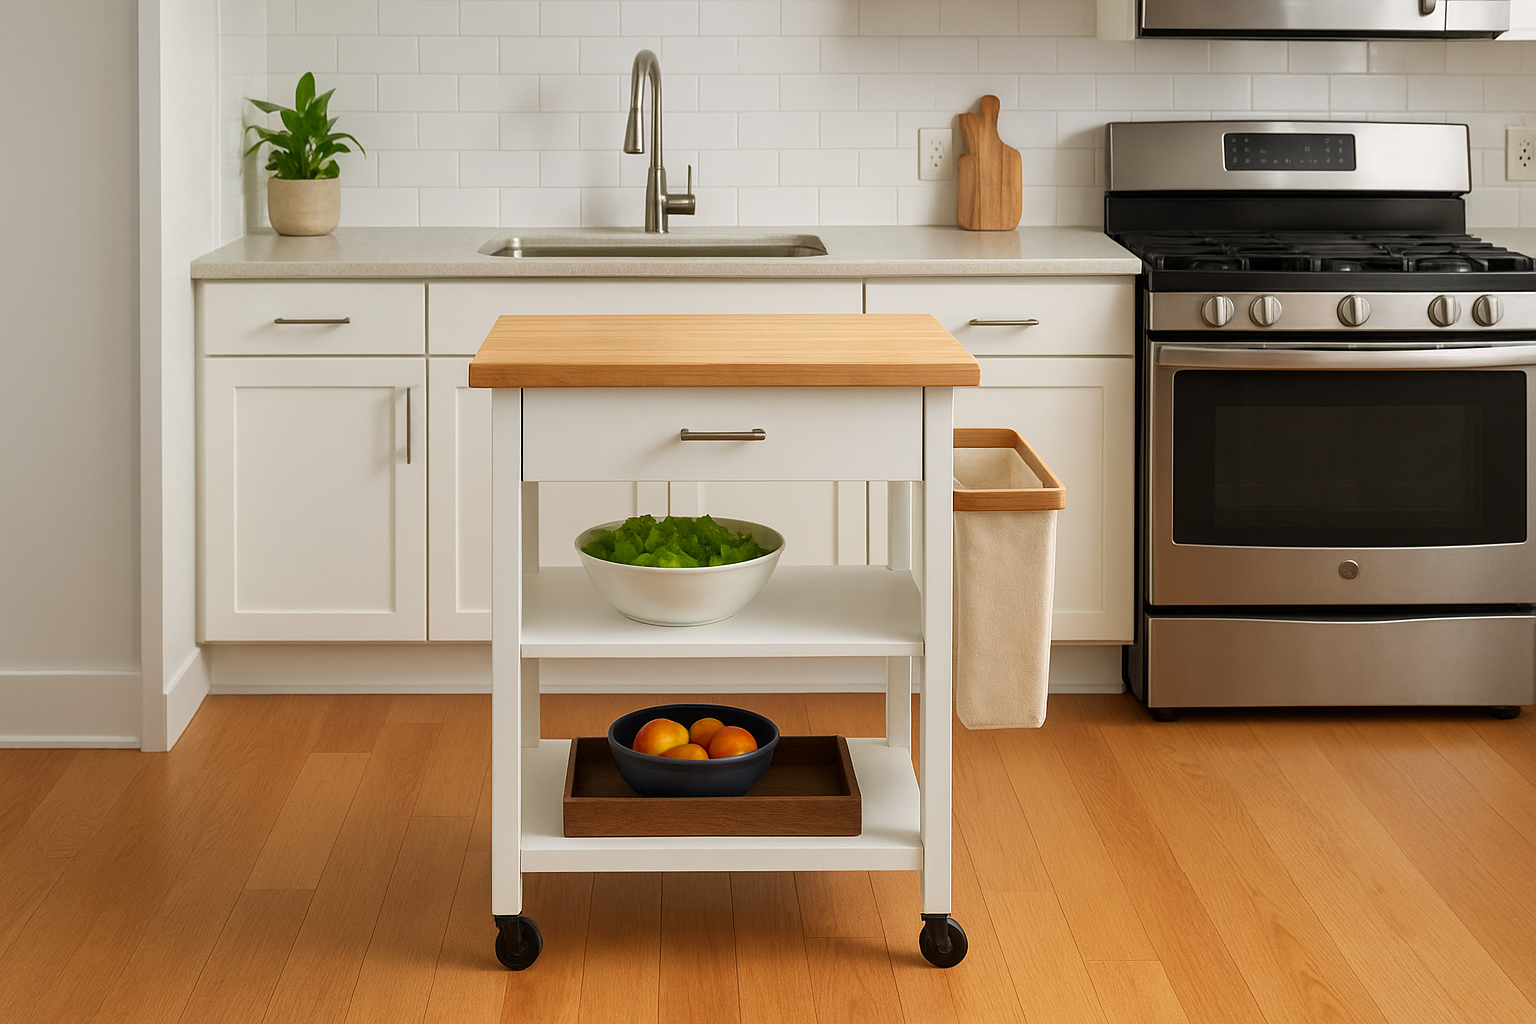
Add prep space where it helps the most
Position your island or cart directly across from your primary work zone, usually between the sink and stove, so it shortens the distance between your most-used surfaces. A unit that sits 24 inches deep gives you real prep room without eating into the walking path on either side.
Keep walking paths comfortable and safe
Building codes recommend at least 42 inches of clearance between a fixed island and surrounding cabinets, and 48 inches if two people regularly cook together. Measure your available floor space before you build or buy anything, because a cart that crowds the room creates more problems than it solves.
A slim island that fits properly beats a larger one that forces you to turn sideways every time you pass it.
Add outlets and trash storage where possible
A built-in electrical outlet on the island face lets you use small appliances off the main counter, which frees up significant prep space. Adding a pull-out trash bin on one end handles food scraps right at the prep surface.
Choose a top that handles heat and moisture
Butcher block and quartz both hold up well to daily kitchen use, but butcher block requires regular oiling to prevent cracking near moisture. Quartz asks for nothing beyond basic cleaning.
Decide when a peninsula works better
If your kitchen has an open wall adjacent to a dining area, a fixed peninsula attached to existing cabinetry gives you more stability and storage than a freestanding unit, while still keeping the layout open on one side.
8. Create a banquette or built-in breakfast nook
A built-in breakfast nook is one of the more underused small kitchen renovation ideas for homes where the dining area bleeds directly into the kitchen. Instead of pulling a full-size table and four chairs into a tight corner, a custom banquette fits the exact dimensions of the space and gives you seating, storage, and a defined dining zone in a fraction of the footprint.
Replace bulky chairs with built-in seating
Built-in bench seating eliminates the need for chairs that pull out, get knocked over, and take up floor space even when not in use. A bench that runs along two walls accommodates more people in the same square footage than any chair arrangement, and it stays tucked neatly in place when the table is not in use.
Add storage under the bench
Lift-top or drawer-access storage under the bench seat is one of the most practical additions you can build into a nook. Use that space for table linens, seasonal cookware, or pantry overflow that doesn’t need daily access.
Storage built into bench seating costs almost nothing extra to add during construction and pays off every single day.
Choose a table size that fits daily use
A table that seats your household comfortably on a typical Tuesday is more useful than one sized for holiday gatherings. A 36-inch round or a 30-by-48-inch rectangle works well for most two-to-four person households.
Use lighting to define the nook
A pendant or small chandelier hung directly over the table visually separates the nook from the rest of the kitchen and adds warmth that overhead recessed lighting alone cannot deliver.
Protect walls and corners from wear
Scuff-resistant paint and corner bead trim protect the surfaces that take the most contact from daily use. Both additions are inexpensive at the build stage and save you from repainting or patching within a few years.
9. Use open shelving selectively and style it simply
Open shelving looks clean and accessible in photographs, but it requires real discipline to maintain in a working kitchen. Used strategically, it ranks among the most effective small kitchen renovation ideas for reducing the heavy, closed-in feeling that standard upper cabinets create in a compact space. The key word is selectively.
Replace one upper run to reduce visual weight
Swap out one section of upper cabinets for open shelves rather than replacing all of them. Removing even a single run of doors opens up a wall visually and gives the room breathing room without sacrificing significant closed storage elsewhere.
Keep daily items within easy reach
Open shelves earn their place only when they hold items you reach for every single day. Mugs, glasses, and a few frequently used bowls work well. Items you pull out once a month belong behind a closed door where dust and grease cannot settle on them.
Open shelving rewards discipline and punishes clutter, so stock it with intention rather than convenience.
Mix shelves with closed storage to prevent clutter
Combining open and closed storage keeps the kitchen functional without making every item visible. Use open shelves for clean, consistent pieces and closed cabinets for everything else.
Choose shelf depth that fits plates and mugs
A 10-to-12-inch shelf depth handles most plates and mugs without items tipping or sitting too close to the front edge. Deeper shelves invite stacking, which defeats the accessibility advantage open shelving is supposed to deliver.
Avoid open shelving overload
Too many open shelves create visual noise that makes a small kitchen feel more cluttered than a fully closed cabinet layout would. Limit open shelving to one or two intentional runs and fill the rest with cabinetry that keeps daily mess out of sight.
10. Brighten the room with layered lighting
Lighting is one of the most overlooked small kitchen renovation ideas that delivers outsized results. A single overhead fixture leaves shadows across your counters, makes the room feel smaller, and turns meal prep into guesswork. Layering multiple light sources at different heights solves all of that without requiring structural changes.

Fix shadows with under-cabinet task lighting
Under-cabinet LED strips direct focused light directly onto your prep surfaces where you actually need it. Mount them toward the front of the cabinet base so they illuminate the counter, not just the backsplash behind it. Hardwired fixtures look cleaner than plug-in options and eliminate cord clutter on the wall.
Add ceiling lighting that spreads evenly
A single centered fixture creates bright spots and dark corners. Recessed lights spaced evenly across the ceiling distribute light far more effectively in a compact kitchen. Space them no more than four feet apart to avoid dead zones near the perimeter.
Evenly distributed ceiling light combined with under-cabinet task lighting eliminates nearly every shadow problem in a small kitchen.
Use dimmers to control glare in small spaces
Dimmer switches let you adjust light intensity based on time of day and activity. Full brightness works for cooking, but lower levels in the evening reduce eye strain and make the kitchen more comfortable when you’re not actively working in it.
Choose warmer color temperatures for comfort
Bulbs rated between 2700K and 3000K produce warm white light that flatters wood tones, paint colors, and natural stone without the harsh clinical feel of cooler temperatures.
Plan lighting before cabinets and backsplash
Electrical rough-in for under-cabinet lighting needs to happen before cabinets go in. Waiting until after installation forces surface-mounted wiring that looks unfinished and creates unnecessary extra work.
11. Choose a backsplash that reflects light
Your backsplash covers more wall surface than almost any other finish in the kitchen, which means it has a real impact on how light moves through the space. Among practical small kitchen renovation ideas, choosing a backsplash that actively reflects and distributes light is one of the simplest ways to make a compact kitchen feel brighter without adding a single fixture.
Use glossy tile to bounce light around
Glossy or semi-gloss tile surfaces reflect both natural and artificial light back into the room rather than absorbing it. Subway tile in a high-gloss white or soft off-white finish is a reliable starting point because it works with nearly any cabinet color and performs well in lower-light kitchens where every bit of reflected light matters.
Glossy tile does more work per square foot than almost any other surface choice in a small kitchen.
Run tile higher to draw the eye up
Extending your backsplash all the way to the bottom of the upper cabinets or even to the ceiling on a short wall creates a vertical line that pulls attention upward, which makes the room feel taller. Running tile higher also protects more wall surface from grease and moisture splatter, which reduces long-term maintenance.
Keep grout choices practical and cleanable
Epoxy grout or a tightly pigmented cement grout holds up better in kitchens than standard unsanded options. Choosing a grout color close to your tile color reduces the visual grid effect and keeps the backsplash reading as one clean surface.
Decide when slab backsplash makes sense
A continuous slab of quartz or porcelain eliminates grout lines entirely, which simplifies cleaning and creates a seamless look behind the range. Slab backsplashes work particularly well when your counter and backsplash share the same material, since the continuous surface reduces visual breaks and makes the room feel more open.
Avoid busy patterns that shrink the space
Intricate patterns and high-contrast geometric tiles draw the eye in multiple directions at once, which works against a small kitchen. Stick with simple shapes and low-contrast color combinations that let the tile add texture without breaking up the wall into competing focal points.
12. Pick flooring that makes the kitchen feel wider
Flooring covers every square foot of your kitchen, which means your material and layout choices carry more visual weight than most people realize. Among the small kitchen renovation ideas that cost-effectively reshape a tight space, flooring direction and tone are two of the simplest levers you can pull.
Use plank direction to visually stretch the room
Running planks lengthwise along your kitchen’s longest wall tricks the eye into reading the room as longer and wider than it is. Diagonal installation works similarly but adds visual complexity that can feel busy in a compact space.
Choose durable, water-resistant materials
Luxury vinyl plank (LVP) and porcelain tile both handle the moisture, dropped pots, and heavy foot traffic a kitchen produces without warping or staining. LVP installs quickly and floats over most existing subfloors, which reduces installation cost and disruption.
Choosing a floor rated for wet areas is not optional in a kitchen; it directly affects how long the floor performs.
Keep thresholds flush for a seamless look
Raised transition strips between the kitchen and adjacent rooms interrupt the visual flow and make the kitchen feel like a separate, smaller box. A flush threshold or a continuous floor material running into the next space removes that visual break and makes both rooms feel larger.
Use lighter tones to open the space
Light oak, pale stone-look tile, and warm greige vinyl all reflect more light than dark floors and help the walls feel farther apart. Stick with mid-range tones rather than stark white, which shows every footprint.
Avoid slippery finishes in a working kitchen
High-gloss flooring looks clean in showrooms but becomes a hazard when wet. Choose a matte or satin finish that provides grip underfoot without sacrificing the lighter tone that keeps your kitchen feeling open.
13. Use light, consistent finishes to reduce visual noise
Among small kitchen renovation ideas that cost nothing extra to plan but everything to ignore, finish consistency ranks near the top. When your cabinet color, countertop tone, paint, and hardware all pull in different directions, your eye never settles, and a compact kitchen feels even more crowded than it is. Choosing a cohesive finish palette before you order a single material makes the room read as one connected space rather than a collection of separate decisions.
Limit strong contrasts that break up the space
High-contrast combinations like stark black cabinets against bright white walls draw sharp lines across a small room that the eye reads as boundaries. Softer tonal pairings, such as warm greige cabinets with a slightly deeper countertop, create visual depth without chopping the room into pieces.
Repeat one or two metals for cohesion
Pick one primary metal finish for your faucet, cabinet hardware, and light fixtures, then commit to it throughout. Mixing brushed nickel with matte black and polished chrome across the same kitchen adds unnecessary visual competition in a space that benefits from quiet repetition.
Repeating one metal across every fixture is the fastest way to make a small kitchen feel designed rather than assembled.
Match undertones across cabinets, counters, and paint
Warm undertones in your cabinet paint clash visually with cool-toned countertops even when both colors seem neutral in isolation. Pull samples together in your actual kitchen lighting before finalizing anything.
Use texture to add interest without clutter
Matte cabinet fronts, honed stone, and textured tile add visual interest without introducing competing colors. Texture works where color variety would overwhelm a tight space.
Avoid trendy choices that date fast
Bold two-tone cabinet schemes and highly patterned surfaces photograph well but often feel dated within five years. Neutral, timeless finishes protect your renovation investment and keep the kitchen looking intentional long after the trend has passed.
14. Upgrade the sink and faucet for more function
Your sink handles more daily tasks than almost any other fixture in the kitchen, yet it’s one of the most overlooked elements in small kitchen renovation ideas. Choosing the right size, configuration, and faucet style turns a basic utility fixture into a genuinely useful workspace that supports meal prep, cleanup, and daily cooking without getting in your way.
Choose a sink size that fits real cookware
Measure your largest sheet pan and stockpot before you select a sink. A basin that’s too shallow forces you to tilt pans awkwardly to rinse them, which sends water straight onto the counter and floor. A 10-inch-deep basin handles most residential cookware comfortably and leaves room for soaking without overflow.
Consider a single-bowl sink for prep flexibility
A single-bowl configuration gives you an uninterrupted basin that accommodates large items without the divider getting in the way. Double-bowl sinks split your usable space in half, which compounds the problem in an already compact kitchen.
A single bowl that fits your largest pot is more useful than two bowls that fit neither.
Use a wall-mount or pull-down faucet thoughtfully
Pull-down faucets with a flexible spray head give you control over where water lands, which matters when you’re rinsing produce or filling tall pots. Confirm that your faucet height clears the items you fill most often.
Add accessories like grids and cutting boards
Sink grids protect the basin floor from scratches and lift dishes off standing water. A fitted cutting board that spans the sink opening creates bonus counter space right where you prep food.
Avoid setups that steal counter space
Keep the area immediately beside the sink clear of permanent fixtures. Soap dispensers built into the sink deck free up counter space compared to a bottle sitting beside the basin, which adds up in a kitchen where every inch counts.
15. Right-size appliances and integrate what you can
Appliances are often the biggest source of visual clutter in a compact kitchen, and choosing the wrong sizes is one of the most common mistakes homeowners make when exploring small kitchen renovation ideas. Selecting appliances that fit your actual cooking habits rather than the largest model available frees up counter space, improves traffic flow, and makes the entire room feel more intentional.
Consider slimmer ranges and counter-depth fridges
24-inch ranges and counter-depth refrigerators are designed specifically for kitchens where standard 30-inch and full-depth models eat too far into the floor plan. A counter-depth fridge sits flush with your cabinet faces, which removes the visual bump that pulls the eye and makes the room feel tighter.
Use panel-ready fronts to reduce visual bulk
Panel-ready dishwashers and refrigerators accept a custom wood front that matches your cabinetry, which makes a large appliance read as part of the cabinet run rather than an interruption in it.
Integrated appliances reduce the number of competing surfaces your eye has to process in a small kitchen.
Move the microwave off the counter
A microwave drawer built into a base cabinet or a unit mounted inside a tall cabinet stack clears your counter entirely. That recovered surface adds meaningful prep space you will use every single day.
Check door swings and landing space
Every appliance door needs clear swing clearance and a landing surface nearby for hot pans and groceries. Map out those zones on paper before your cabinets are finalized.
Avoid losing storage to oversized appliances
A refrigerator that extends past your cabinet line forces awkward filler panels and blocks adjacent drawers from opening fully. Match appliance depth to your cabinet depth before you purchase anything.
16. Add small built-ins that remove countertop clutter
Counter space is scarce in a compact kitchen, and small appliances, trash cans, and loose trays sitting on the surface steal prep room you cannot afford to lose. These targeted small kitchen renovation ideas move clutter off your counter and into purpose-built spaces that keep everything accessible without consuming the workspace you need every day.
Build an appliance garage or lift-up cabinet
An appliance garage is a cabinet compartment built directly on the counter with a tambour door or lift-up panel that closes flush when not in use. Your toaster, coffee maker, and blender stay plugged in and ready but completely out of sight during prep, which recovers several linear feet of counter in a single upgrade.
Add a trash pull-out and recycling center
A pull-out trash unit built into a base cabinet removes your bin from the floor entirely. Choose a unit that holds at least two containers side by side so waste and recycling stay separated without requiring a second freestanding bin crowding your kitchen.
A built-in trash pull-out recovers more usable floor space than almost any other single base cabinet upgrade.
Use toe-kick drawers for flat items
The toe-kick space below your base cabinets is typically four inches tall, which fits cutting boards, sheet pan lids, and baking mats perfectly. Adding shallow pull-out drawers in that zone uses space that standard cabinet builds leave completely empty.
Add vertical tray dividers near the oven
Vertical tray dividers built into a tall cabinet or base pull-out store sheet pans, cooling racks, and cutting boards upright so you pull one item without disturbing everything else stored beside it.
Choose organizers you will actually maintain
Buy or build organizers sized for what you actually own, not for an idealized future kitchen. A system that fits your real habits and real items stays functional for years rather than reverting to clutter within a few months.
Next steps
Every idea in this guide comes down to one principle: design around how you actually use your kitchen, not how it looks in a catalog. The best small kitchen renovation ideas are the ones built specifically for your space, your cooking habits, and your storage needs. Generic solutions leave gaps that custom work fills.
Your next move is a conversation, not a commitment. Bring your measurements, your frustrations, and your wish list to a carpenter who builds in-house and manages the full project from design through installation. That conversation will tell you quickly which upgrades deliver the most return for your budget and which ones you can phase in later.
If you’re ready to start planning a kitchen that actually works for you, reach out to Suman Custom Carpentry to schedule a consultation. Dieyson and the team build every cabinet by hand in their Hyannis shop and back their work with a lifetime guarantee.