
A single kitchen renovation before and after comparison can do what no mood board or Pinterest save ever will, show you exactly what’s possible in your own home. At Suman Custom Carpentry, we’ve spent over seven years transforming kitchens across Cape Cod, and we’ve seen firsthand how a well-planned renovation turns the most outdated room in the house into the reason people love coming home.
Real transformations tell a story that swatches and samples can’t. They show you how dark, cramped layouts open up, how worn cabinetry gives way to hand-built custom millwork, and how a tired kitchen becomes something that actually fits the way you cook and live. That kind of proof matters, especially when you’re about to make one of the biggest investments in your home.
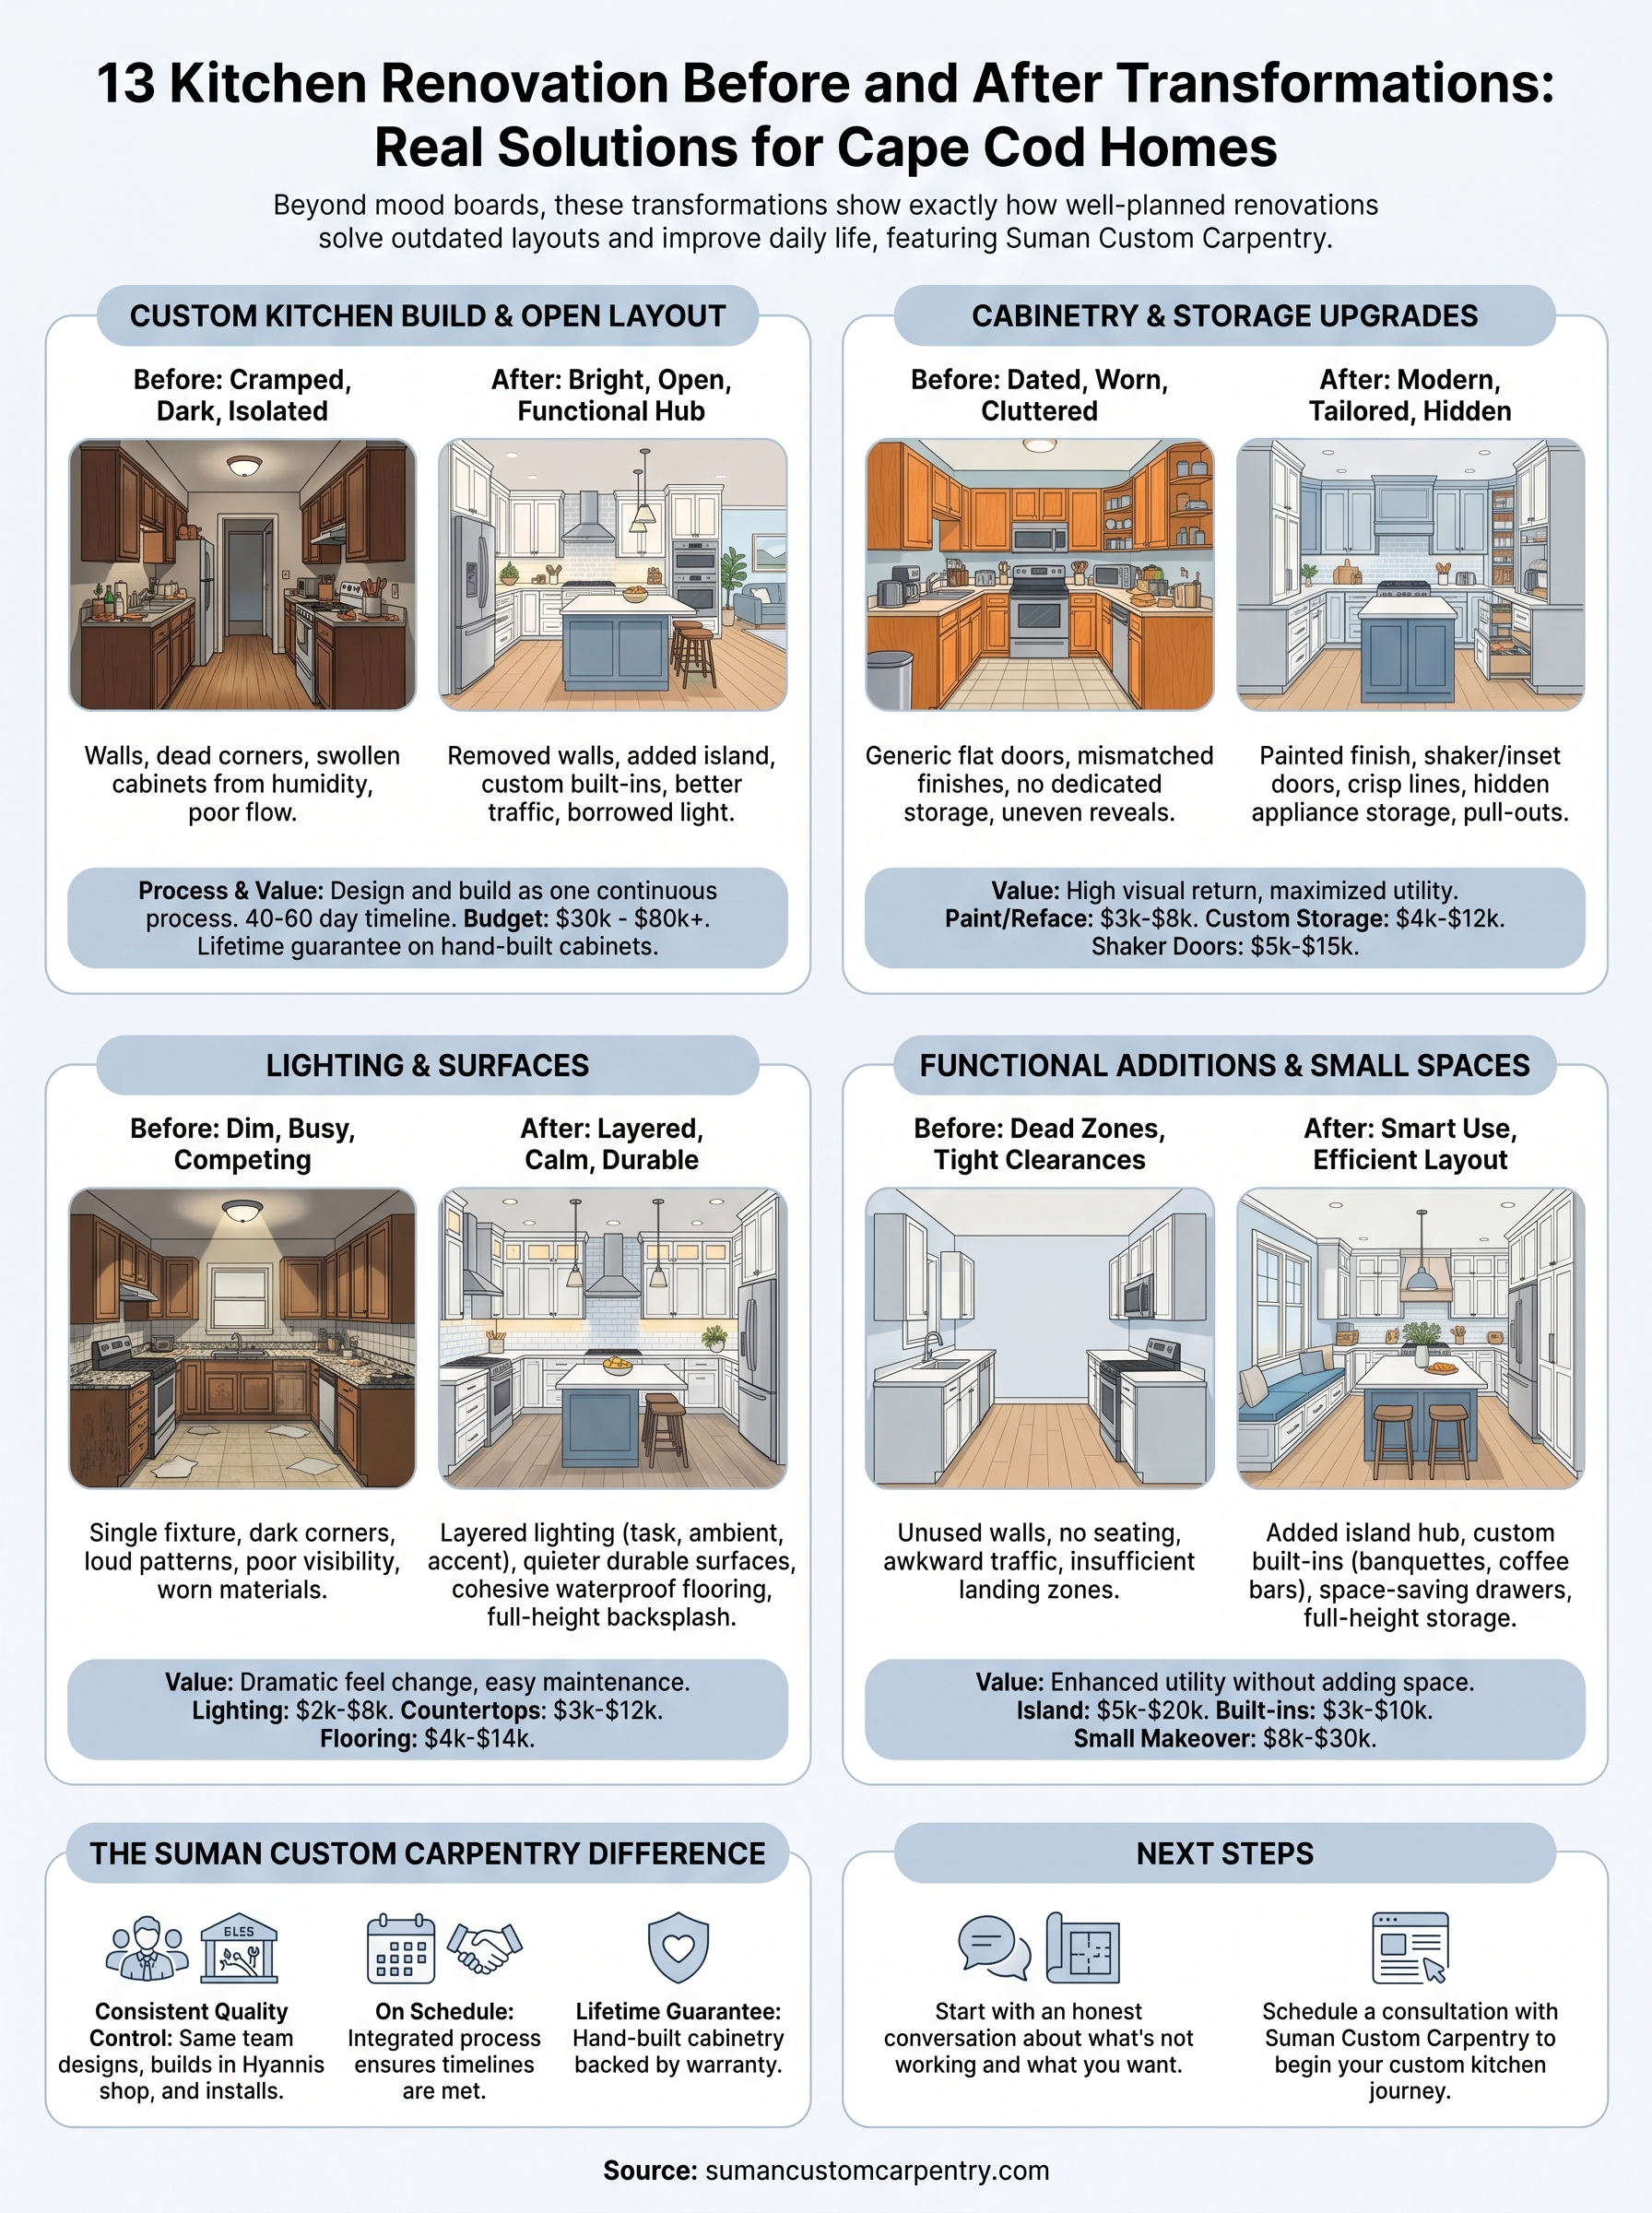
We pulled together 13 kitchen renovations that deliver exactly that proof. Each one walks you through the before, the after, and what made the difference, from layout changes and cabinetry upgrades to material choices and finishing details. Whether you’re still in the dreaming phase or ready to start planning, these transformations will give you a realistic picture of what a kitchen renovation can achieve and help you figure out what you actually want from yours.
1. Custom kitchen build with Suman Custom Carpentry
A full custom kitchen build starts with an honest look at what’s not working. Cape Cod homes bring a specific set of challenges that stock cabinets and off-the-shelf layouts were never designed to solve, from salt-air humidity to the tight footprints common in older cottages and colonials.
Before: Common Cape Cod kitchen pain points
Most kitchens we see before a renovation share the same problems. Cabinet boxes swollen or delaminated from coastal moisture, dead corner zones, no room for modern appliances, and counter space that disappears the moment two people cook at once. The layout often reflects how the home was built decades ago, not how your family actually uses the space today.
Common issues that show up in nearly every before photo:
- Cabinet doors that no longer hang level
- Countertops that stop short of useful landing zones
- No dedicated pantry or appliance storage
- Mismatched finishes from years of patchwork updates
After: What a fully custom kitchen changes
A custom build eliminates the compromises that come with prefab. Every cabinet box and door gets built to your exact dimensions in our Hyannis shop, which means no filler strips, no wasted corners, and no cabinets that almost fit. Clients consistently say the finished kitchen feels larger than the old one, even when the footprint is identical.
The biggest shift isn’t always visual. When storage works the way you need it to, the whole kitchen feels different to use every single day.
What drives the transformation
The transformation comes from treating the design and build as one continuous process. When the same team that consults on your layout also builds and installs your cabinetry, details don’t get lost between handoffs. You get consistent quality control from the first design meeting through the final installation day.
Typical timeline and what to expect
Custom kitchens at Suman run on a 40 to 60 day build and installation timeline once design is finalized. That window covers fabrication in the shop, delivery, and full installation. Your project stays on schedule because the team managing the build is the same one doing the work.
Budget range and where the money goes
Custom kitchen projects on Cape Cod typically range from $30,000 to $80,000 or more, depending on size, materials, and scope. The budget goes toward hand-built cabinetry, countertops, hardware, and installation. You’re investing in work backed by a lifetime guarantee on cabinet boxes and doors, not a product that needs replacing within a decade.
2. Closed-off kitchen to open concept layout
Few kitchen renovation before and after results draw more attention than the shift from a closed kitchen to an open layout. What looks like a minor architectural change in a floor plan creates a dramatically different experience the moment you walk through the door.
Before: Walls, choke points, and dark corners
Closed kitchens in older Cape Cod homes typically cut the cooking area off from living and dining spaces, leaving the cook isolated and the room feeling smaller than its square footage suggests. A single doorway forces traffic into one lane, and natural light never reaches the center of the room.
After: Sightlines, flow, and shared gathering space
Removing a wall opens the room to borrowed light from adjacent spaces and lets the kitchen function as part of the main living area. You gain visual depth, better traffic flow, and a space that works whether you’re cooking alone or hosting a group.
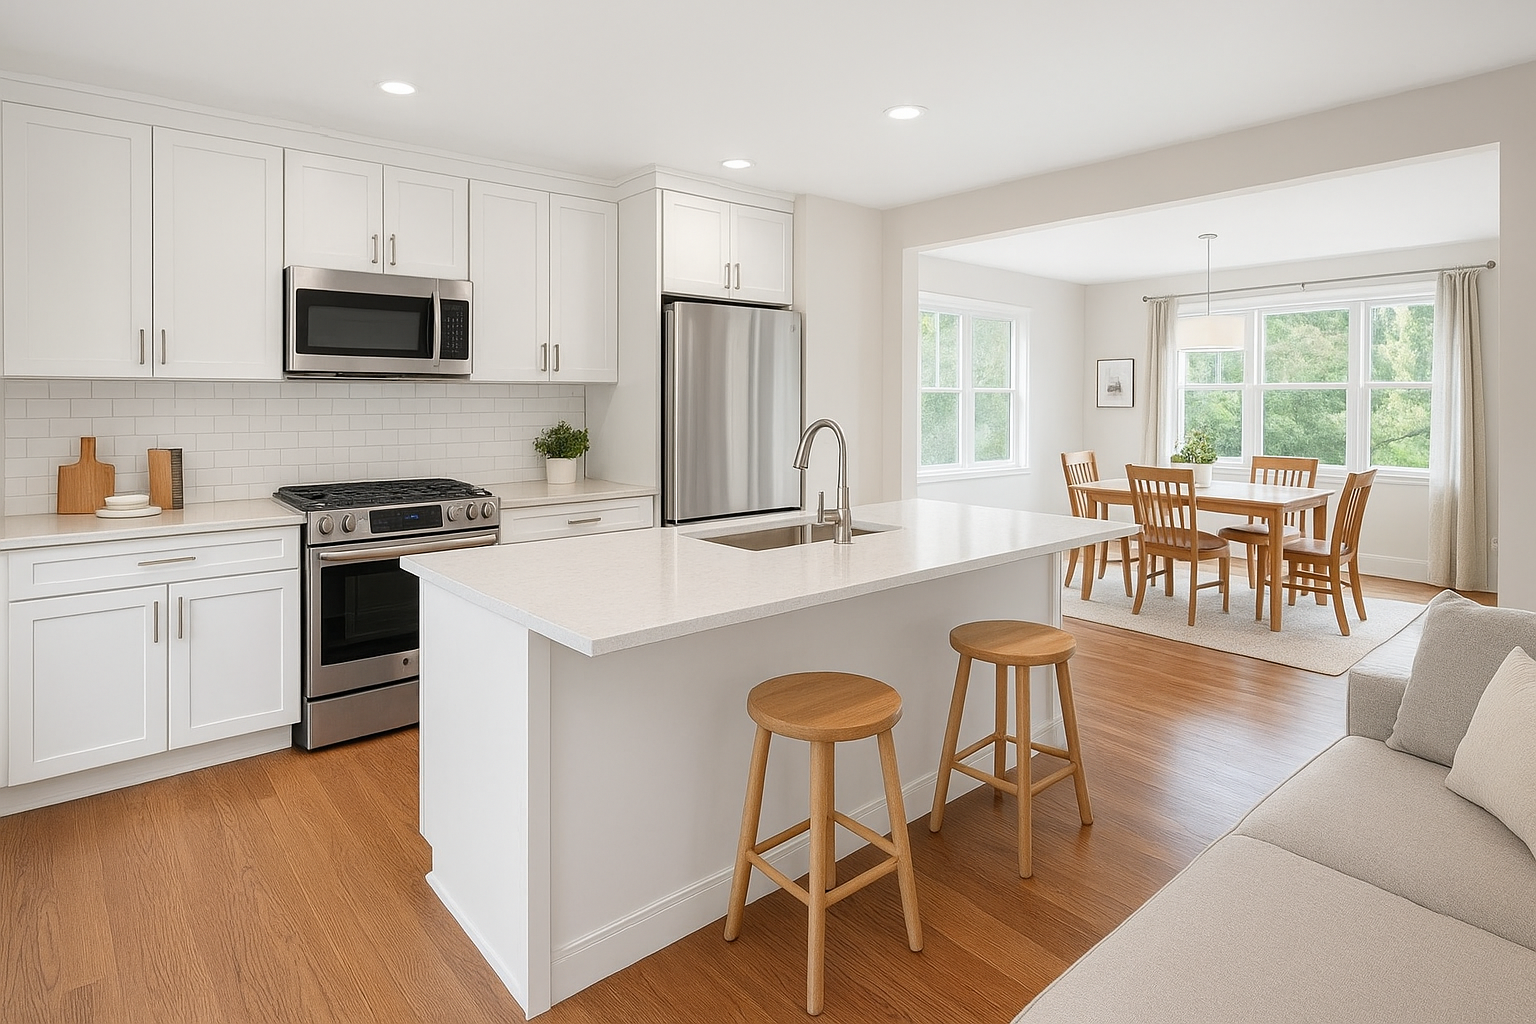
The single biggest visual payoff in any open concept remodel is the way light travels freely through the space.
Structural and permitting realities on Cape Cod
Not every wall comes down without planning. Load-bearing walls require a structural engineer and a building permit before any work begins. Cape Cod municipalities each have their own review timelines, so build permit lead time into your project schedule from the start.
Best layout moves that show up in photos
A peninsula or island at the new opening anchors the space and creates a natural boundary without closing the room back off. Matching flooring across both rooms ties the transformation together visually.
Budget range and time range
Expect $8,000 to $25,000 for an open concept conversion, depending on wall complexity and finishing scope. Timeline runs four to eight weeks including permits and structural work.
3. Dated wood cabinets to modern painted cabinets
One of the most striking kitchen renovation before and after comparisons involves swapping out dark, stained wood cabinets for a clean painted finish. This single change shifts the entire mood of the room without touching the layout or footprint.
Before: Orange oak, heavy stain, and busy grain
Oak cabinets from the 1980s and 1990s dominate a huge share of Cape Cod kitchens. The orange undertones and heavy grain patterns compete with countertops, flooring, and backsplash tile, leaving the room feeling visually busy and dated regardless of how well you style it.
After: Cleaner lines and a brighter palette
A painted cabinet finish, particularly in whites, off-whites, or soft greens, quiets the visual noise and lets the rest of the kitchen breathe. The room reads as larger, lighter, and more intentional, even when nothing else has changed.
Painted cabinets consistently deliver one of the highest visual returns of any single kitchen update.
Paint vs replacement and how to decide
If your cabinet boxes are structurally solid, painting is a smart way to modernize without a full replacement budget. Replace instead when you’re dealing with any of these conditions:
- Warped or delaminated frames
- Poor-quality original construction
- A layout you want to redesign entirely
Hardware swaps that change the look fast
New pulls and knobs do a surprising amount of work alongside a paint job. Brushed brass, matte black, and satin nickel finishes all read differently against painted surfaces, so bring samples to your kitchen before committing to a full order.
Budget range and durability notes
Professional cabinet painting runs $3,000 to $8,000 for a full kitchen, while full custom replacement starts higher but delivers longer-lasting results backed by a warranty on the work.
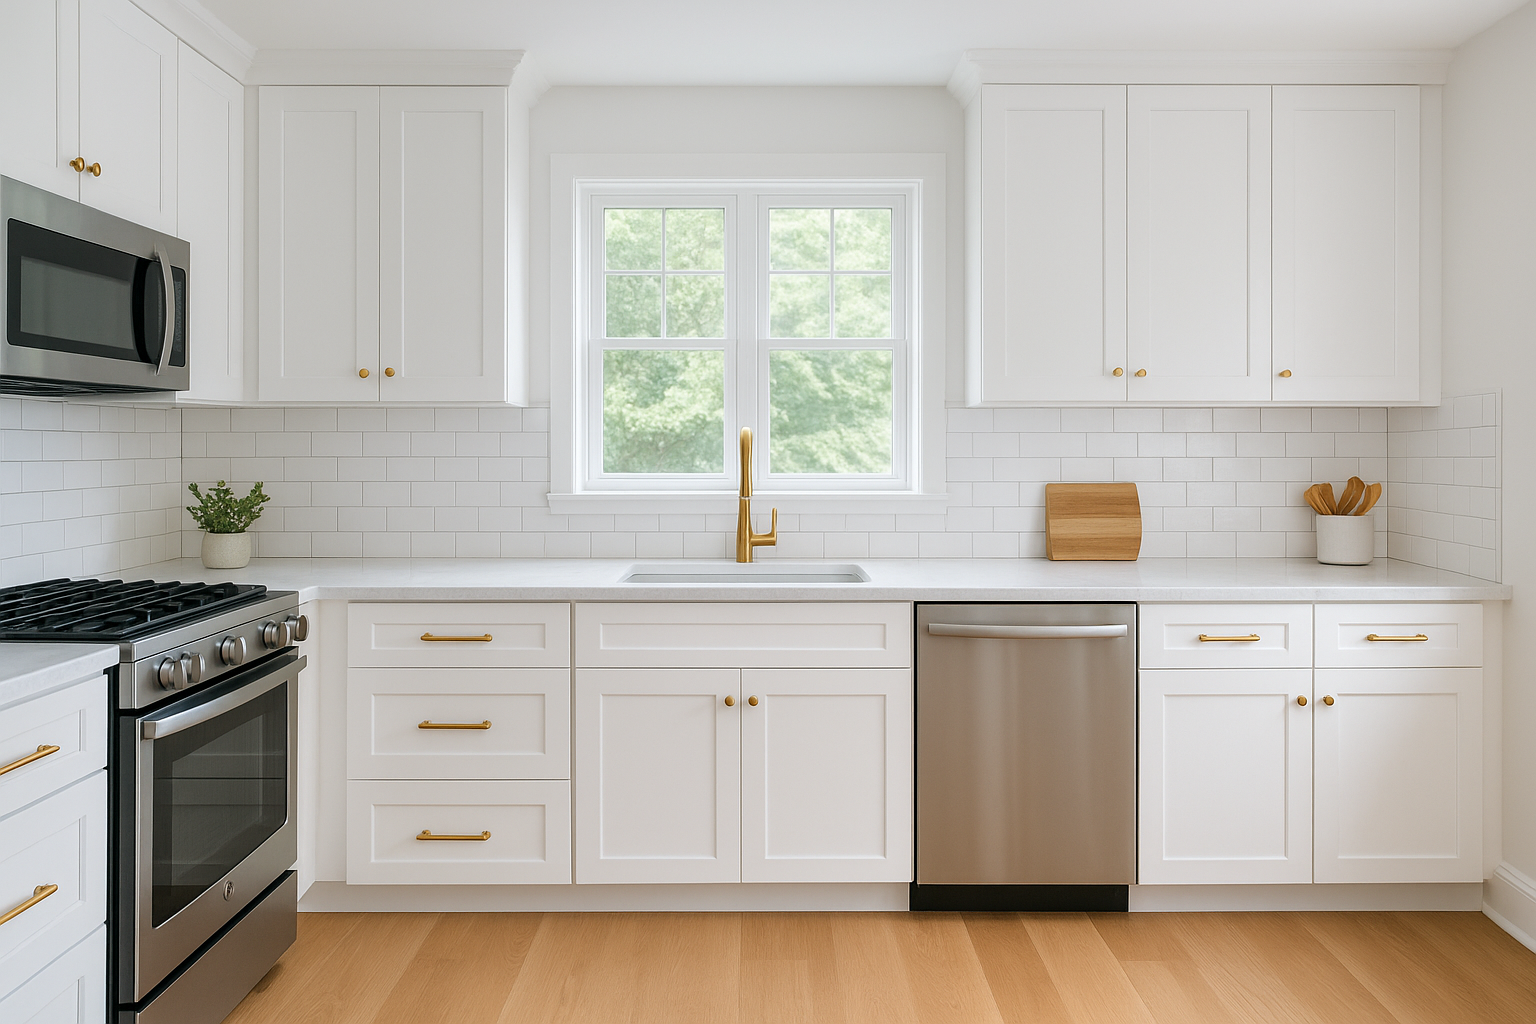
4. Flat doors to shaker or inset cabinetry
Swapping flat slab doors for shaker or inset cabinetry is one of the most impactful upgrades in any kitchen renovation before and after comparison. The change is subtle in concept but dramatic in result, giving the entire room a sense of intention it lacked before.
Before: Generic profiles and uneven reveals
Flat doors with no profile detail tend to look cheap and imprecise, especially as cabinet boxes shift over time. Uneven reveals, where the gap between doors varies across a run of cabinets, are difficult to hide without a strong frame or shadow line to anchor the eye.
After: Crisp shadow lines and a tailored fit
Shaker and inset doors bring consistent geometry and depth to the cabinet faces. The shadow lines created by the recessed center panel give the room a finished, architectural quality that flat doors simply cannot replicate.
The moment a kitchen gets proper cabinet profiles, the whole room reads as designed rather than assembled.
Shaker vs inset and how each reads in photos
Shaker doors overlay the cabinet frame and deliver a clean, classic look at a more accessible price point. Inset doors sit flush inside the frame, requiring tighter tolerances and more skilled craftsmanship, but the result photographs with a precision that sets high-end kitchens apart from standard renovations.
Where inset makes the most sense
Inset cabinetry performs best in kitchens where detail and longevity are the priority. Homes on Cape Cod with stable interior environments and a longer renovation horizon justify the added investment.
Budget range and lead times
Shaker door replacements run $5,000 to $15,000 for a full kitchen. Custom inset builds start higher and carry longer lead times, typically eight to twelve weeks for hand-built fabrication.
5. No island to a functional island hub
Adding an island to a kitchen that never had one produces some of the most satisfying kitchen renovation before and after results you’ll see. The room gains a dedicated work zone and gathering point that changes how you cook, how people move through the space, and how the kitchen functions on a daily basis.
Before: Missing prep space and awkward traffic
Without an island, most kitchens force all the prep work onto narrow perimeter counters while foot traffic cuts directly through the workspace. Anyone walking to the fridge disrupts whoever is cooking, and there’s rarely enough landing space to lay out ingredients, tools, and finished dishes at the same time.
After: Seating, storage, and better workflow
A well-placed island gives you dedicated prep surface, built-in storage, and casual seating in one structure. Your kitchen becomes a place where people gather naturally rather than waiting in an adjacent room.
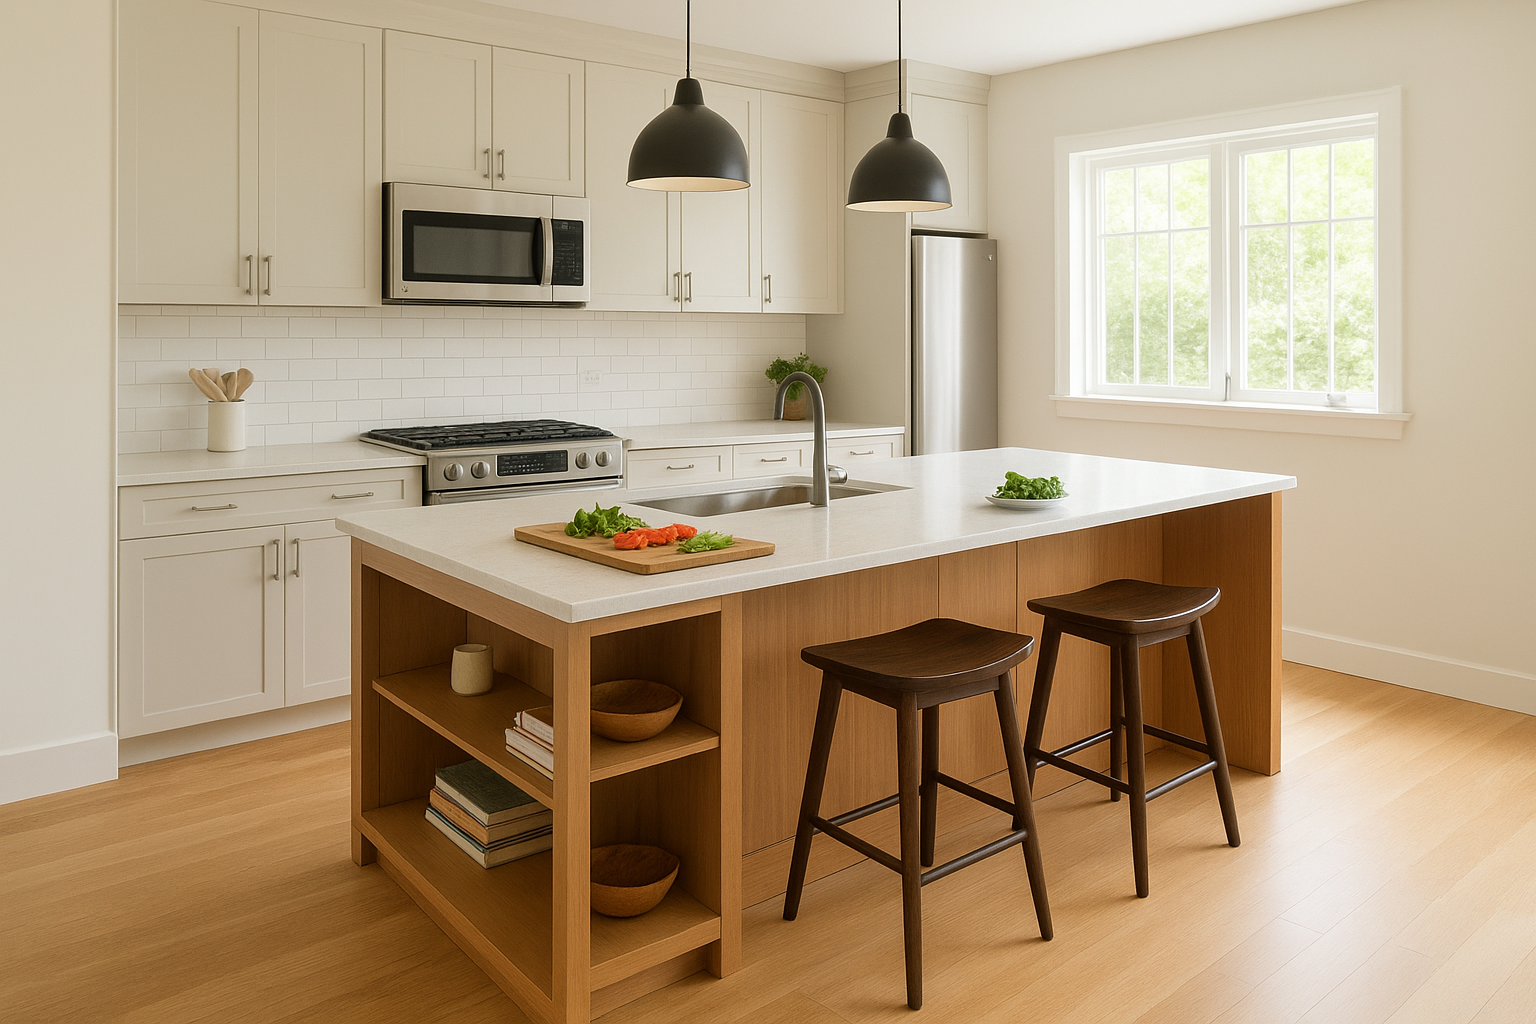
An island that solves a real workflow problem delivers more lasting value than one chosen purely for appearance.
Island sizing rules that prevent regrets
Your island needs at least 42 inches of clearance on all working sides to allow two people to move without bumping into each other. Anything tighter recreates the exact traffic problem you were trying to solve.
Power, lighting, and ventilation considerations
Plan for dedicated electrical outlets on the island from the start of your design. Pendant lighting overhead and proper ventilation complete the zone and make it functional rather than decorative.
Budget range and layout tradeoffs
Island additions run $5,000 to $20,000 depending on size, materials, and whether plumbing or electrical work is involved. Fixed islands without plumbing cost significantly less than those with integrated sinks or cooktops.
6. Cluttered counters to hidden storage and pantry zones
Counter clutter is one of the most consistent complaints we hear before a renovation starts, and one of the most underrated wins in any kitchen renovation before and after comparison. When your surfaces are constantly buried under appliances, mail, and random kitchen gear, the room never feels organized no matter how much you clean it.
Before: Appliances out, nowhere to put anything
Most kitchens without dedicated storage force every appliance and tool onto the counter because there’s simply nowhere else for it to go. The toaster, the coffee maker, the air fryer, and the cutting boards compete for the same limited space, leaving almost no usable prep surface and making the kitchen feel chaotic regardless of its actual size.
After: Appliance garages, pull-outs, and tall storage
Custom cabinetry solves the clutter problem at the source by giving every appliance a dedicated home behind a door or inside a drawer. Appliance garages tucked under upper cabinets, deep pull-out drawers, and floor-to-ceiling pantry towers completely change how the room looks and how quickly it comes together after cooking.
The kitchens that stay cleanest long-term are the ones where putting things away takes less effort than leaving them out.
Storage upgrades that deliver the biggest payoff
The upgrades that consistently deliver the most usable space include:
- Pull-out base cabinet organizers for pots, pans, and dry goods
- Tall pantry towers with adjustable shelving
- Dedicated appliance garages with retractable or hinged doors
- Drawer inserts for utensils and spices
Pantry options for small and mid-size kitchens
Even tight kitchens can accommodate a full-height pantry column in an unused wall section or at the end of a cabinet run. A single 12-inch-deep pantry tower adds significant storage without consuming meaningful floor space.
Budget range and install complexity
Custom storage upgrades typically range from $4,000 to $12,000 depending on scope and cabinet count. Pull-out hardware and pantry towers add cost but consistently rank among the features clients say they’d never give up after living with them.
7. Dark kitchen to bright kitchen with better lighting
Lighting is the most underestimated element in any kitchen renovation before and after comparison. A kitchen that looks dated and unwelcoming often has nothing physically wrong with it, but a single overhead fixture doing all the work makes every surface look flat and every corner look shadowed.
Before: Single ceiling fixture and shadows everywhere
Most older kitchens rely on one central ceiling light that throws a wide, undirected glow across the room. The result is heavy shadows on countertops, dark cabinet interiors, and a workspace that feels dim even at midday. Cooking in poor light is frustrating and, over time, genuinely inconvenient.
After: Layered lighting that makes finishes pop
A layered lighting plan separates your kitchen into task zones, ambient zones, and accent zones, each served by a dedicated light source. When everything is lit correctly, your countertops, cabinet finishes, and backsplash all read clearly and the room feels significantly larger.
Layered lighting does more to transform how a kitchen feels than almost any other single upgrade at its price point.
Recessed, pendants, under-cabinet, and toe-kick
Recessed fixtures handle ambient coverage, pendants anchor the island visually, under-cabinet lighting eliminates counter shadows, and toe-kick lighting adds depth at floor level. Each layer solves a specific problem.
Light temperature and dimming choices
Stick to 2700K to 3000K bulbs for a warm, natural feel that flatters wood tones and painted finishes. Dimmer switches on every circuit give you full control over the room’s mood.
Budget range and electrician scope
Lighting upgrades typically run $2,000 to $8,000 depending on fixture count and how much new wiring your electrician needs to run.
8. Busy granite to calm, durable countertops
Countertops take up more visual real estate than most homeowners realize until they swap them out. In a kitchen renovation before and after comparison, nothing quiets a chaotic room faster than replacing a loud stone surface with something calmer.
Before: High-contrast patterns that fight everything
Heavy-movement granite with bold brown and burgundy veining was a standard upgrade choice for decades, but it competes with almost every other finish in the room. When your countertop fights your backsplash, your cabinet color, and your flooring all at once, no amount of adjustment fixes the visual noise.
After: Quieter surfaces that photograph well
Calmer countertop surfaces, whether white quartz, soft quartzite, or a simple butcher block section, let your cabinetry and backsplash do their job without competing for attention. The room looks more composed, and every other material you’ve chosen finally gets a chance to register.
A countertop that recedes into the background is often the smartest design choice you can make.
Quartz vs granite vs quartzite vs butcher block
Each material carries a different set of tradeoffs worth understanding before you commit:
- Quartz: Non-porous, consistent color, and zero sealing required
- Quartzite: Natural variation with more durability than marble
- Granite: Proven longevity but needs annual sealing
- Butcher block: Adds warmth but requires regular oiling near the sink
Edge profiles and backsplash pairings
A simple eased or waterfall edge keeps the surface calm and pairs well with most backsplash materials. Avoid busy edge profiles on already-patterned stones, since two competing textures pull the eye in opposite directions.
Budget range and maintenance reality check
Countertop replacements run $3,000 to $12,000 for a full kitchen, depending on material and linear footage. Factor in sealing and maintenance costs over time when comparing materials side by side.
9. Short backsplash to full-height backsplash statement
The backsplash is one of the most visible surfaces in any kitchen renovation before and after comparison, yet it’s one of the most commonly underbuilt. A standard four-inch strip protects almost nothing and contributes very little to the overall design.
Before: Small strip tile and visual clutter
A short backsplash wedged between the counter and the upper cabinets leaves a wide band of painted drywall exposed behind the range and sink. That exposed wall collects grease, absorbs moisture, and breaks up the visual rhythm of the room with a material that doesn’t belong there.
After: One clean plane behind the range and sink
Running tile or slab material floor-to-ceiling or cabinet-to-ceiling behind the range creates a single, uninterrupted surface that anchors the whole kitchen. The room reads as more intentional, and cleaning becomes significantly easier without grout-free drywall absorbing every splatter.
A full-height backsplash behind the range is one of the most dramatic single-surface changes you can make in any kitchen.
Tile, slab, and panel backsplash options
Large-format porcelain tiles minimize grout lines and photograph cleanly. Slab materials like quartz or marble remnants eliminate grout entirely behind the range. Shiplap and wood panels work in casual kitchens but require a sealer in any wet zone.
Grout choices that stay clean longer
Epoxy grout resists staining and moisture far better than standard cement grout. Matching your grout color to the tile keeps the surface looking consistent longer without requiring aggressive cleaning.
Budget range and material waste factors
Full-height backsplash installations typically run $1,500 to $6,000 depending on material and linear footage. Large-format tiles generate more cut waste on irregular walls, so factor that into your material order.
10. Worn floors to cohesive, waterproof flooring
Flooring rarely gets the credit it deserves in a kitchen renovation before and after comparison, but it sets the foundation for every other material in the room. When the floor is tired, nothing else in the kitchen can look its best.
Before: Peeling vinyl, stained grout, or squeaky boards
Old kitchen floors tell a story you’d rather not repeat. Peeling sheet vinyl, cracked tiles, and permanently stained grout lines are nearly impossible to clean back to acceptable, no matter how much effort you put in. Squeaky subfloors and uneven seams between flooring zones compound the problem and make the room feel neglected.
After: A floor that ties rooms together
A new floor done right connects your kitchen to adjacent living areas with a consistent material and color palette that makes the entire space feel unified. When the floor works, every cabinet, countertop, and appliance you’ve chosen gets to land against a surface that supports them.
A cohesive floor is the single element that makes everything else in the room look like it belongs.
Hardwood, engineered, tile, and luxury vinyl
Each material handles moisture and foot traffic differently in a kitchen environment. Solid hardwood looks beautiful but swells with humidity, while engineered hardwood and luxury vinyl plank handle moisture far better and still deliver a warm appearance.
Coastal durability considerations for Cape Cod homes
Cape Cod homes deal with elevated humidity year-round, which rules out several flooring categories that perform well in drier climates. Luxury vinyl plank and large-format porcelain tile consistently outperform alternatives in coastal conditions.
Budget range and subfloor surprises
New kitchen flooring typically runs $4,000 to $14,000 installed, but subfloor repairs or leveling work can add meaningful cost once the old material is removed.
11. Standard boxes to custom built-ins and banquettes
Standard cabinet runs leave a lot of square footage untouched. In any kitchen renovation before and after comparison, the spaces that catch the eye aren’t just the countertops and cabinets but the corners, walls, and windows that most kitchens never put to work.
Before: Dead corners and unused wall space
Dead corners and blank wall runs are a consistent feature in kitchens built with stock cabinet layouts. The end of a run stops wherever the last box fits, leaving awkward gaps and corners that collect clutter with no real function behind them.
After: Coffee bars, window seats, and display storage
Custom built-ins turn those overlooked areas into intentional, hardworking spaces. A window seat with storage underneath, a dedicated coffee bar with a built-in upper, or a display cabinet at the end of a run all photograph dramatically better than the blank wall they replaced.
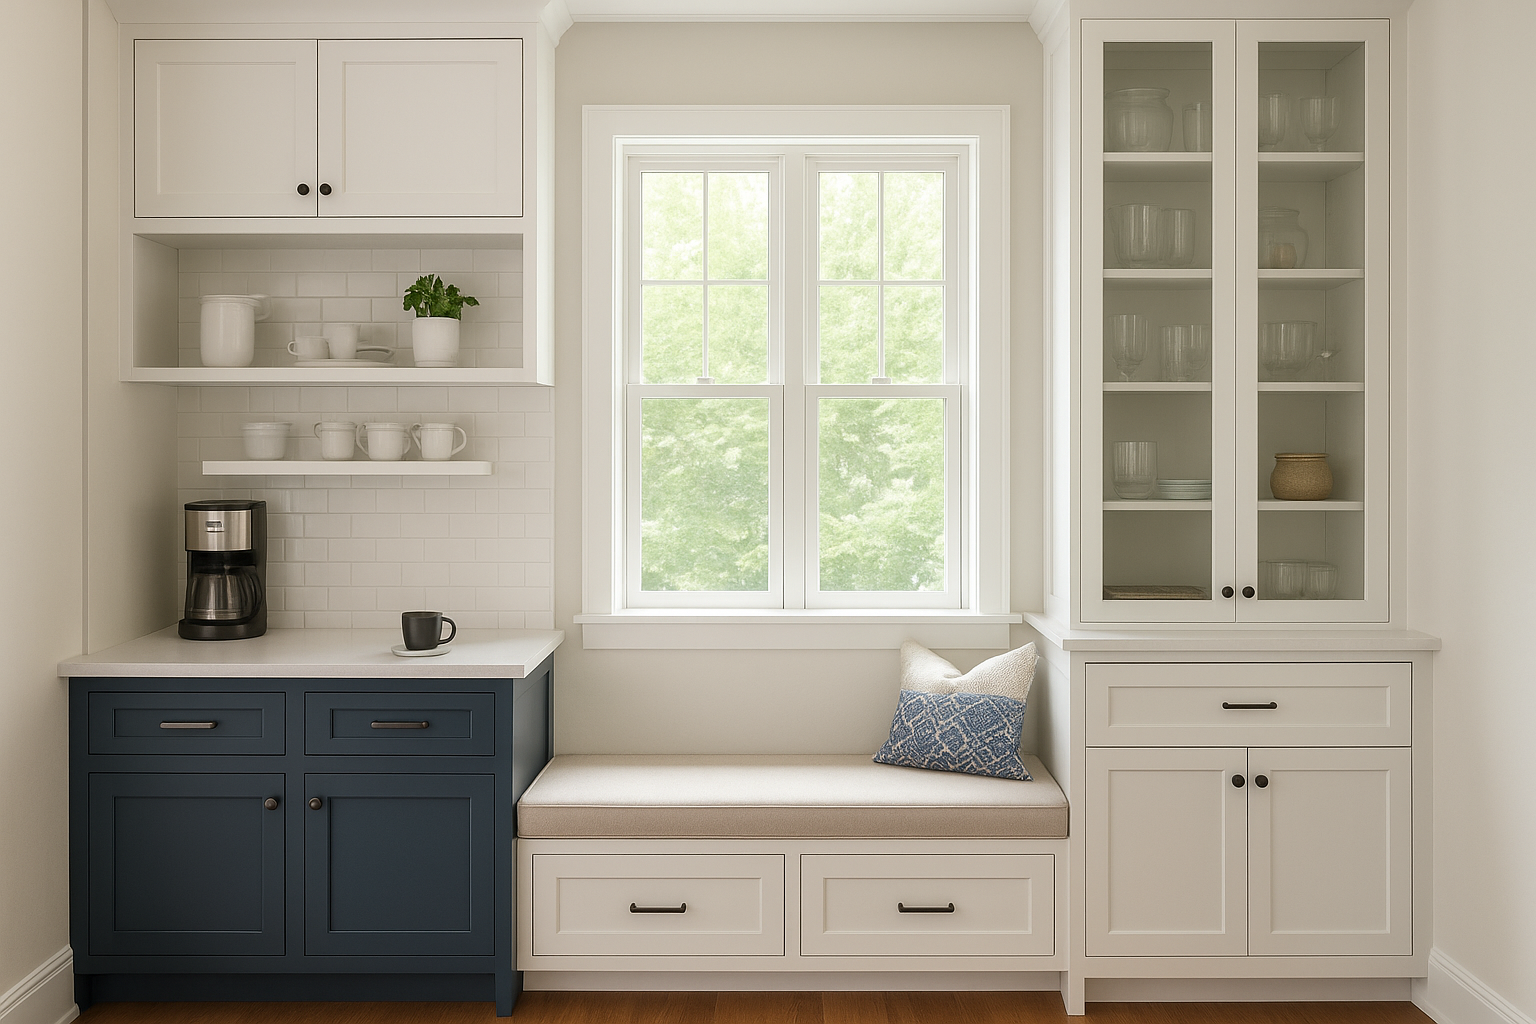
Built-ins make a kitchen feel designed all the way to the edges, not just down the center.
Built-in ideas that show up best in before and afters
The built-in upgrades that deliver the strongest visual contrast include:
- Banquette seating with hinged-lid storage beneath the bench
- Floor-to-ceiling display cabinets flanking a window
- Coffee and beverage stations with dedicated outlets and upper shelving
When to match cabinets vs contrast
Matching your built-ins to your main cabinetry creates a unified, seamless look that makes the room feel larger. Contrasting finishes, like a painted built-in against stained perimeter cabinets, draw deliberate attention to the feature and give the space a custom focal point.
Budget range and carpentry details
Custom built-ins typically run $3,000 to $10,000 depending on size and complexity. Hand-built construction ensures tighter tolerances and longer-lasting results than prefab alternatives.
12. Builder-grade details to trim-forward craftsmanship
Trim work is the detail that separates a finished kitchen from a truly refined one, and it shows up clearly in any kitchen renovation before and after comparison. Most builder-grade kitchens stop at functional, leaving gaps, raw edges, and transitions that no amount of paint corrects.
Before: Gaps, filler strips, and mismatched lines
Builder kitchens rely on filler strips and scribe molding to cover the distance between cabinet runs and walls, but those fixes only highlight the problem. Cabinets that stop short of the ceiling leave an awkward dead zone above that collects dust and reads as incomplete no matter how clean the rest of the room looks.
After: Crown, light rails, panels, and clean transitions
Adding crown molding to the top of your cabinets closes the gap to the ceiling and gives the whole run a built-in, architectural quality. Light rail molding along the bottom of upper cabinets hides under-cabinet fixtures and creates a crisp finished edge that stops the eye naturally.
The trim details in a kitchen are what separate a renovation that looks expensive from one that just looks new.
The small details that make the after photo look high-end
- Consistent reveal lines across all doors and drawers
- Matching end panels on exposed cabinet sides
- Scribe molding cut tight to wall irregularities instead of caulked gaps
Where trim adds value and where it doesn’t
Trim pays off most on perimeter cabinetry visible from the main living area. On interior or pantry cabinets, the investment rarely justifies the added cost.
Budget range and how to prioritize
Trim upgrades typically run $1,500 to $5,000 depending on linear footage and profile complexity. Prioritize crown and light rail first since those deliver the strongest visual return per dollar spent.
13. Small kitchen makeover that feels bigger
A small kitchen renovation before and after comparison carries a different kind of satisfaction. When you can’t knock down walls or expand the footprint, every design decision has to earn its place, and the right choices deliver a room that genuinely functions better without adding a single square foot.
Before: Tight clearances and zero landing space
Small kitchens hit their limits fast. Narrow aisles and overloaded counters leave you with almost no room to prep, plate, or simply set down a grocery bag. Every inch of usable surface disappears the moment you start cooking, and the layout punishes you for it every single day.
After: More function without adding square footage
A well-planned small kitchen makeover shifts every cabinet, drawer, and surface toward maximum utility. The room doesn’t grow, but it stops working against you, and that difference is immediately obvious to anyone who uses it.
A small kitchen that works efficiently feels bigger than a large one that doesn’t.
Space-saving cabinet and drawer strategies
The upgrades that recover the most usable space in small kitchens include:
- Full-height upper cabinets that capture storage all the way to the ceiling
- Deep pull-out drawers replacing standard base cabinet shelves
- Toe-kick drawers in otherwise dead space beneath cabinets
Visual tricks that actually work in real kitchens
Light cabinet colors and continuous countertop runs without unnecessary breaks make the room read as larger than it is. Consistent flooring that flows into adjacent rooms extends the visual field without any structural work.
Budget range for phased vs full remodels
Small kitchen makeovers run $8,000 to $30,000 depending on whether you phase the work or tackle the full scope at once. Phasing cabinetry first and countertops later lets you spread the investment without compromising the result.
Next steps for your kitchen plan
Every kitchen renovation before and after in this list started with a single honest conversation about what wasn’t working. You don’t need a finished design or a locked budget to get started. You just need a clear picture of what frustrates you about your current kitchen and a sense of what you want your daily cooking and living experience to feel like once the work is done.
Suman Custom Carpentry handles the full process from that first conversation through final installation. All cabinetry is hand-built in our Hyannis shop, backed by a lifetime guarantee on every cabinet box and door, and the same team that designs your kitchen also builds and installs it with no handoffs and no gaps in quality. Your timeline, your budget, and your vision all get the focused attention they deserve. When you’re ready, schedule a consultation with Suman Custom Carpentry and take the first real step toward your custom kitchen.