
Nothing sells a kitchen renovation quite like seeing the kitchen cabinet remodel before and after side by side. That moment when dated, worn-out cabinets give way to something custom and intentional, it hits different than any mood board or Pinterest save. It’s proof that the right cabinetry can completely change how a kitchen looks, feels, and functions.
At Suman Custom Carpentry, we design and hand-build every cabinet in our Hyannis, Cape Cod shop, from first sketch to final installation. We’ve spent over seven years transforming kitchens across Cape Cod, and we’ve learned that homeowners don’t just want to see generic stock photos. They want real transformations with real context: what changed, why it worked, and what made the biggest visual impact.
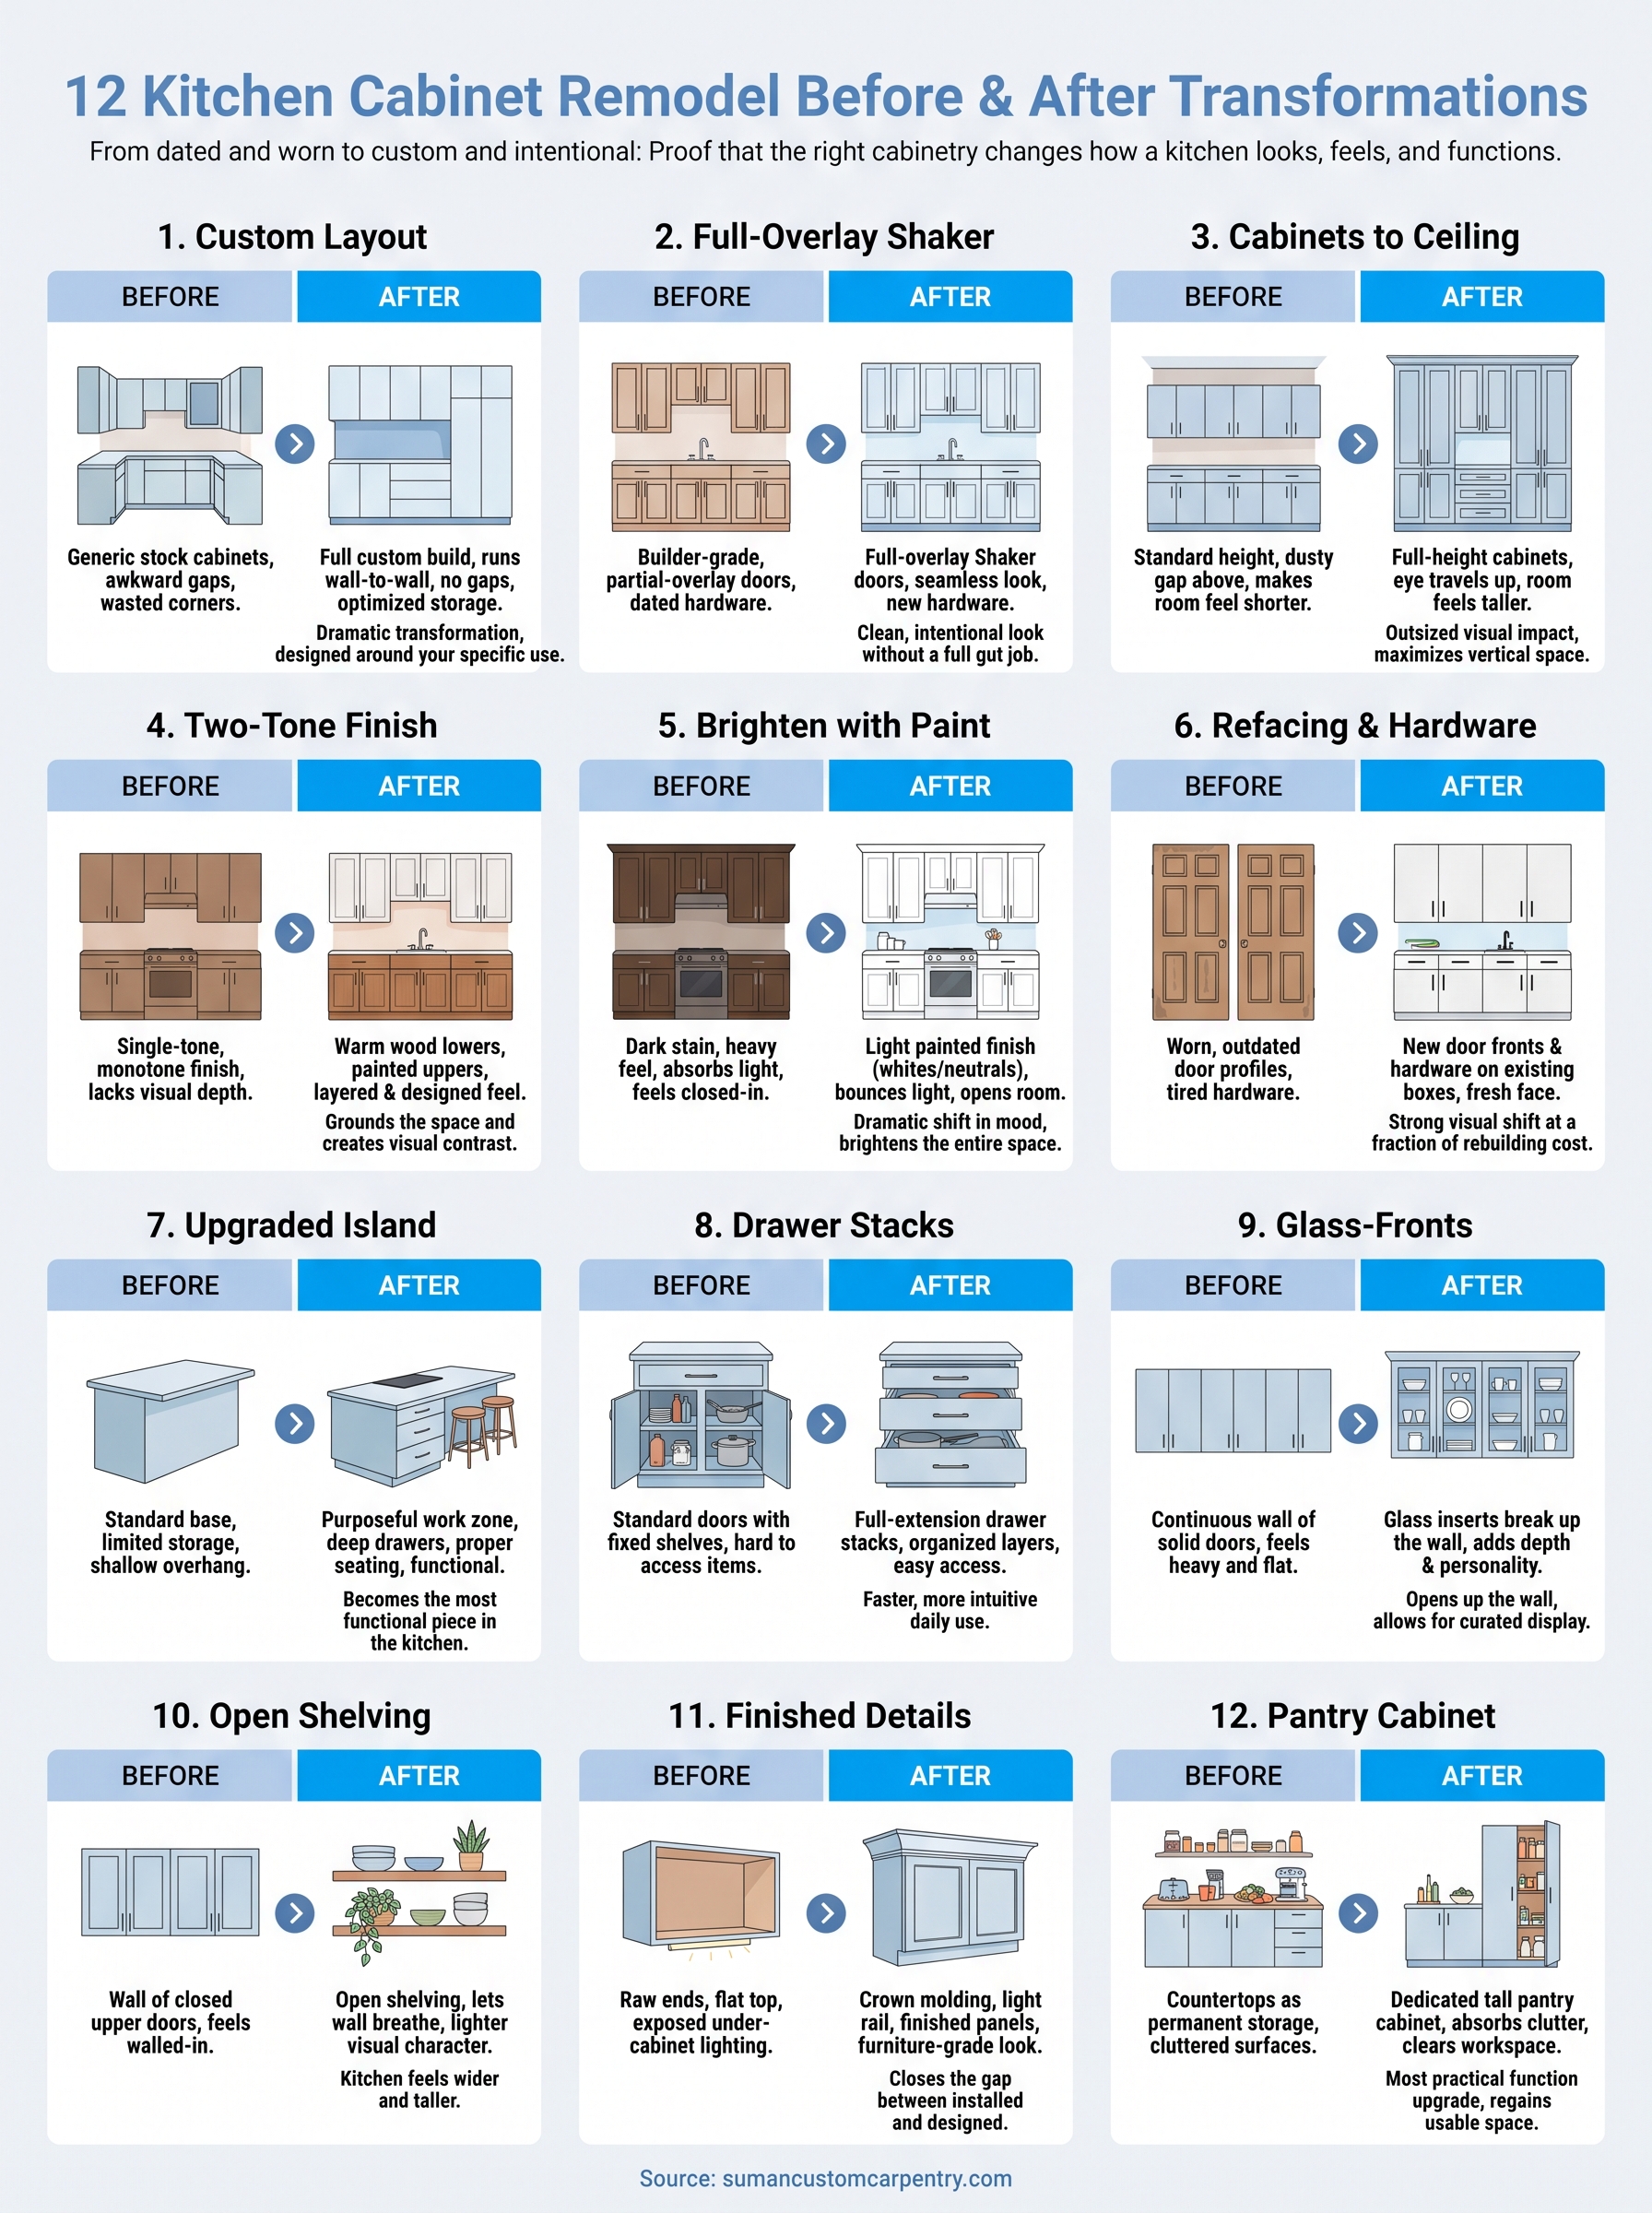
That’s exactly what this article delivers. We pulled together 12 of our favorite kitchen cabinet before-and-after photos that show a range of styles, budgets, and approaches, from full custom builds to smart refacing projects. Whether you’re planning a complete kitchen overhaul or exploring ways to refresh what you already have, these examples will give you a clear picture of what’s possible. We’ll break down what makes each transformation work so you can start shaping your own renovation with confidence.
1. Custom hand-built cabinets made for your layout
When you replace your existing cabinets with a fully custom set built for your specific kitchen, the transformation is the most dramatic of any approach in this list. Nothing from a big-box store fits your walls, your ceiling height, or your workflow the way hand-built cabinetry does. This kitchen cabinet remodel before and after scenario is the gold standard because every inch of the result was designed around how you actually use the space.
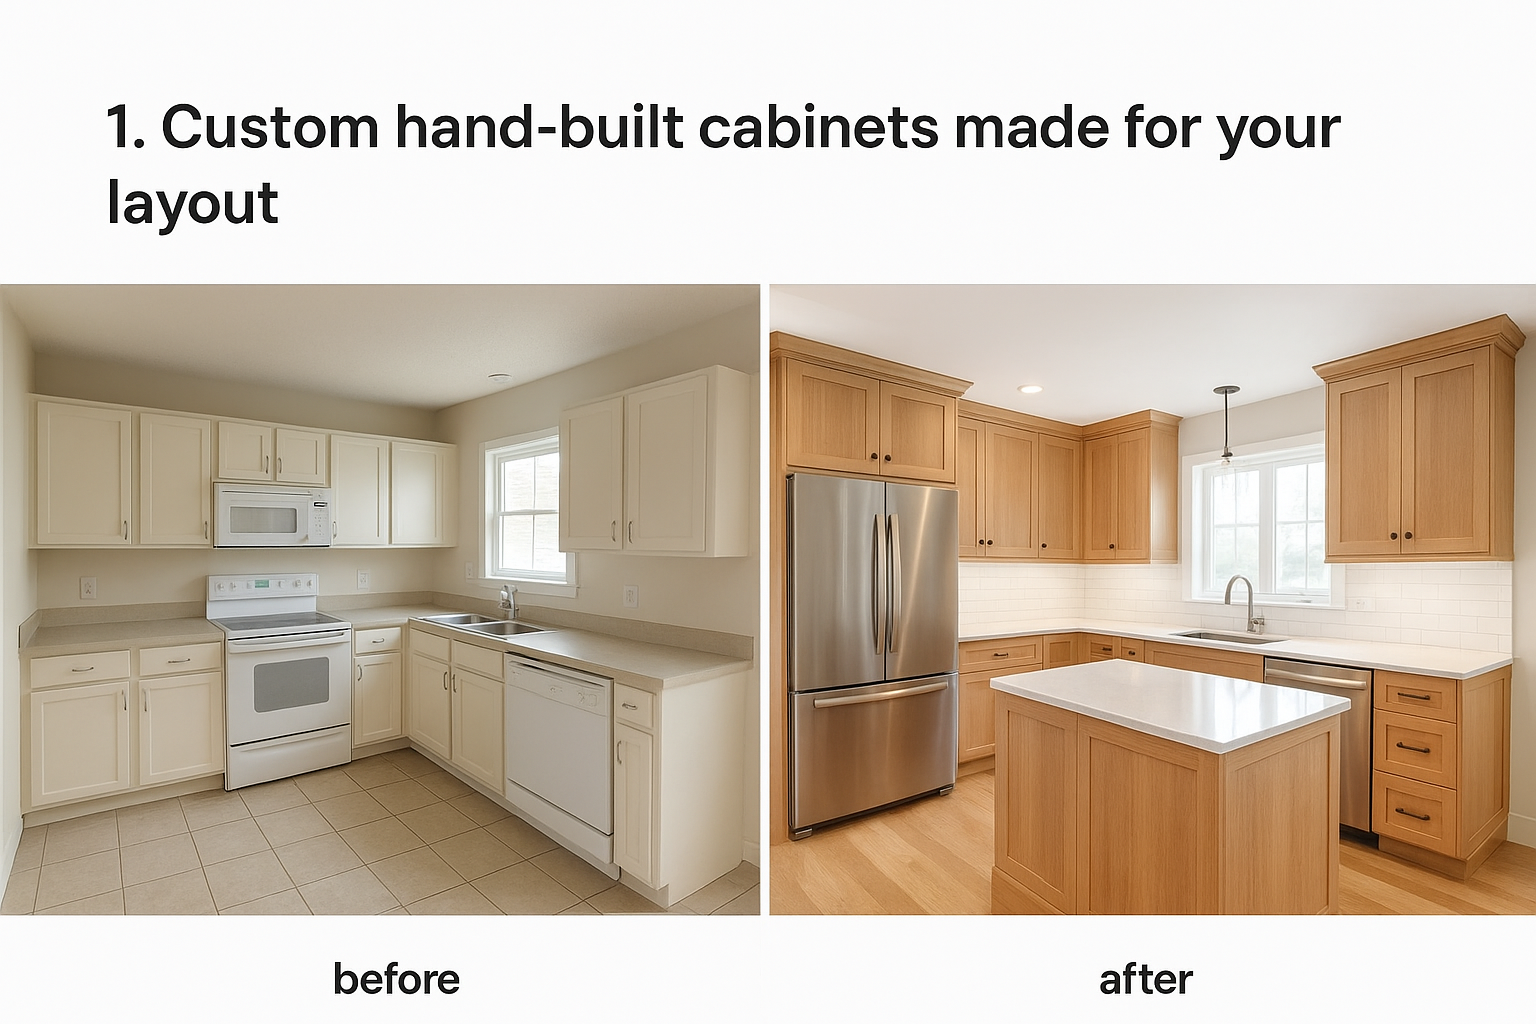
What you see in the before
The before photo typically shows a kitchen with standard 30-inch or 36-inch stock cabinets that leave awkward gaps near the ceiling, wasted corner space, and a layout designed for a generic kitchen rather than yours. You’ll often see filler strips stuffed between cabinets and walls, mismatched depths at the island, and shallow drawers that barely hold anything useful.
What changes in the after
Your after photo shows cabinets that run wall to wall and floor to ceiling with no gaps, no fillers, and no wasted corners. Drawers are sized for what you actually store. Pull-outs, built-in spice racks, and custom drawer stacks go exactly where you need them. The result looks intentional rather than assembled, and the kitchen functions twice as well overnight.
Custom cabinets built to your layout can add measurable resale value to your home, especially in high-demand markets like Cape Cod where buyers expect quality finishes.
Materials and finish choices to consider
For hand-built cabinets, solid wood face frames with plywood box construction give you the best combination of durability and dimensional stability. Popular species include maple, cherry, and white oak. Common finish directions include:
- Painted whites and warm neutrals for a clean, timeless look
- Natural stained wood in coastal and transitional kitchens
- Two-tone combinations with painted uppers and stained lowers
What it typically costs and how long it takes
Custom cabinetry typically runs $500 to $1,500 per linear foot depending on species, finish, and hardware choices. At Suman Custom Carpentry, full kitchen builds follow a 40 to 60-day build and installation timeline once the design is finalized, covering fabrication at our Hyannis shop and full installation at your home.
Mistakes to avoid
The biggest mistake homeowners make is rushing the design phase before measurements are confirmed. If dimensions are off by even a quarter inch, it creates real problems during installation. You also want to confirm your hardware selections before fabrication begins, since pull placement depends on door and drawer sizing from the start.
2. Builder-grade cabinets replaced with full-overlay Shaker
Swapping out builder-grade cabinets for full-overlay Shaker doors is one of the most cost-effective kitchen cabinet remodel before and after transformations you can make. The visual difference is immediate because full-overlay doors cover the face frame almost completely, giving the kitchen a cleaner, more intentional look without a full gut job.
What you see in the before
Builder-grade kitchens typically feature partial-overlay doors with visible face frame gaps between every cabinet. The doors are often thin, the hardware is dated, and the overall look reads as temporary rather than designed. Drawer fronts are usually flat and feel flimsy compared to frame-and-panel construction.
What changes in the after
Full-overlay Shaker doors close those gaps and create a seamless wall of cabinetry that looks custom even when the boxes stay in place. The recessed center panel adds depth and shadow lines that make the kitchen feel more finished. Pair that with new hardware and updated hinges, and the transformation is significant.
The right door profile does more visual work than almost any other single change you can make to a kitchen.
Materials and finish choices to consider
For Shaker doors, your best options include:
- Solid wood in maple or poplar for painted finishes
- MDF center panels for better paint adhesion and fewer cracks over time
- Slab Shaker profiles for a more modern, minimal look
What it typically costs and how long it takes
Replacing doors and hardware on existing boxes generally runs $3,000 to $8,000 depending on kitchen size and material choices. Lead time is shorter than a full build, often two to four weeks.
Mistakes to avoid
The most common mistake is ordering new doors without verifying the existing box dimensions first. If your old boxes are warped or out of square, new doors will not hang correctly no matter how well they are made.
3. Upper cabinets taken to the ceiling for a taller look
Taking your upper cabinets all the way to the ceiling is one of the simplest layout changes that delivers an outsized visual impact in a kitchen cabinet remodel before and after comparison. The shift from standard-height uppers to full-height cabinets makes the entire kitchen feel taller, more finished, and far more intentional than it did before.
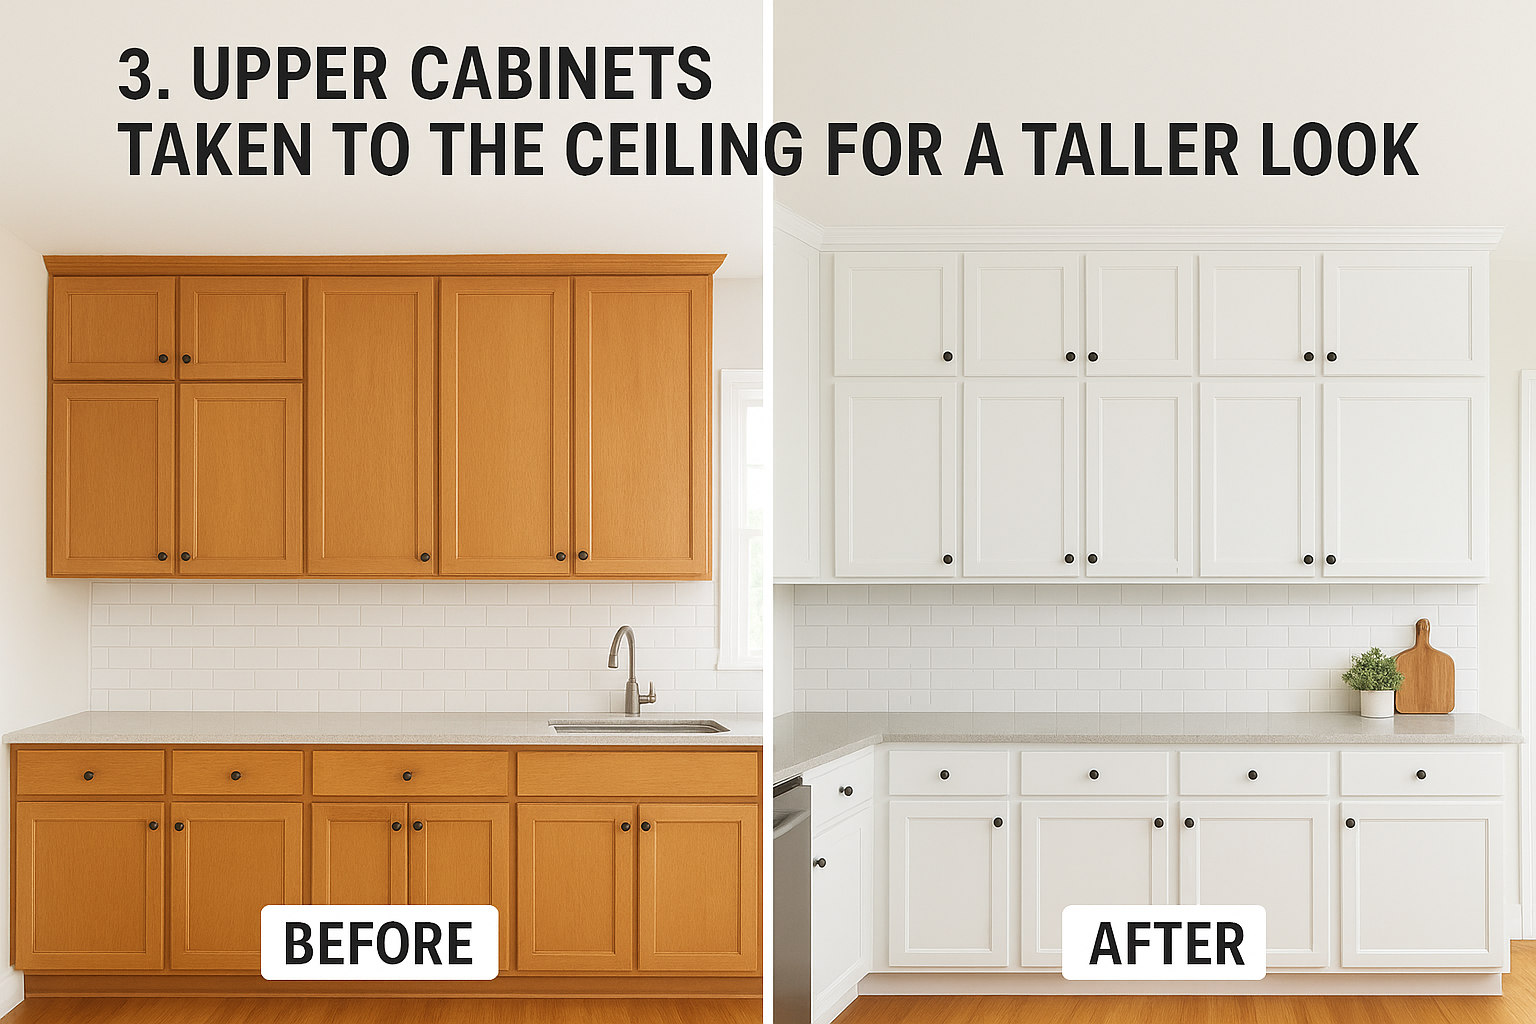
What you see in the before
Most kitchens stop upper cabinets at 84 inches, leaving a dusty, awkward gap between the top of the cabinet and the ceiling. That space collects grease and clutter, and visually it makes the ceiling feel lower and the room feel smaller than it is.
What changes in the after
When your cabinets reach the ceiling, the eye travels upward and the whole room opens up. You gain real storage for seasonal items at the top, and the kitchen reads as a single continuous design rather than a box with cabinets stuck to a wall.
This change works especially well in kitchens with 9-foot or higher ceilings, where the before photo shows an even more dramatic dead zone above the cabinets.
Materials and finish choices to consider
Your best options for tall upper cabinets include:
- Painted finishes in lighter colors to keep the upper portion from feeling heavy
- Glass inserts on the top row to reduce visual weight near the ceiling
- Matching wood species between lowers and uppers for a unified look
What it typically costs and how long it takes
This upgrade typically adds $1,500 to $4,000 to a cabinet project depending on how many uppers you extend. For a custom build, it folds into the standard 40 to 60-day timeline.
Mistakes to avoid
The most common mistake is ignoring crown molding at the transition point. If your ceiling is not perfectly level, a skilled carpenter needs to scribe the top of the cabinet or add a filler strip that reads as intentional rather than an afterthought.
4. Warm wood lowers paired with painted uppers
Two-tone kitchens are one of the most requested kitchen cabinet remodel before and after transformations we see. The combination of warm wood lowers and painted uppers grounds the kitchen visually while keeping the upper half light and open.
What you see in the before
The before is almost always a single-tone kitchen where every cabinet shares the same finish. That sameness flattens the space and removes any sense of visual depth. Your kitchen reads as one large block rather than a designed environment with distinct zones.
What changes in the after
Your after photo shows a kitchen with real visual contrast and depth. The wood lowers anchor the space and pull warmth into the room, while the painted uppers keep the eye moving upward. Together they make the kitchen feel layered and designed rather than assembled from a catalog.
This two-tone approach works especially well in coastal kitchens on Cape Cod, where natural wood tones complement the surrounding environment without competing with it.
Materials and finish choices to consider
Picking the right pairing matters more here than in any single-tone kitchen. The species and tone of your wood needs to complement the painted color without fighting for attention. Your best combinations include:
- White oak or walnut for lowers in stain or natural finish
- Painted whites, warm greiges, or soft greens for upper cabinets
- Matching hardware across both sections to tie the two finishes together
What it typically costs and how long it takes
Two-tone custom builds sit in the same range as standard custom work, generally $500 to $1,500 per linear foot. The timeline at Suman Custom Carpentry follows the same 40 to 60-day build and installation schedule.
Mistakes to avoid
The most common mistake is choosing finishes separately without seeing them together in your actual kitchen lighting. What looks balanced in a showroom can read as mismatched under your specific overhead lights. Always request samples of both finishes side by side before you commit.
5. Dark cabinets painted to brighten the whole kitchen
Painting dark cabinets is one of the most dramatic kitchen cabinet remodel before and after transformations you can make without replacing a single box. If your kitchen feels dim and closed-in, the cabinet color is often the primary reason, and changing it can shift the entire mood of the room in a matter of days.
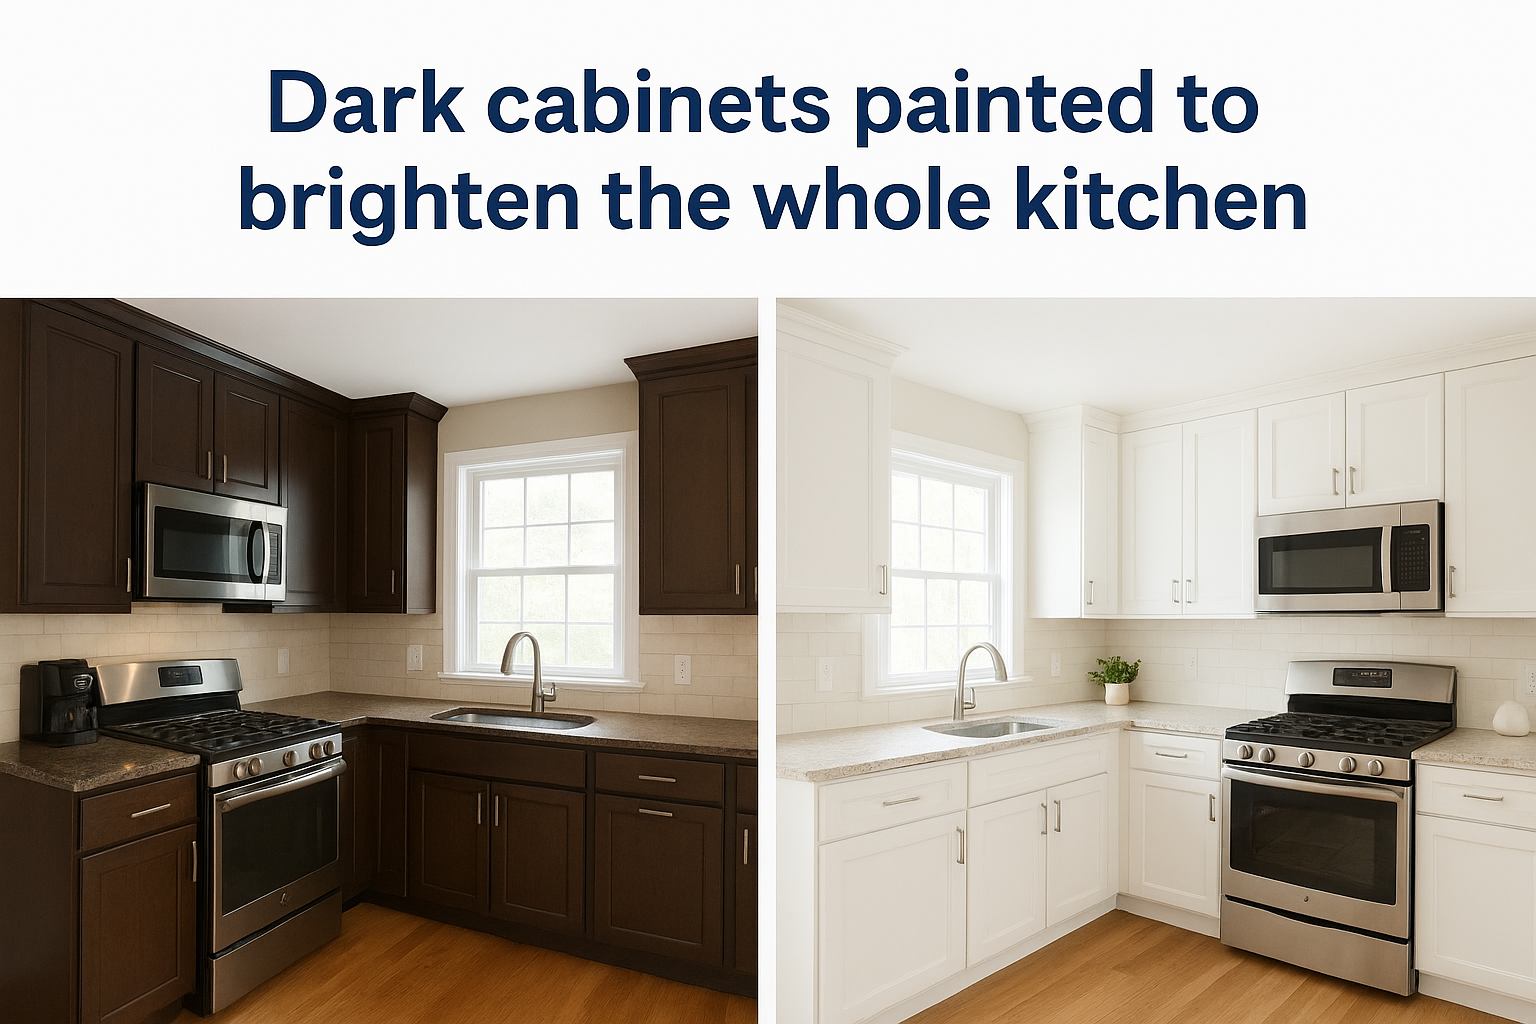
What you see in the before
Dark brown stain, black walnut, or espresso-finished cabinets absorb light rather than reflect it. The before photo typically shows a kitchen that feels smaller and heavier than it actually is, with countertops and backsplash details getting lost against the dark background. Even kitchens with large windows can feel oppressive when the cabinets dominate the walls in a deep, saturated tone.
What changes in the after
A light painted finish opens the room immediately. Whites, off-whites, and soft warm neutrals bounce light around the space and allow your countertops, tile, and hardware to stand out as distinct design elements rather than disappearing into the background.
This transformation works especially well in Cape Cod kitchens where natural light is often directional and seasonal, making surface reflectivity more important than in sunnier climates.
Materials and finish choices to consider
The paint product and prep process matter far more here than most homeowners realize. Your best finish choices include:
- Cabinet-specific alkyd or water-based enamel for a hard, cleanable surface
- Satin or semi-gloss sheens that hold up to daily cleaning without looking too flat or too shiny
What it typically costs and how long it takes
Professional cabinet painting generally runs $1,500 to $5,000 depending on kitchen size and prep requirements, with a typical project timeline of one to two weeks.
Mistakes to avoid
Skipping proper degreasing and sanding before priming is the number one reason painted cabinets fail early. Without thorough prep, even premium paint will peel within a year.
6. Old doors refaced with new fronts and new hardware
Refacing keeps your existing cabinet boxes in place and swaps out only the doors, drawer fronts, and hardware. In a kitchen cabinet remodel before and after context, this approach delivers a strong visual shift at a fraction of the cost of a full rebuild, provided your boxes are still structurally solid.
What you see in the before
Your before photo shows worn, outdated door profiles with tired hardware that dates the kitchen immediately. The boxes behind them may be perfectly functional, but the doors carry all the visual weight of the room, and old styles like raised-panel oak or flat thermofoil fronts signal age faster than almost anything else.
What changes in the after
New door fronts transform the entire face of the kitchen without touching the layout or plumbing. Fresh hardware in brushed nickel, matte black, or unlacquered brass adds another layer of intentionality that makes the refaced result look closer to a new build than a patch job.
Refacing works best when your boxes are plumb, level, and free of water damage. If the structure is compromised, a full replacement is the smarter long-term investment.
Materials and finish choices to consider
Your strongest options for refaced doors include:
- Solid wood Shaker frames for painted or stained finishes
- MDF slab doors for a modern, seamless look with painted enamel
- Matching veneer applied to exposed box sides for a consistent finish
What it typically costs and how long it takes
Refacing a full kitchen typically runs $4,000 to $9,000 depending on door material and hardware choices. Most projects complete in one to two weeks.
Mistakes to avoid
The most common mistake is skipping the veneer on exposed box sides. New doors on bare old boxes create a mismatched finish that undermines the entire transformation.
7. A cabinet island upgraded into a real work zone
A kitchen cabinet remodel before and after focused on the island reveals one of the most underused opportunities in the entire kitchen. Most builder islands are little more than a box with a countertop, offering limited storage and zero workflow logic. Upgrading it into a purposeful work zone changes how you use the whole kitchen, not just the island itself.
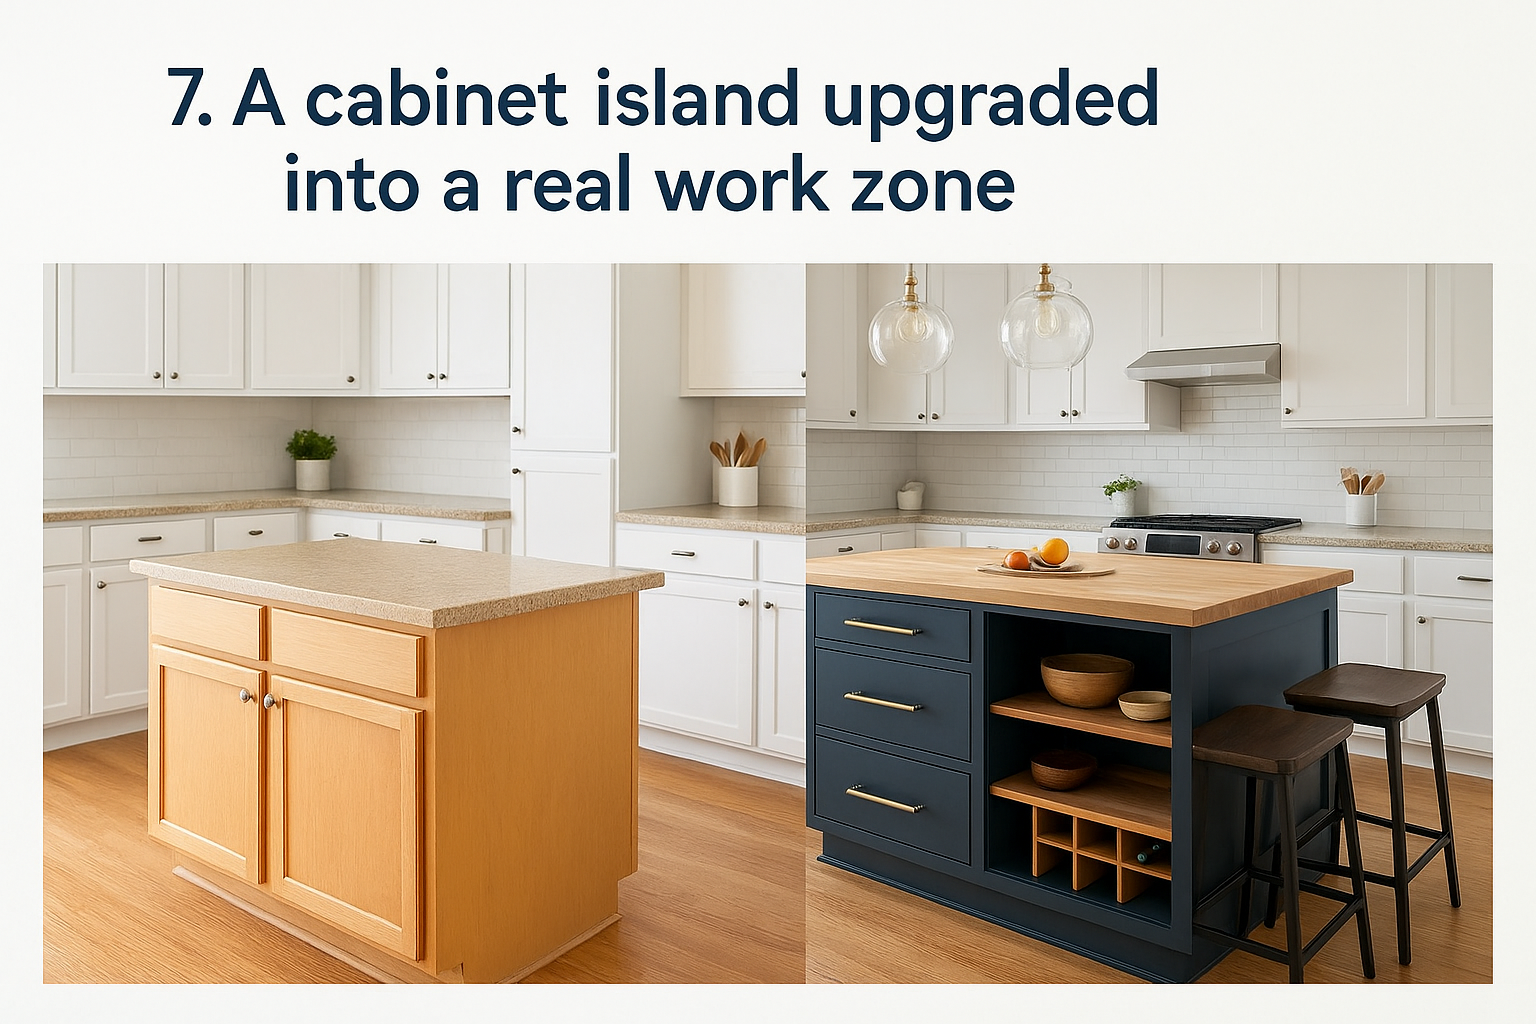
What you see in the before
Your before photo shows a standard island base with one or two doors hiding a single open shelf inside. There is no seating integration, no dedicated storage for specific items, and the countertop overhang is too shallow for comfortable bar stools. The island takes up floor space without justifying it.
What changes in the after
The after shows a custom island with deep drawer stacks on one side, open shelving or wine storage on another, and a properly extended overhang that actually fits seating. Every surface and cabinet section has a defined purpose, and the island becomes the most functional piece in the kitchen.
A well-designed island can handle prep, storage, seating, and serving all at once, which is something a generic base cabinet arrangement can never accomplish.
Materials and finish choices to consider
Your strongest options include:
- A contrasting paint color or wood finish to distinguish the island from the perimeter cabinets
- Butcher block or quartzite tops for a surface that handles heavy prep work
- Pendant lighting positioned to match the island’s new footprint
What it typically costs and how long it takes
A custom island build typically runs $3,000 to $8,000 depending on size and features, with the same 40 to 60-day timeline for hand-built work.
Mistakes to avoid
The most common mistake is sizing the island too large for the kitchen footprint. You need at least 42 inches of clearance on all sides for comfortable movement, and ignoring that number creates a kitchen that feels congested rather than functional.
8. New drawer stacks added for everyday storage
Adding drawer stacks in place of base cabinet doors is one of those kitchen cabinet remodel before and after upgrades that looks simple in photos but completely changes how you interact with your kitchen every single day. Replacing a door-and-shelf base with three or four full-extension drawers gives you instant, visible access to everything you store, without digging through the back of a dark cabinet.
What you see in the before
Your before photo shows standard base cabinets with two doors hiding a single fixed shelf inside. Pots, pans, and dry goods stack on top of each other, and finding anything near the back requires pulling everything out first. The storage looks sufficient on paper but fails the moment you actually start cooking.
What changes in the after
Drawer stacks replace that frustrating system with organized, accessible layers that roll out smoothly on full-extension slides. Each drawer holds a dedicated category, pots on the bottom, utensils in the middle, and smaller items up top, making the kitchen faster and more intuitive to use.
Full-extension soft-close drawer slides make a bigger difference in daily usability than almost any other hardware upgrade you can add to a kitchen.
Materials and finish choices to consider
Your best options include dovetail-joined solid wood drawer boxes for long-term durability, paired with full-extension undermount slides rated for at least 100 pounds per drawer.
What it typically costs and how long it takes
Converting base cabinets to drawer stacks typically runs $1,500 to $4,000 depending on how many bases you convert, with a two to four-week lead time for custom work.
Mistakes to avoid
The most common mistake is making drawers too shallow to handle the items you actually store. Confirm interior depth against your largest pots before fabrication begins.
9. Glass-front cabinets used to break up a solid wall
Swapping some solid doors for glass-front cabinet doors is a targeted kitchen cabinet remodel before and after move that adds depth and visual variety to any wall of cabinetry. It works especially well when you have a long run of upper cabinets that reads as a flat, unbroken mass.
What you see in the before
Your before photo shows a continuous wall of solid cabinet doors that stretches across the kitchen without a single break in tone or texture. Even well-made solid doors create a visual barrier when there are too many of them in a row, and the wall of cabinetry shrinks the room rather than contributing to it.
What changes in the after
Replacing two or three solid upper doors with glass inserts opens up the wall and creates moments where the eye can rest and move through the space. Your dishes, glassware, or curated items become part of the design, and the kitchen gains a layer of personality it did not have before.
Glass fronts work best when what is stored inside looks intentional, so plan what you will display before you commit to the placement.
Materials and finish choices to consider
Your strongest glass options include:
- Clear glass for a clean, modern look when your shelving is organized
- Reeded or fluted glass for texture that obscures contents while still letting light through
- Seeded glass for a more traditional or coastal aesthetic
What it typically costs and how long it takes
Adding glass fronts to existing doors typically runs $800 to $2,500 depending on the number of doors and glass type, with a one to three-week lead time.
Mistakes to avoid
The most common mistake is placing glass fronts randomly without thinking about the overall wall composition. Symmetrical placement on either side of a window or hood keeps the design from feeling arbitrary.
10. Open shelving swapped in for a lighter, airier feel
Removing upper cabinet doors and converting sections to open shelving is one of the fastest kitchen cabinet remodel before and after shifts you can make. It pulls weight off the walls and gives the kitchen an entirely different visual character without touching a single cabinet box.
What you see in the before
Your before photo shows a wall of closed upper doors that contains everything behind solid panels. The kitchen functions fine, but every upper cabinet contributes to a feeling of enclosure. The space reads as walled-in and heavy even when the lower cabinets are well-designed.
What changes in the after
Open shelves replace those solid doors with floating surfaces that let the wall breathe. Dishes, glassware, plants, and everyday items become part of the design rather than hidden behind it. The kitchen feels wider and taller even though nothing structural changed.
Open shelving works best when you commit to keeping what is displayed organized and edited, because everything on those shelves is always visible.
Materials and finish choices to consider
Your strongest options for open shelves include:
- Solid wood shelves in maple, oak, or walnut for a natural, warm look
- Painted wood or MDF for a clean finish that matches your cabinet color
- Floating metal brackets for an industrial or modern aesthetic
What it typically costs and how long it takes
Converting upper cabinets to open shelving typically runs $800 to $3,000 depending on the number of runs and shelf material, with a one to three-week timeline for custom work.
Mistakes to avoid
The most common mistake is pulling too many upper doors at once. Removing every upper cabinet creates a kitchen that feels exposed rather than designed, so limit open sections to one or two intentional runs.
11. Crown, light rail, and end panels added for a built-in look
Adding crown molding, light rail trim, and finished end panels to your existing cabinets is one of the most overlooked kitchen cabinet remodel before and after upgrades on this list. These finishing details cost relatively little compared to a full rebuild, but they close the gap between cabinetry that looks installed and cabinetry that looks designed.
What you see in the before
Your before photo shows raw cabinet ends facing the room on any exposed side, along with a flat top edge where the upper cabinets meet the ceiling or the soffit. The bottom of your upper cabinets has no finished detail between the cabinet face and the underside, which leaves the lighting strip or the raw edge fully exposed.
What changes in the after
Crown molding at the top gives the cabinets a furniture-grade transition to the ceiling. Light rail trim along the bottom of the uppers frames the under-cabinet lighting and adds a shadow line that makes the whole run feel intentional and complete. End panels wrap exposed cabinet sides in a matching finish so nothing looks raw or unfinished.
These three additions together cost a fraction of new cabinetry but close most of the visual gap between builder-grade and custom.
Materials and finish choices to consider
Your best options include solid wood crown and light rail profiles painted to match your cabinet finish, with matching veneer end panels applied to all exposed box sides.
What it typically costs and how long it takes
This upgrade typically runs $800 to $3,000 depending on kitchen size, with a one to three-week lead time for custom millwork.
Mistakes to avoid
The most common mistake is mismatching the crown profile to your door style. A heavy traditional crown on a simple Shaker door creates a visual conflict that undermines both elements.
12. A pantry cabinet added to replace cluttered counters
Adding a dedicated pantry cabinet is one of the most practical kitchen cabinet remodel before and after upgrades you can make, especially in kitchens where counter surfaces have turned into permanent storage zones. A single tall pantry cabinet can absorb an enormous amount of clutter and give your kitchen back the clear, usable workspace it was always supposed to have.
What you see in the before
Your before photo shows countertops lined with appliances, dry goods, and stacked items that have nowhere else to go. The kitchen technically has storage, but none of it is scaled for the volume of things a working kitchen actually needs to hold. Every surface becomes a landing zone because the cabinet layout never accounted for real-life pantry needs.
What changes in the after
A full-height pantry cabinet absorbs everything that was living on your counters, from small appliances to canned goods to cookbooks. The countertops open up, and the kitchen immediately feels larger and more organized without changing the layout at all.
A well-placed pantry cabinet does more for daily kitchen function than almost any other single addition you can make.
Materials and finish choices to consider
Your strongest options include adjustable interior shelving with pull-out drawers at the base for heavier items, and a finish that matches your existing cabinetry for a seamless, built-in look.
What it typically costs and how long it takes
A custom pantry cabinet typically runs $2,000 to $5,000 depending on size and interior configuration, with a two to four-week lead time for hand-built work.
Mistakes to avoid
The most common mistake is underestimating the interior depth you need. A pantry cabinet shallower than 18 inches limits what you can actually store and defeats the purpose of adding it.
Next steps for your cabinet remodel
Every kitchen cabinet remodel before and after on this list started the same way: with a homeowner who decided the status quo was no longer working and took the first step toward fixing it. The right approach for your kitchen depends on your budget, your timeline, and how much of the existing layout actually serves you, but one thing holds true across all twelve examples: the result is always worth doing right the first time.
At Suman Custom Carpentry, we hand-build every cabinet in our Hyannis shop and manage each project from initial design through final installation. We serve homeowners across Cape Cod who want cabinetry built specifically for how they live and cook. If you are ready to see what your kitchen could look like, start a conversation with our team and we will walk you through the options that fit your space, your style, and your goals.